THE CORNUCOPIA
olympus mju 1040
a quick review of a brand new compact
|
THE CORNUCOPIA
olympus mju 1040 a quick review of a brand new compact |
|
INTRODUCTION
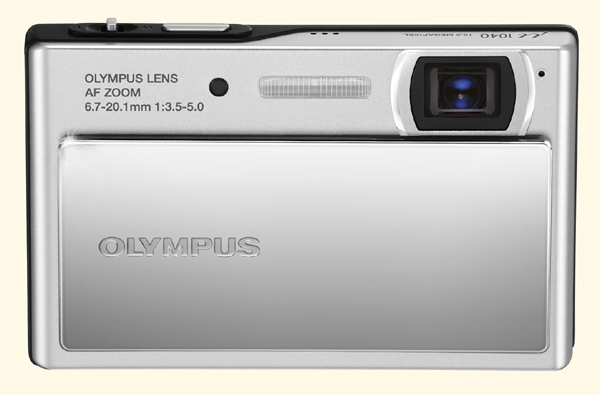
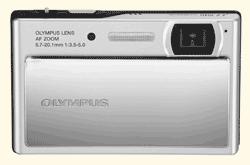
I normally do not review compacts but Olympus UK asked if I was interested in the brand new Mju 1040 and I agreed. They sent me an example just as it had been released (last week in August) but not reviewed by any other sites. So this is a pleasant diversion for me and the biofos site and may lead to other than E-System Camera body and lens reviews in the future as I agreed to accept bridge cameras as well as compacts; we'll see how it pans out. The new Mju 1040 is an 'ultra-compact' camera and Olympus are not joking. This thing is tiny measuring 88mm x 55mm x 15mm wide! It is introduced as a new generation of compact camera with many new design features fronted (in every sense) by a stylish full width vertical sliding lens barrier which covers two thirds of the front of the camera and a totally flat user interface on the back. In brief the camera features: * A 3x optical zoom equivalent to 38-114mm (on a 35mm camera) * 10MP 1/1/3rd" sensor * Digital Image Stabilisation * Intelligent Auto mode * 6.9cm (2.7") HyperCrystal LCD * Advanced Face Detection Technology * Super slim metal body in Starry Silver, Midnight Black, Magma Red and Melon Yellow
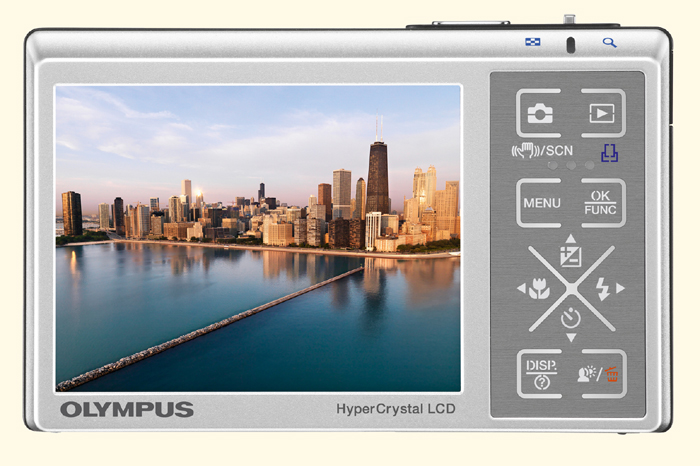
Let's briefly look at the various controls on the right of the rear panel (there are no buttons as such, rather the metal cover 'gives' to activate the function). NOTE some functions differ depending on the camera mode: CAMERA ICON: press for shooting mode; P/iAUTO/SCENE/DIS REVIEW BUTTON: to access the images on the card or in the camera memory MENU: brings up the camera main menu OK/FUNC(TION): confirms your selection OR brings up the sub-menu for shooting parameters 4-WAY CONTROLLER: COMPENSATION or UP; FLASH or RIGHT; TIMER or DOWN; MACRO or LEFT DISP(LAY): overlays the screen with battery state; rule of thirds; file size/no remaining OR in REVIEW MODE overlays basic exposure details. SAT/DELETE: accesses Shadow Adjustment Technology in shooting modes OR is DELETE button in REVIEW mode
On the top of the camera is the shutter button with the zoom peg next to it. Both are heavily chrome plated. Directly beneath the zoom peg is the 'BUSY' light. On the base of the camera is the card and battery access door as well as a plastic tripod bush. I note here that when tripod mounted this door cannot be opened, which can be a nuisance. The USB socket is placed on the right side of the 1040 and the single plug serves as external power source, USB and AV port. Just below is the anchor point for the supplied handstrap.
GETTING TO GRIPS WITH THE TINY Mju 1040: Quite literally - getting to grips!! Being a DSLR user I find compacts a very small and fiddly (or is it because I find them difficult to use I choose a DSLR?). My hands are quite large and I have arthritis in my fingers so tiny things are particularly challenging. The Mju 1040 is certainly challenging for me; but for those with smaller and/or more mobile hands and fingers there will be no problem. The body is metal, very smooth metal at that; and there is no shaped grip or rubber sections for the fingers/thumb. It's just a smooth and slippery but lovely sculpted piece of design. Once the battery is installed the 1040 starts up when the lens barrier is pressed downwards. The interface lights up for 3 seconds and the screen comes to life. To switch off push the lens barrier upwards. (There is a menu facility to set the top buttons to turn on/switch off the camera if desired). The first thing you have to do is set the internal clock and once done you are taken to the cameras main menu (which you can access at any time using the MENU button on the interface).
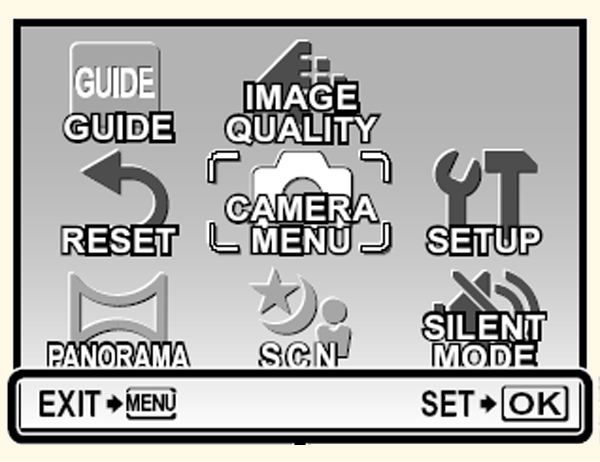
MENU: This is the camera MENU:
The menu has 8 choices though some are 'greyed out' depending on the camera/card status. The choices are: GUIDE, IMAGE QUALITY, RESET, CAMERA MENU, SETUP, PANORAMA, SCENE, SILENT MODE. GUIDE: Offers an 'in camera' manual which takes the user through 14 of the most common camera settings and problem areas likely to be met and offers a series of solutions shown to the user via the live view on the camnera screen. I found this both useful and confusing as the camera changes settings as necessary when exploring any particular solution. It was also difficult to get back into GUIDE mode and I suspect a soft/firmare glitch.
IMAGE QUALITY: * Image Size; 10MP, 5MP, 3MP, 2MP * COMPRESSION; Fine, Normal
RESET: * YES/NO
CAMERA MENU: 2 full screens comprising: * WB: auto, clear sky, cloudy, tungsten lamp, and fluorescent lights 1,2,3. * ISO: AUTO, 50, 100, 200, 400, 800, 1600, & 3200 (with pixel binning) * DRIVE: Single or High Speed * FINE ZOOM: on/off * DIGITAL ZOOM: on/off * METERING: ESP, SPOT * AF MODE: Face detect, iESP, SPOT * MIC: on/off
SETUP: 3 full screens comprising: * FORMAT: yes/no * BACKUP: yes/no * LANGUAGE: 39 language choices * ALTERNATIVE CAMERA ON/OFF: yes/no * SAVE SETTINGS: yes/no * POWER-ON SETUP: Screen choice (2) and Sound choice (3) * MENU COLOUR: Screen background colour choice (4) * SOUND SETTINGS: Control various beeps * REC VIEW: on/off * FILE NAME: reset or auto * PIXEL MAPPING: start * LCD BRIGHTNESS: Levels (5) * INTERNAL CLOCK: setup * VIDEO OUT: NTSC/PAL * POWER SAVE: off/on
PANORAMA: * Combine in camera 1 * Combine in camera 2 * Combine in PC
SCN (SCENE MODES): * This simply accesses the normal 'scene mode' screen and is only available if the camera is already in SCENE mode! I cannot see the point of a menu selection for this mode when it is controlled by the programme selection button in any case. There are 'only' 8 scene modes plus movie mode. In movie mode you can choose 320 x 240 or 640 x 480 resolution at either 15 or 30 fps.
SILENT MODE: * on/off
This is all pretty straightforward. However I had to refer to the manual to see how to vary the main camera programme between 'P' (Programme) and Intelligent AUTO (iAUTO) mode and had to refresh my memory several times during the time I was with the camera. I found this fundamental camera control counter-intuitive and why it could not simply be controlled from the 'CAMERA' icon is beyond me.
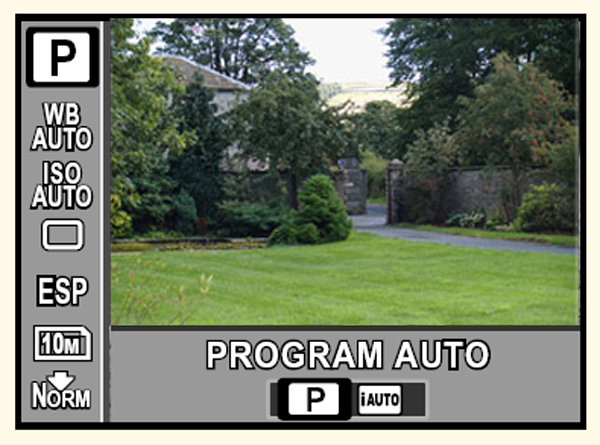
Mju 1040 IN USE: The camera is simple to use. Switch on using the barrier and choose the mode you wish to shoot in; P or iAUTO, DIS (digital image stabilization) or SCENE by pressing the camera icon button. To switch between P and iAUTO press the OK/FUNC button and scroll to the top of the imposed menu on the left of the screen to the P icon and press the left/right button to change. The OK/FUNC button brings up a sub-menu to the left and bottom of the screen viz:
The Sub-menu shown above allows instant access to the following parameters: * SHOOTING MODE: [either P or iAUTO] there are 4 shooting modes, these two plus SCENE and DIS * WB * ISO * DRIVE * METERING * FILE SIZE * COMPRESSION Obviously the sub-menu accesses exactly the same screens and choices for these selected shooting functions as displayed in the main camera menu; it is just using the OK/FUNC button is so much quicker when in shooting mode. When you have made your selection press OK to exit and return to the live view of the scene you are about to photograph. As with any new camera, the menu system takes a little time to understand how it all hangs together and the level of control offered. There are always idiosyncracies in any system; it is a matter of becoming familiar and that comes with time.
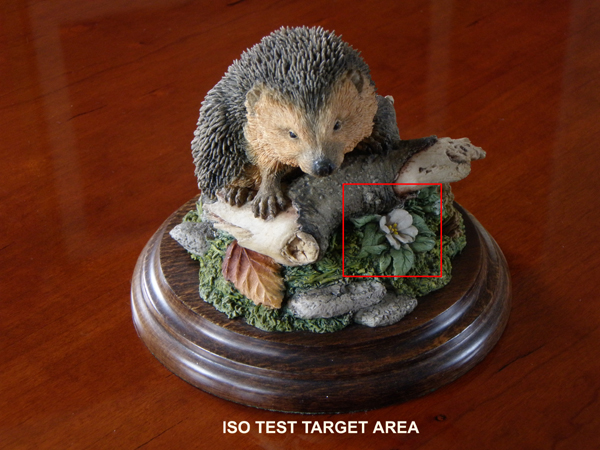
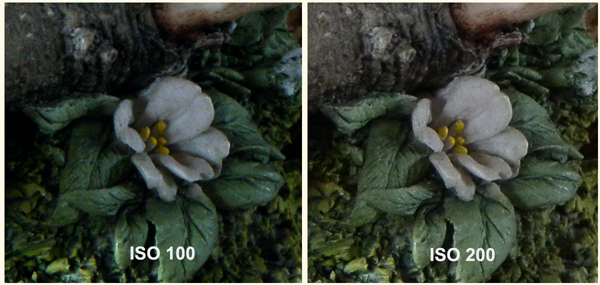
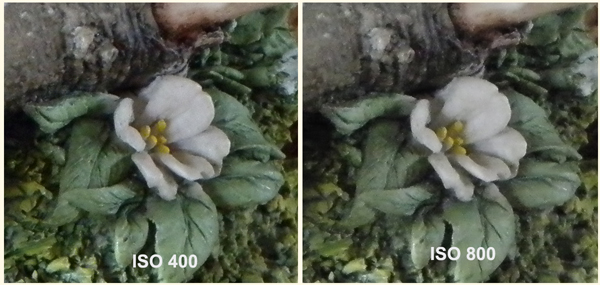
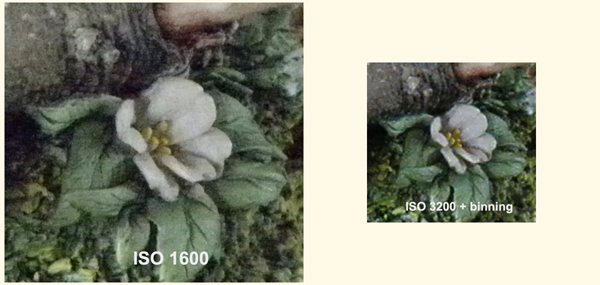
The ISO test series shows that while some progress is being made with improved noise performance on these tiny CCD imaging chips, I suspect more is derived from sophisticated noise reduction processing in-camera. Threr's no escaping the physics here; the more photosites are crammed onto a tiny chip the more noise is generated. More inherent noise results in more agressive noise reduction producing softened images which lack sharpness and colour fidelty. That said the 1040's ISO performance is perfectly acceptable to ISO 400 with ISO 800 producing 'reasonable' images. The top settings are strictly for emergencies. However, compared to just a couple of years ago when ISO 200 was virtually unusable on many compacts this does show modest progress. It seemed to me in my short time with the little 1040 that while there is some manual over-rides available, for general use it may be best left to the camera to select all its exposure settings as the exposure value (EV) algorithms seem well thought out and executed. I noticed in restricted light, especially outdoors (dull days) the camera did NOT necessarily simply select a high ISO as a matter of course and I was pleased to see in many EXIF's an AUTO selected ISO 64 in conditions when less well prepared machines would have gone for ISO 400.
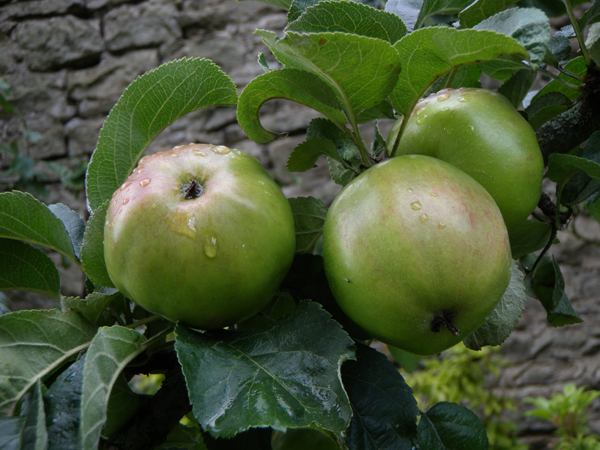
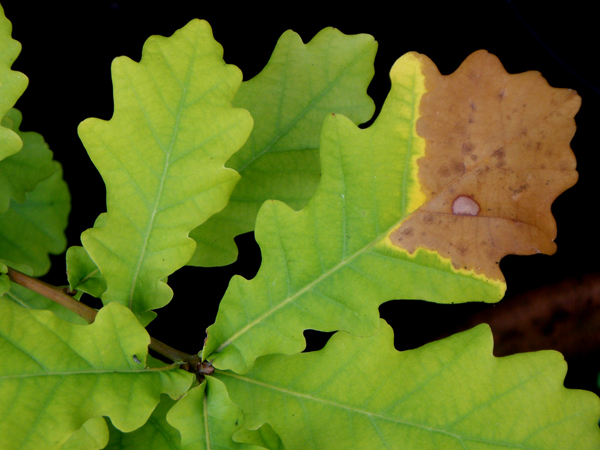
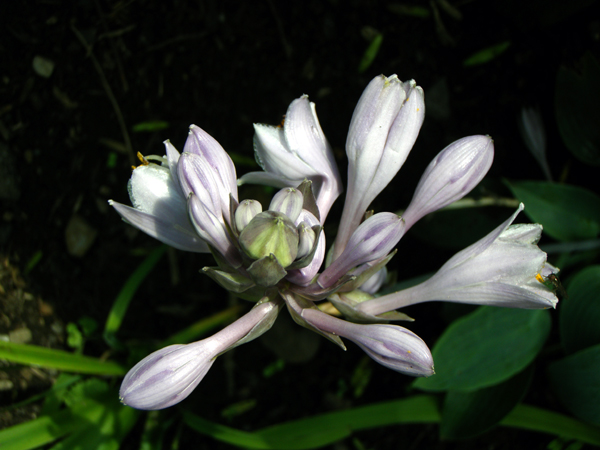
RESULTS & SAMPLE IMAGES:
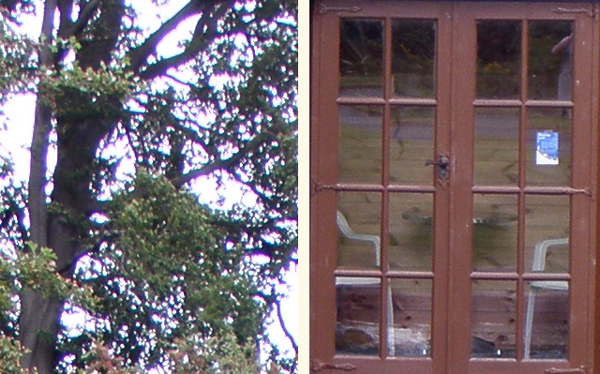
GENERAL OBSERVATIONS: As said in the commentary, I believe for 95% of use the 1040 is best left to do the 'thinking' for you. Other than the application of some EV compensation there is little benefit in constantly applying manual over-rides. The camera is a 'point and shoot' that is reasonably intelligent and capable of delivering pretty good results without relying on user intervention. Let it do its job. Colour rendition and contrast interpretation is quite good providing the ISO is not cranked up too high. If so the rather too aggressive noise reduction processing kicks in leaving the images soft and flat with some banding in the darker areas. Stick to ISO 400 and below; use ISO 800 carefully and avoid the top two settings if at all possible. Sharpness is innately quite good but there are some restrictions. Remember that sharpness relies mainly on the user having a steady hand rather than camera assistance like DIS. As with all cameras it is beter to learn shutter technique than having noisy images from applying too high levels of ISO. Again, keep off DIS or applying high ISO and the little lens will provide quite satisfactory image sharpness. Stray into DIS or high ISO and be prepared to pay the price. Programme (P) mode offers the best range of image reproduction. I used iAUTO only once and found it offered no more than P or any one of the SCENE modes offered. It is only selecting the most appropriate out of 5 SCENE modes in any case. I do not like DIS mode as this leads to raised ISO values with the resultant noise reduction issues of softness and poor fidelity. The SCENE modes are useful in this class of camera and it's good to see the scene menu not bloated with choice. Beware of lens blocking with the fingers. I found this an issue. Battery life is reasonable but if you are constantly reviewing your shots be aware this drains the unit quite quickly. It might be advisable to have a spare battery. I drained the battery within 2 hours of use; exploring the menu's, setting the camera, taking and reviewing shots, testing histogram etc.
LIKES/DISLIKES: I Like: * Its sculpted good look and feel. * The flat rear aspect with no knobs or buttons. * Sliding lens barrier and on/off switch. * Very adequate screen. * Good choice of image size/resolution.
I Don't Like: * Slow write to card and shutter lag. * Placement of lens (too readily blocked by pinkies). * Image output at higher ISO; too aggressive processing - soft/flat. * Inherent levels of in-camera sharpening that restrict post processing (cannot apply any PP sharpening) * The GUIDE facility - it was often difficult to return to normal 'camera' mode.
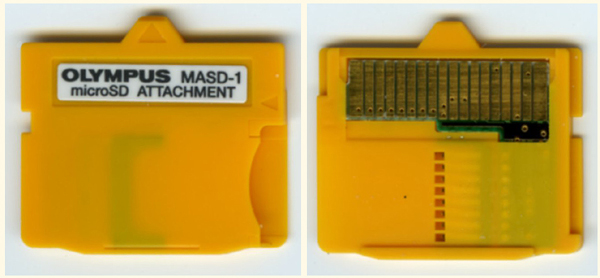
SUMMARY: To me this is an ideal beginners, child or ladies bag camera. From a mans point of view I think it too small and slippery in larger hands and will inevitably get dropped like a wet bar of soap! These lens 'barrier' camera are not supposed to need a case. In a pocket or the bottom of a ladies handbag the 1040 will suffer scratches at best, compress damage to screen at worst. A case is almost inevitable thus making the camera overall less accessible and attractive. It is a fair camera to use. The results will not disappoint but do not expect anything other than point and press output. Just be aware that applied levels of in-camera processing will limit further post processing. Get it right at the point of taking the image and do not think you might save the image in post processing. There is no RAW output from these cameras. In some way it's a pity as I believe an experienced post-processor could probably squeeze more out of the RAW data than the jpg engine in-camera. The downside of RAW data output is the long write time to card. It is possible to 'hack' some Olympus compact cameras to produce RAW files (I have done this with my C4040 and IR500 but it is quite complex and not for the faint-hearted!) PRICE: UK price is £145.00 retail. You will need an xD card or Micro SD for use in the adapter provided. Unfortunatley I did not have chance to test the speed of the new memory arrangements.
NOTE: This article seeks nothing other than to inform. Only you can decide what equipment you want/need for your use. I am simply testing this camera on loan from Olympus UK for website review. However; I have nothing to gain or lose by publishing this article, photographs, examples or opinion. Olympus UK have no input into this review.
|
|
HOME |
INTRO |
BOOKS |
OLYMPUS CIRCLE |
QUEST |
TOC MEMBERS |
GALLERIES
|
| Posted 12th September 2008. | Copyright © 2008 John Foster |