OLYMPUS E-SYSTEM; E-M SYSTEM; PEN SYSTEM and HIGH-END COMPACTS
how to read the hidden information
all e & e-m system cameras
all pen cameras & high-end compacts
all om-d cameras
UPDATED 15/12/2017 FOR TG TOUGH SERIES
|
OLYMPUS E-SYSTEM; E-M SYSTEM; PEN SYSTEM and HIGH-END COMPACTS
how to read the hidden information all e & e-m system cameras all pen cameras & high-end compacts all om-d cameras
UPDATED 15/12/2017 FOR TG TOUGH SERIES |
|
THIS PAGE IS SECTIONED INTO TWO PARTS, SECTION ONE DEALS WITH HIDDEN CODES IN E-SYSTEM CAMERAS AND SECTION TWO DEALS WITH HIDDEN CODES IN PEN SYSTEM CAMERAS; E-5, XZ-1 & 2, OM-D MACHINES EM-5, E-M1 MkI and EM-1 MkII .
SECTION ONE - OLYMPUS E-SYSTEM MACHINES - EXCLUDING E-5 (see PEN section): NOTE 1: Because the E-5 no longer has a card door open sensor the procedure is the same as for the Pen (section 2 below). NOTE 2: It so happens that the sequence for the Pens and E-5 works on the new XZ-1. NOTE 3: Following further research and reliable information received this page has been totally re-written.
INTRODUCTION: Have you ever wondered how some people can quote the number of shutter actuations their E-system camera has done from new? Yes, me too! Well here's the answer. You may already know how to do this, so forgive me if that's the case. For any of you who don't know how to access this information and more - read on! It's quite simple but you won't find it any any Olympus Handbook. The procedure is good for all E-System cameras (but please see 4. immediately below for the correct buttons sequence to access the camera designation screen). It also worked with my Mini Mju S. The screenshots below are from my E-1, taken with an E-330. PROCEDURE: WARNING - At your own risk - I've done this without problem, as have many others; but still..........
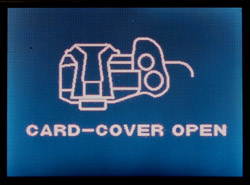
1. With a working and charged battery installed switch the camera ON. 2. Open the card door. 3. You will see the warning CARD COVER OPEN icon in red on your screen thus:
Screen 1. Open card door warning.
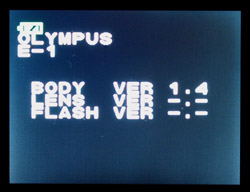
4. Press DISPLAY & OK buttons together for E-1 and E-500; for other, later E-Cameras it is MENU & OK. 5. You will see the Camera Designation (Top Left of screen) thus:
Camera Designation screen.
6. Press the following buttons in sequence: ARROW PAD up, down, left, right; then press the shutter button; then press the up button on the arrow pad. If nothing happens close the card door, wait a couple of seconds and re-open it and try again. Press the buttons firmly and hold them in for about a second. Press the shutter button well in. 7. You will see Page 1 displayed. You can scroll through the 4 available pages by pressing the arrow pad keys. 8. To revert back to normal operation simply close the card door. WHAT DOES IT ALL MEAN? The image below is a composite of the four screens you see on the E-1. The information that follows is accurate. Later cameras follow the same style but the page contents will be slightly different.
These are the four E-1 service screens accessed by pressing the 4-way arrow buttons; pages 1, 2, 3 & D:
PAGE 1 *² : *¹ It is not a lens/flash model identity function, it is the firmware version. Most lenses are at a different level of firmware. Public firmware versions are numbered 1.0, 1.1, etc. Real firmware version is four digits hence 1004 appears as 1.0 on the initial firmware display and 1102 appears as 1.1. *² It's been confirmed that all of 'page one' are firmware versions, the main camera firmware being top of the list. *³ MU or U position on list is camera dependent; eg it is listed second on E-300. NB: The first letter of two letter codes is deleted in other cameras; MU = U; MB = B etc. Later models such as E-400 & E-620 are vertically notated: BU CAL FM
PAGE 2: PAGE 3: The first four digits of the MCS number are the model code of the camera:- E-1 = 4001 E-300 = 4007 E-500 = 4011 E-330 = 4016 E-510 = 4046 E-520 = 4067 - thanks to Jonas Hajek E-400 = 4023 E-410 = 4038 - thanks to Michiel van Dijk E-420 = 4060 E-450 = 4060 - thanks also to Jonas Hajek (basically same camera as 420) E-30 = 4073 - thanks to Miguel de No, from Spain E-3 = 4031 E-620 = 4080 E-600 = 4080 - same code as E-620 (basically same camera) Thanks to Kevin Greensil, UK. E-5 = 4109 - Update: The button sequence for the E-5 is the same as for the Pen - see Section Two. And thanks to J-Marc Guillemaut for confirming E-5 Model Number. The next digit is the year it was built. The next two digits are the month of the year it was built - year first (single digit) then month (dual digit). For example "710" indicates October 2007. * Thanks to Joe R in Florida. NOTE: I have two E-1's, one bought in UK serial number 5000118XX that displays the MCS code (4001)310 - October 2003; the other was sourced from US serial number 140081XX that displays the MCS code (4001)310 - also October 2003. Please note the different enumeration of the serial numbers, presumably for different continents. I also own a very early E-620 that has the MCS line running [4080] [902] 000281001 where 4080 is the camera code, 902 is February 2009. For a 2010 model the code will read 003 for March 2010 for example. The remainder of the code sequence is unknown at the moment but probably relates to the factory. My attention has been drawn to some recent posts on DP Review that call into question the accuracy of this page. This page has been scrutinized by an Olympus technician well versed in the codes and their meanings. While he amended one or two previous errors he made no comment on the date coding. Please make sure you read the correct line on page 3 - the MCS line. The three figures immediately after the camera code designation such as 4001 (for E-1) will indicate the year and month the camera was built. If you have a MCS line that cannot be interpreted please email me the details so I can investigate further. This will be more constructive for the whole Olympus community than simply endeavouring to trash the accuracy of the information posted here. You can email me here. PAGE 4: NB: These codes are recorded in 4 digit hexadecimal x 5 occasions; latest occurrence assumes top position. Clear by pressing OK (not advised) Olympus technicians look here to see what error(s) the camera has recorded.
OTHER OLYMPUS DSLR's Some of the screens change from model to model so this requires some interpretation by the examiner. The service screens all follow the basic format though some letters may change in later models. The E-5 service screen sequence is, at the moment, unknown. I am hoping to discover the methodology in due course.
Here are the four service screens you will see on the E-500.
The E-330 is the same as E-500 except Screen 2 sequence is R S C U V L The E-400 is the same as the E-500 except Screen 1 where the sequence is B U C A L F M The E-3 has the same Screen 1 as the E-400 The E-3 has a different Screen 2 with this sequence: R S C U V B L. The E-620 for example has the same Screen 2 as the E-3.
READERS NOTES: NOTE 1: A reader pointed out that E-1 counters are re-set when firmware is upgraded or when camera is returned for service. Thanks Dane. My own recent observations are different. In April 2006 I upgraded an E-1 from version 1.0 to 1.4 and noted with interest that the counters on page 2 where maintained. This particular E-1 (US sourced) was new in 2004 but had been virtually unused showing shutter actuation count of less than 400 before upgrading. Others report that removing the battery grip with the camera switched on resets the counters; I have tried to duplicate this with my E-1 with no success.
E500/E-400 FURTHER HIDDEN SCREENS FOUND: This information has come from Chris Mancrief of the UK; thanks Chris, I had not seen this hack before. Accessing the TEST screen to select ISO ranges beyond menu/button choice. 1. Turn on your E500 (this method does not work with E-1 or E-3 or E-330, but does so with the E-400) 2. Open the card cover door - you will see the warning as in screen 1 above. 3. Press PLAY & OK buttons simultaneously. 4. Press UP; DOWN; LEFT; RIGHT and then press the SHUTTER. If you now press any of the 4-way buttons you will see pages 1 to 4 on the LCD. Press the UP button to go to Page 1. 5. Continue by pressing UP; LEFT; DOWN; RIGHT in sequence and end by pressing DOWN again. This will enter page three; it looks the same but is actually the test mode access page. 6. Now press EXPOSURE COMPENTATION ; RIGHT; DOWN; SHUTTER; OK in sequence. This screen is shown:
7. To change the variables of PRG (255 in all) and ITEM (500 in all) use the 4-way controller as normal. For example set PRG to 10 and ITEM to 18 allows use of ISO 3200. Set PRG to 10 and ITEM to 0 allows use of ISO 50. It's possible to use many ISO numbers by changing ITEM variable from 0 to 20 9. To save your selection press the OK button and the SET screen will be displayed for 2 seconds showing your choice. To exit simply close the CF door. In case of ISO alteration the set ISO number will be correct in the INFO screens after exposure but is shown as AUTO ISO in the menu screen for ISO change. The set ISO number will remain until you change the ISO setup via the MENU. If the button combination outlined in step 6 above does not work try this combination : EXPOSURE COMPENSATION; METERING: DOWN; SHUTTER, OK in sequence too. This extra sequence only applies to the E-400/500; it does not work for any other E-Camera. All we require now is some altruistic Olympus technician to release the code variables so we can thoroughly test our E-500/E-400's and see just how the company has restricted them. As said above this sequence does not work for the E-1. I am positive it will be possible if the correct sequence is known. TEST IMAGES at (NORMALLY) UNSELECTABLE ISO: I tried the E-500 at both ISO 50 and ISO 3200: Here's what I found:
Hand-held, ZD 17-45 @ 45mm, f=5.6, 1/5th second. ISO 50
Hand-held, ZD 17-45 @ 45mm, f=5.6, 1/320th second. ISO 3200
TARGET: Printed wall chart, indoors artificially lit, OM1 is 3.5" across, distance approx 10 feet. Wow! That's a noisy image. The loss of detail is dramatic. Even with the best noise removing software this image would be featureless when cleaned up. Please Note: These images are for demonstration only. They are GIF's and not for serious study. I may do some contemplative comparisons when I have more time. So there you have it. I'm grateful to Chris for pointing the out E-500 hack (subsequently found to work on E-400). The test pages will be available for all other models IF we knew the button sequence. I've not found any other hidden pages or codes but I'm sure they're in there - after all this is a computer.
SECTION TWO - OLYMPUS PEN SYSTEM; E-5; XZ-1; OM-D E-M5, E-M1 MkI, E-M1 MkII and TG-5 NOTE: I'd like to thank Guy Parsons for passing the PEN information and recently to Maciej Matysiak for confirming at least half the screens of the hidden menu's apply to his TG-5. INTRODUCTION: One great feature of the new Olympus Pen system interchangeable lens cameras and the latest E-5, is the move towards SDHC cards rather than the old xD memory cards in an effort to save space. With this change comes the absence of the old familiar 'CARD DOOR OPEN' warning message on the LCD if the card door was opened with the camera switched on. Of course what we didn't realise at the time was the 'door open' flag was part of the hidden codes sequence through which we can interrogate part of the firmware to see (amongst other things) the shutter activation count of our cameras. The Olympus E-P1 was released in 2009 and since then folks have been anxious to access the hidden codes if only for their own information. The Olympus XZ-1 high grade compact was released in February 2011 and this sequence reveals its hidden codes. PROCEDURE: I'm pleased to tell you it is now possible to access the hidden codes in the Olympus E-5, E-P1, E-P2 and E-PL1 and E-PL2), as well as XZ-1 and probably other compacts too, by following this simple procedure: 1. With a charged battery installed hold down the MENU button while switching on the camera. 2. When the LCD lights release the MENU button and immediately press it again, once. 3. In the menu go to SPANNER (line 5) and press RIGHT. 4. Press DOWN until you are at the LCD brightness screen (line 3). 5. Enter the brightness screen (shows twin adjusters) by pressing RIGHT and then press INFO and OK sequentially. 6. You will see on the LCD 'OLYMPUS' followed by the designation of your camera (eg E-P1). 7. Press in sequence UP, DOWN, LEFT, RIGHT, SHUTTER and UP for screen 1. 8. You are now in the hidden information screens: RIGHT = screen 2, DOWN = screen 3, LEFT = screen 4. 9. When you have your information simply switch off the camera. WHAT DOES IT ALL MEAN? Whereas some parts of the hidden information are very useful, others are purely for the technicians and relate to parts of the camera hard/firm and software that is beyond the understanding of ordinary folks like you and I.
PAGE 1: I believe these number sequences are relating to the various firmware versions of the different controller boards in the camera and for further information please look at the same section for E-System cameras above.
PAGE 2: PAGE 3: The first four digits of the MCS number are the model code of the camera and the next three digits relate to the year and month of manufacture:- E-P1 = 4087 my example first seven digits are 4087905 indicating manufacture May 2009. E-P2 = 4096 my example first seven digits are 4096912 indicating manufacture December 2009. E-PL1 = 4102 my example first seven digits are 4102003 indicating manufacture March 2010. E-PL2 = 4118 (thanks to Chris Wegner's digits of 4118103 indicating manufacture March 2011). XZ-1 = 0273 my example first seven digits are 0273101 indicating manufacture January 2011. E-P3 = 4124 my example first seven digits are 4124105 indicating manufacture May 2011. E-PL3 = 4131 my example first seven digits are 4131107 indicating manufacture July 2011. E-PM1 = 4134 my example first seven digits are 4134108 indicating manufacture Aug 2011. E-PM2 = 4140 my example first seven digits are 4140210 indicating manufacture Oct 2012. STYLUS 1 = 2660 review sample all further digits are 0 - no information - reason unknown.** OM-D E-M5 = 4138 review sample first seven digits 4138204 indicating manufacture April 2012. OM-D E-M1 = 4151 review sample first seven digits 4151307 indicating manufacture July 2013. OM-D E-M1 Mk II = 4183 (J-Marc G) first seven digits 4183610 indicating manufacture October 2016. (Camera purchased in December 2016) As can be seen from the above examples the three digits after the camera code relate to the year and month of production. The first single digit is the year it was built (0-9). The next two digits are the month of the year it was built (01-12). Read the year first (single digit) then month (dual digit). For example "905" indicates 2009 - May. NOTE: 'My example' only indicates the example I used to discover the codes - I do not own all these cameras! Most codes were uncovered via review sample machines. ** The Stylus 1 hidden information is odd. The MCS line consisted of 0266000000000000 so no manufacturing information. All other screens accorded with the general rules above including a fault code in screen 4.
PAGE 4: NB: These codes are recorded in 4 digit hexadecimal x 5 occasions; latest occurrence assumes top position. You can no longer clear these by pressing OK or delete button. However, some codes are temporary; I had a fault code on my XZ-1 that I believe happened when the on button was pressed accidentally while the camera was in its loose case causing a lens extension 'blip'. The code disappeared after about 10 start-ups. Olympus technicians look here to see what error(s) the camera has recorded.
CONCLUSION: Obviously I will add to this section of this webpage as and when more information is available. If your experience is different from above please let me know. So at last we have the means to check our Pen shutter actuation number - very important when selling/buying our gear or just to know how heavily we use our cameras. Quite why Olympus does not let us check shutter activations by a simpler procedure I'm not sure, but I know trying to estimate usage by the other method of noting the file number progression of our images is not particularly accurate. If you glean any further information as to the various meanings of each code/number or have found additional screens or procedures please let me know and I'll share it with the Olympus community. You can email me here. |
|
HOME |
INTRO |
BOOKS |
OLYMPUS CIRCLE |
QUEST |
TOC MEMBERS |
GALLERIES
|
| Posted March 2006; continually updated. | Copyright © 2006 ~ 2017 inclusive John Foster biofos publications |