E-SYSTEM
E-620 production camera review
|
E-SYSTEM
E-620 production camera review
|
This article is almost complete; there are a couple of additions waiting for image examples but I thought it important to post the review sooner rather than later.
NAVIGATION INDEX: This is quite a large article divided into 9 sections with links for ease of navigation. These are:
1 - GLOSSARY of ABBREVIATIONS USED.
I have been asked to provide a small glossary of the more common abbreviations I use throughout various articles appearing on this website. Abbreviations, while useful can be difficult to understand, especially for those whose native language may not be English.
AEL/AFL = Auto Exposure/Auto Focus Lock
AF = Auto Focus
CCD = Charged Coupled Device
CD AF = Contrast Detect Auto Focus
CMOS = Complementary metaloxidesemiconductor
CW = Centre Weighted (metering)
DOF = Depth of Field
DSLR = Digital Single Lens Reflex camera
EFL = Equivalent Focal Length (on a 24x36mm film camera)
ESP = Electro Selective Pattern (metering)
EVF = Electronic Viewfinder
fps = frames per second
GN = Guide Number (flash)
jpg = Joint Photographers Expert Group (image file format)
I.S. = Image Stabilization
LCD = Liquid Crystal Display
MP = MegaPixels/Mega Photosites
OMZ = OM Zuiko (lens)
ORF = Olympus Raw File
OVF = Optical Viewfinder
PD AF = Phase Detect Auto Focus
RC = Remote Control
SSWF = Supersonic Wave Filter (body feature)
SWD = Supersonic Wave Drive (lens feature)
TIF = Tagged Image File (image file format)
TTL = Through The Lens
USB = Universal Serial Bus
ZD = Zuiko Digital (lens)
2 - INTRODUCTION; REVIEW BACKGROUND; E-620 HEADLINE FEATURES.
INTRODUCTION: Olympus surprised us all with the E-620 announcement timed to coincide with PMA 2009. The new model is a significant step up for the four-thirds system as a whole as it takes the best from previous incarnations and blends them together in a new package. It also addresses the perceived weak points of the four-thirds 'entry level' machines, namely the small viewfinder, the 3-point AF system as well as improving image quality by promising less noise and extending dynamic range. As regards image quality and noise suppression in particular, Akira Watanabe, manager of Olympus Imaging's SLR planning department has indicated that the company will not aggressively pursue the mega-pixel race by simply cramming more photosites onto the four-thirds imaging chip, but rather concentrate on improving aspects such as increased dynamic range, colour fidelity and noise. In other words Olympus feels the race for more MP's is, for the moment, satisfied at 12MP and that if photographers require more than 20MP they should look to full frame machines. You can read what he had to say (and the subsequent text changes) here . The E-620 also builds on Olympus' strength of packing many features into small cameras which is one of the many reasons people are persuaded by the general four-thirds ethos, and that DSLR's do not have to be 'monsters'. Size-wise the new model sits somewhere between the E-420 (currently the world's smallest DSLR) and the E-520, but from a manufacturing point of view will (apparently) not replace either. I can certainly see Olympus wishing to continue the E-4XX line as every manufacturer needs an entry level machine and the diminutive E-4XX is the company's best seller. But will the E5XX line survive? Only time will tell. Paradoxically, and in spite of a brand new camera from the company, there is general concern that the impending release of Olympus' version of the micro four-thirds system might affect the overall future development of 'normal' four-thirds machines. Some commentators believe that Olympus' imaging division is not large enough to develop two consecutive lines of DSLR machines. Personally I too was initially bothered by this possible consequence but now believe that micro four-thirds will not threaten the established four-thirds development and the two can comfortably co-exist by sharing R&D and technological advancements across the lines. Olympus confirmed this in an interview with the DP Review team at PMA in Las Vegas 20th March 2009 that you can read here . Shortly after the E-620's release, I was promised an early sample of the new camera for review as soon as it was commercially available in May but was pleasantly surprised when, in late March, Olympus UK sent me one of the few evaluation copies available. My thanks to Mark Thackara (Olympus UK) and Ian Burley (DPNow). The camera body I received is loaded with firmware version 1.0; no restrictions have been placed on image reproduction so I'm assuming this is the final firmware version. I understand the E-620 is on sale in Japan so it might be wise to keep an eye on the Japanese websites for reviews and images from production cameras to study.
E-620 HEADLINE FEATURES: Pixels: 12.3mp Effective Live MOS Sensor ([RAW] 4032 x 3024 pixels USP: Art filters & Multi-Aspect Shooting AF: 7 Point Twin AF (E30 is 11 point) Fast Imager Autofocus in Live View IS: Smallest built-in image stabilisation body (up to 4 steps) (E30 is 5 steps) Memory Cards: CF/xD Twin slot Weight: 475g (w/o battery) Size: 130 x 94.0 x 60 mm LCD: Free-angle 6.9cm/2.7 HyperCrystal III LCD VF: Optical viewfinder with approx 95% field of view and approx 0.96x magnification Live View: Comfortable Live View thanks to high-speed contrast AF Recording: Jpeg, RAW, RAW plus Jpeg FPS: 4fps - 5 RAW unlimited Jpeg ( E30 is 14 RAW) ISO: ISO 100-3200 for wide-ranging sensitivity Plus: Face Detection and Shadow Adjustment Technology Dust Reduction: Reliable Supersonic Wave Filter dust reduction system Extras: Illuminated Buttons New Accessories: HLD-5 Power Grip; FL-BK04 Flash Bracket; FL-BKM03 Flash Bracket; PT-E06 Underwater Case
E-620 SERVICE SCREEN; VIEWS; BODY FINISH & HANDLING.
SERVICE SCREEN: In line with other E-system cameras the E-620 has a series of service screens and an error page (p.4). To access say, the shutter count (page 2 item R), follow this basic procedure: 1. Switch on and open the card door 2. Press OK and MENU together; this will bring up the basic camera description screen 3. Press up, down, left, right, shutter button and up button to get screen 1 4. Use right, down, left and up to cycle through the 4 pages 5. To return to normal just close the card door. To see what each screen tells you read my descriptive article here .
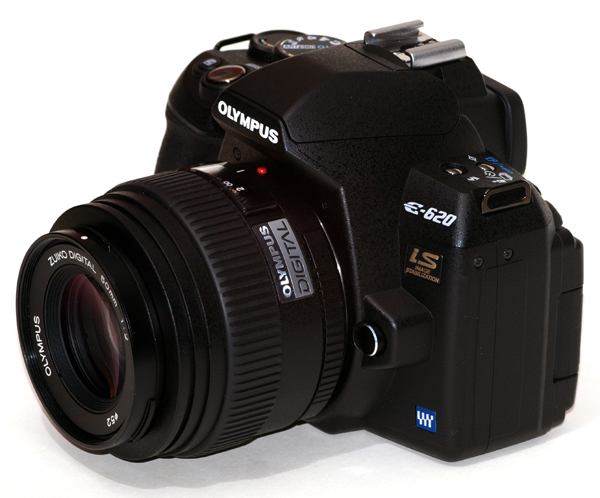
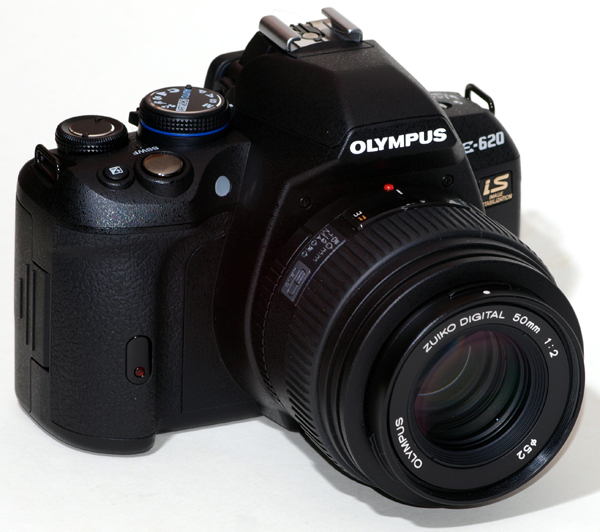
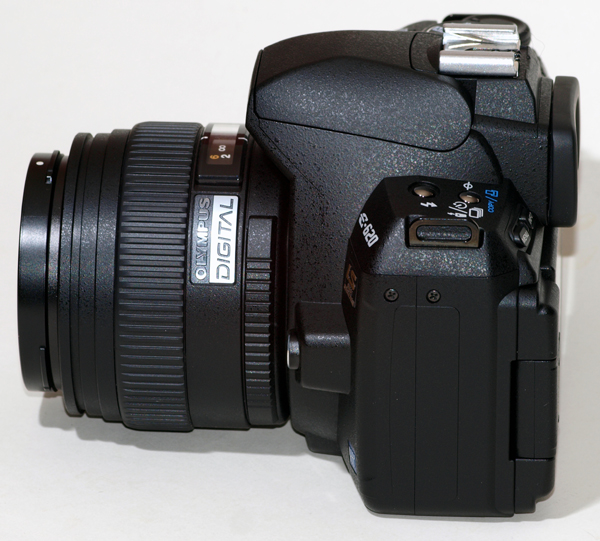
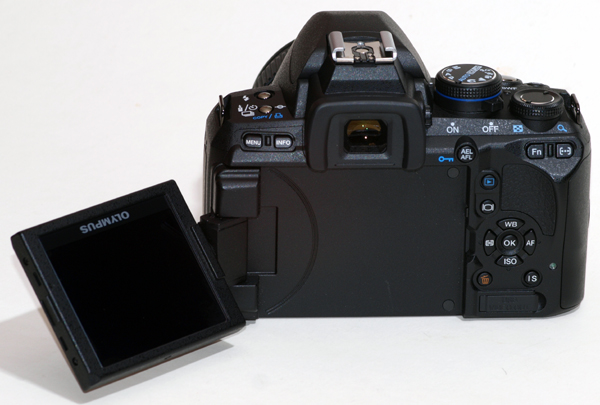
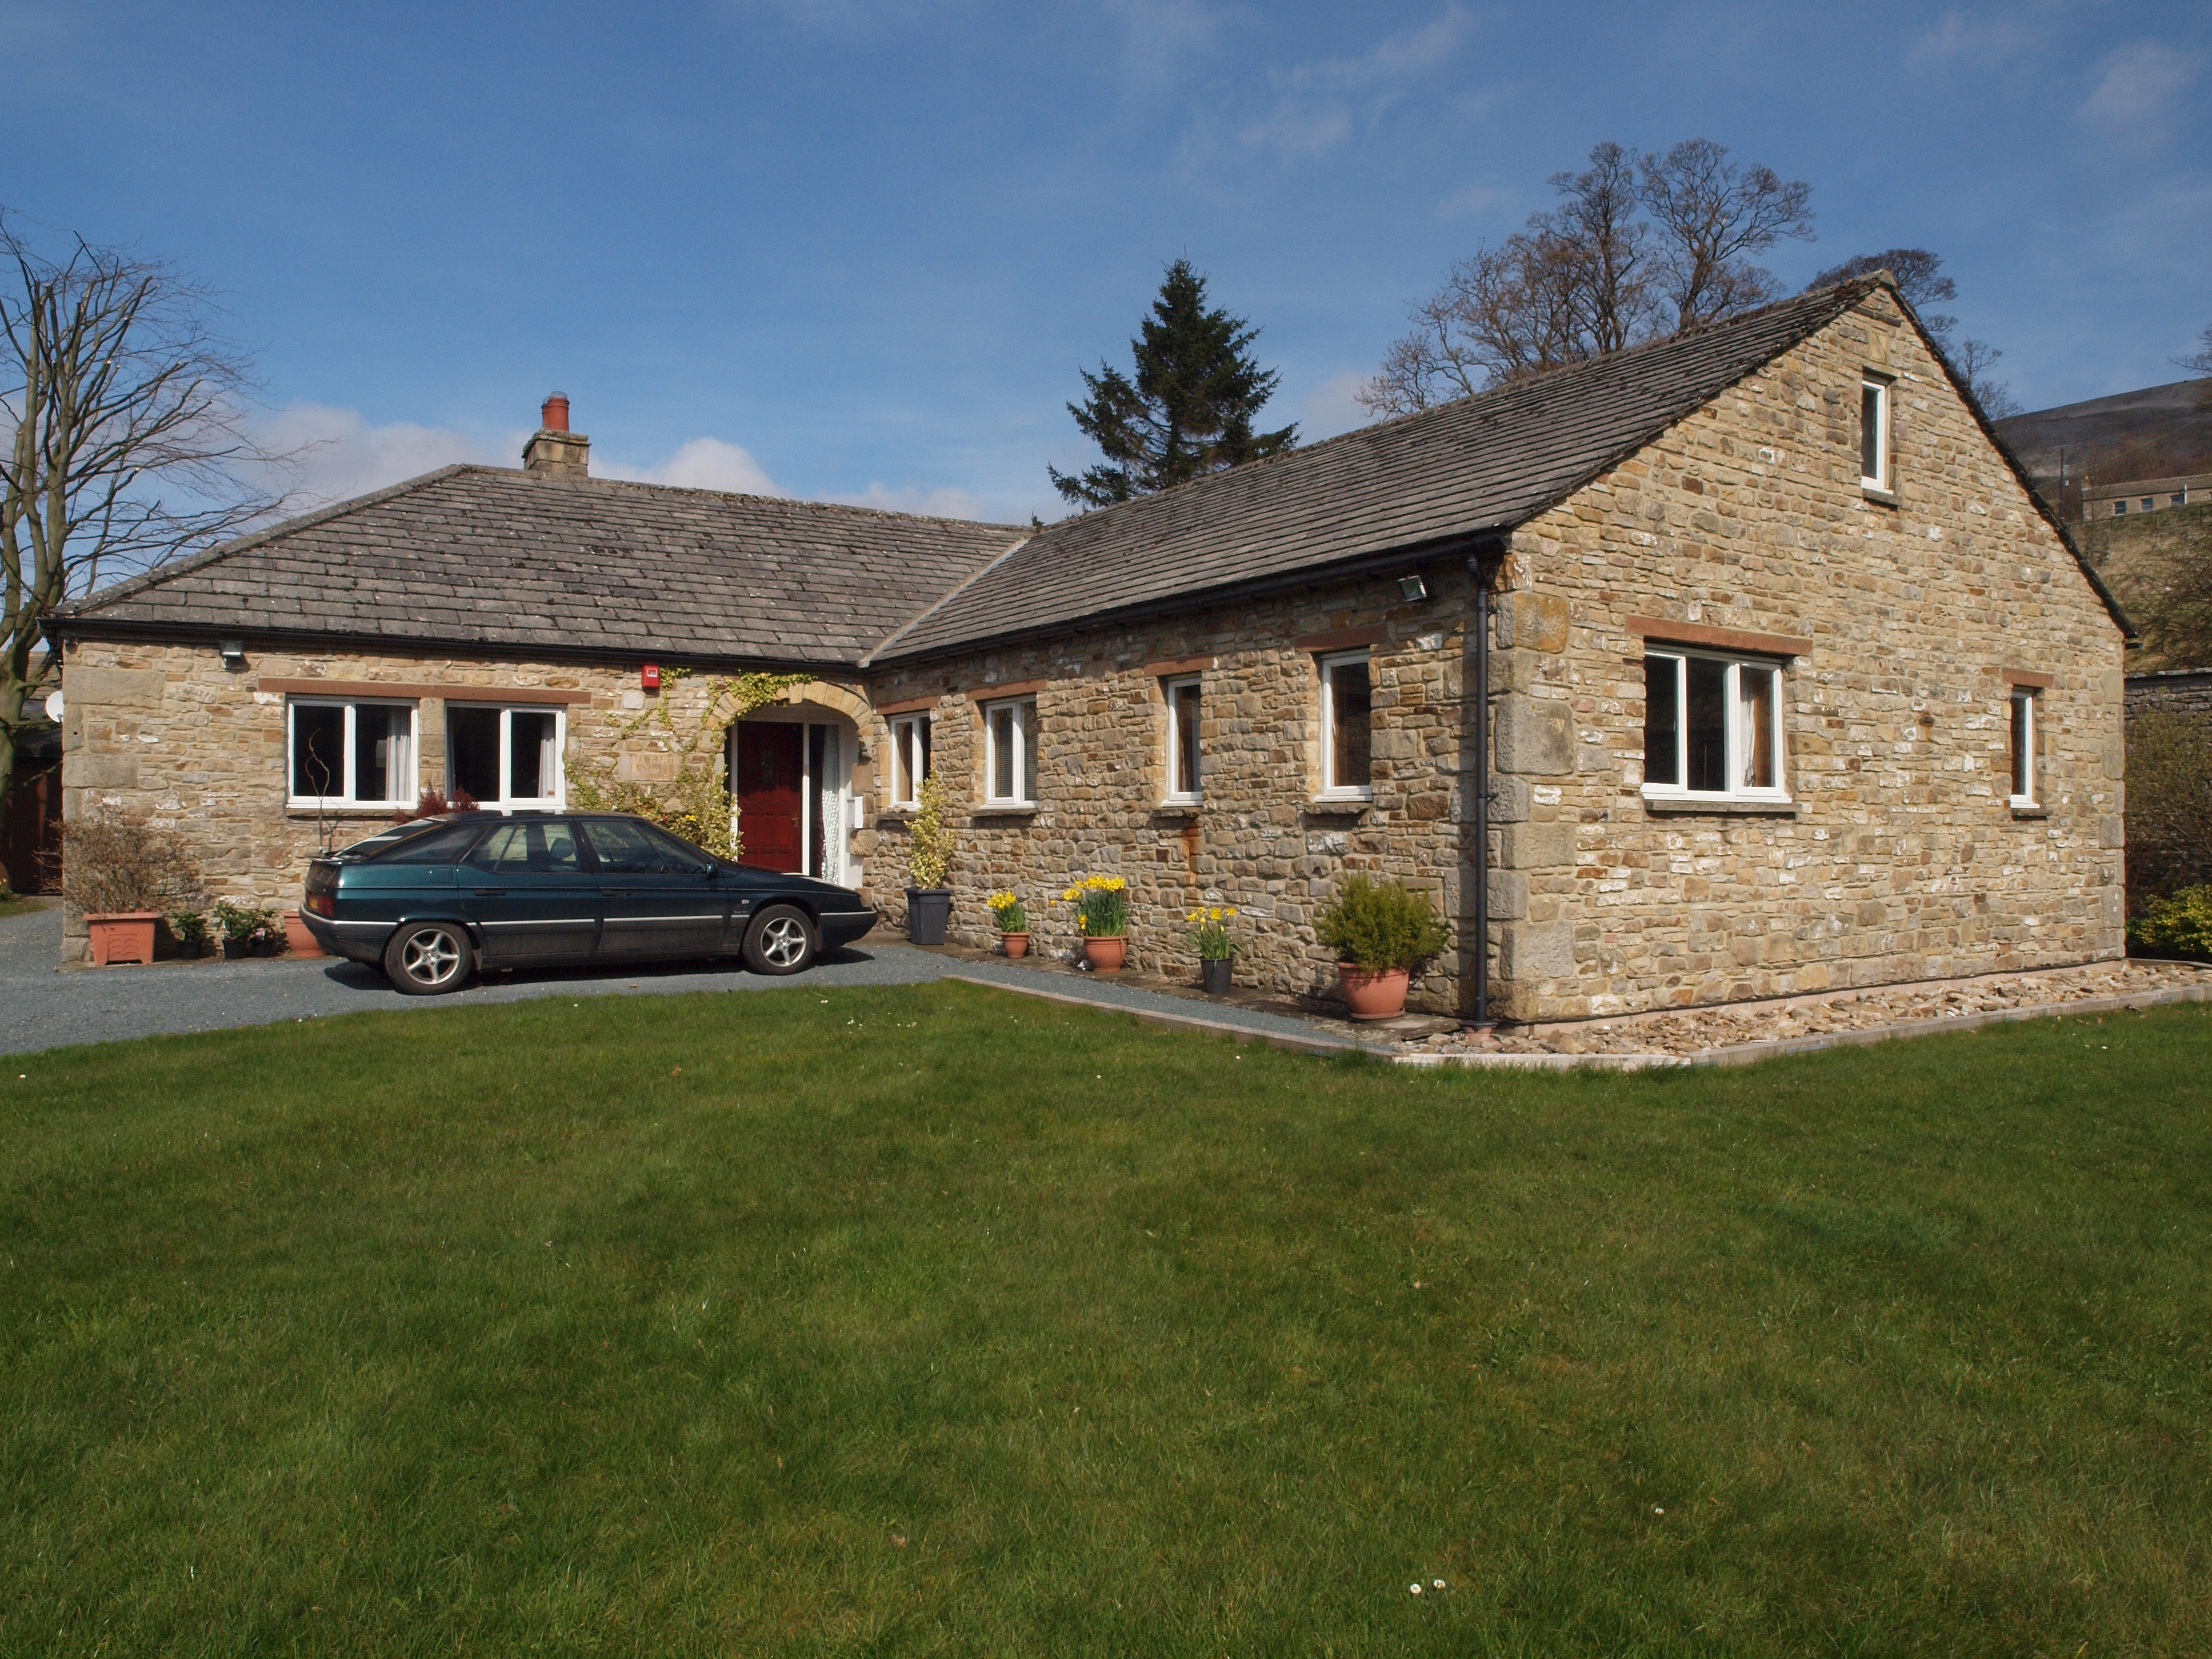
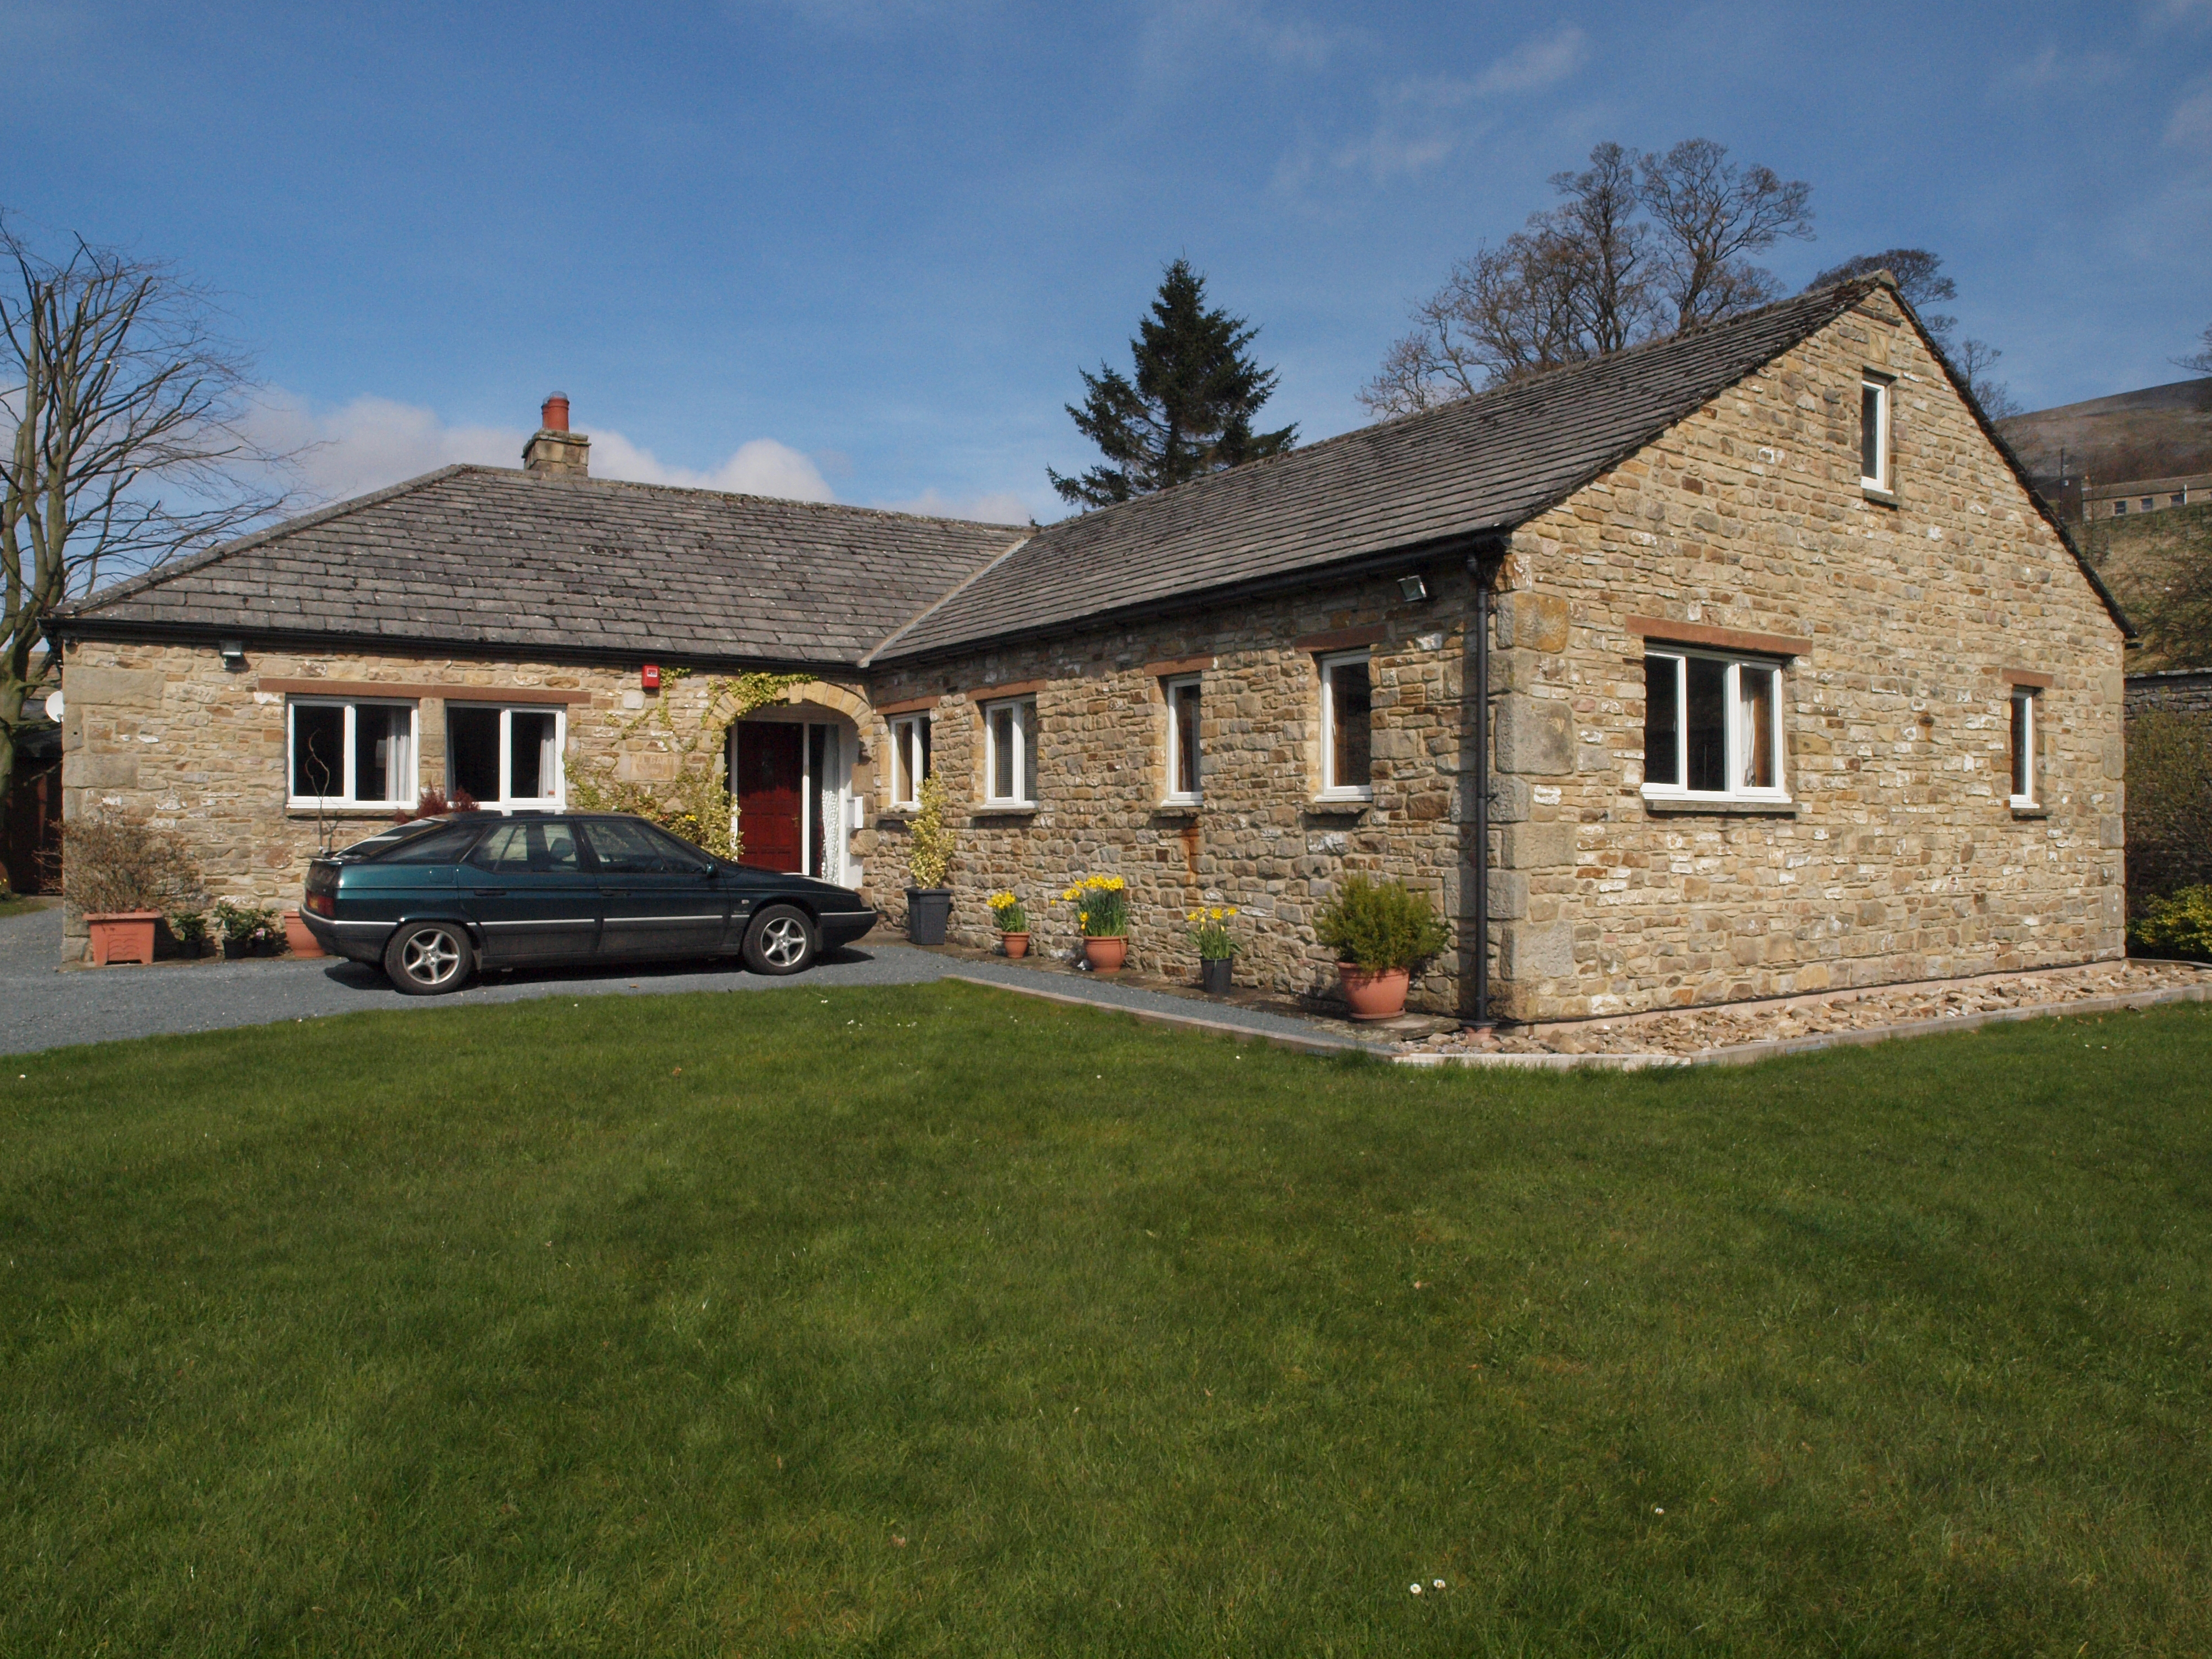
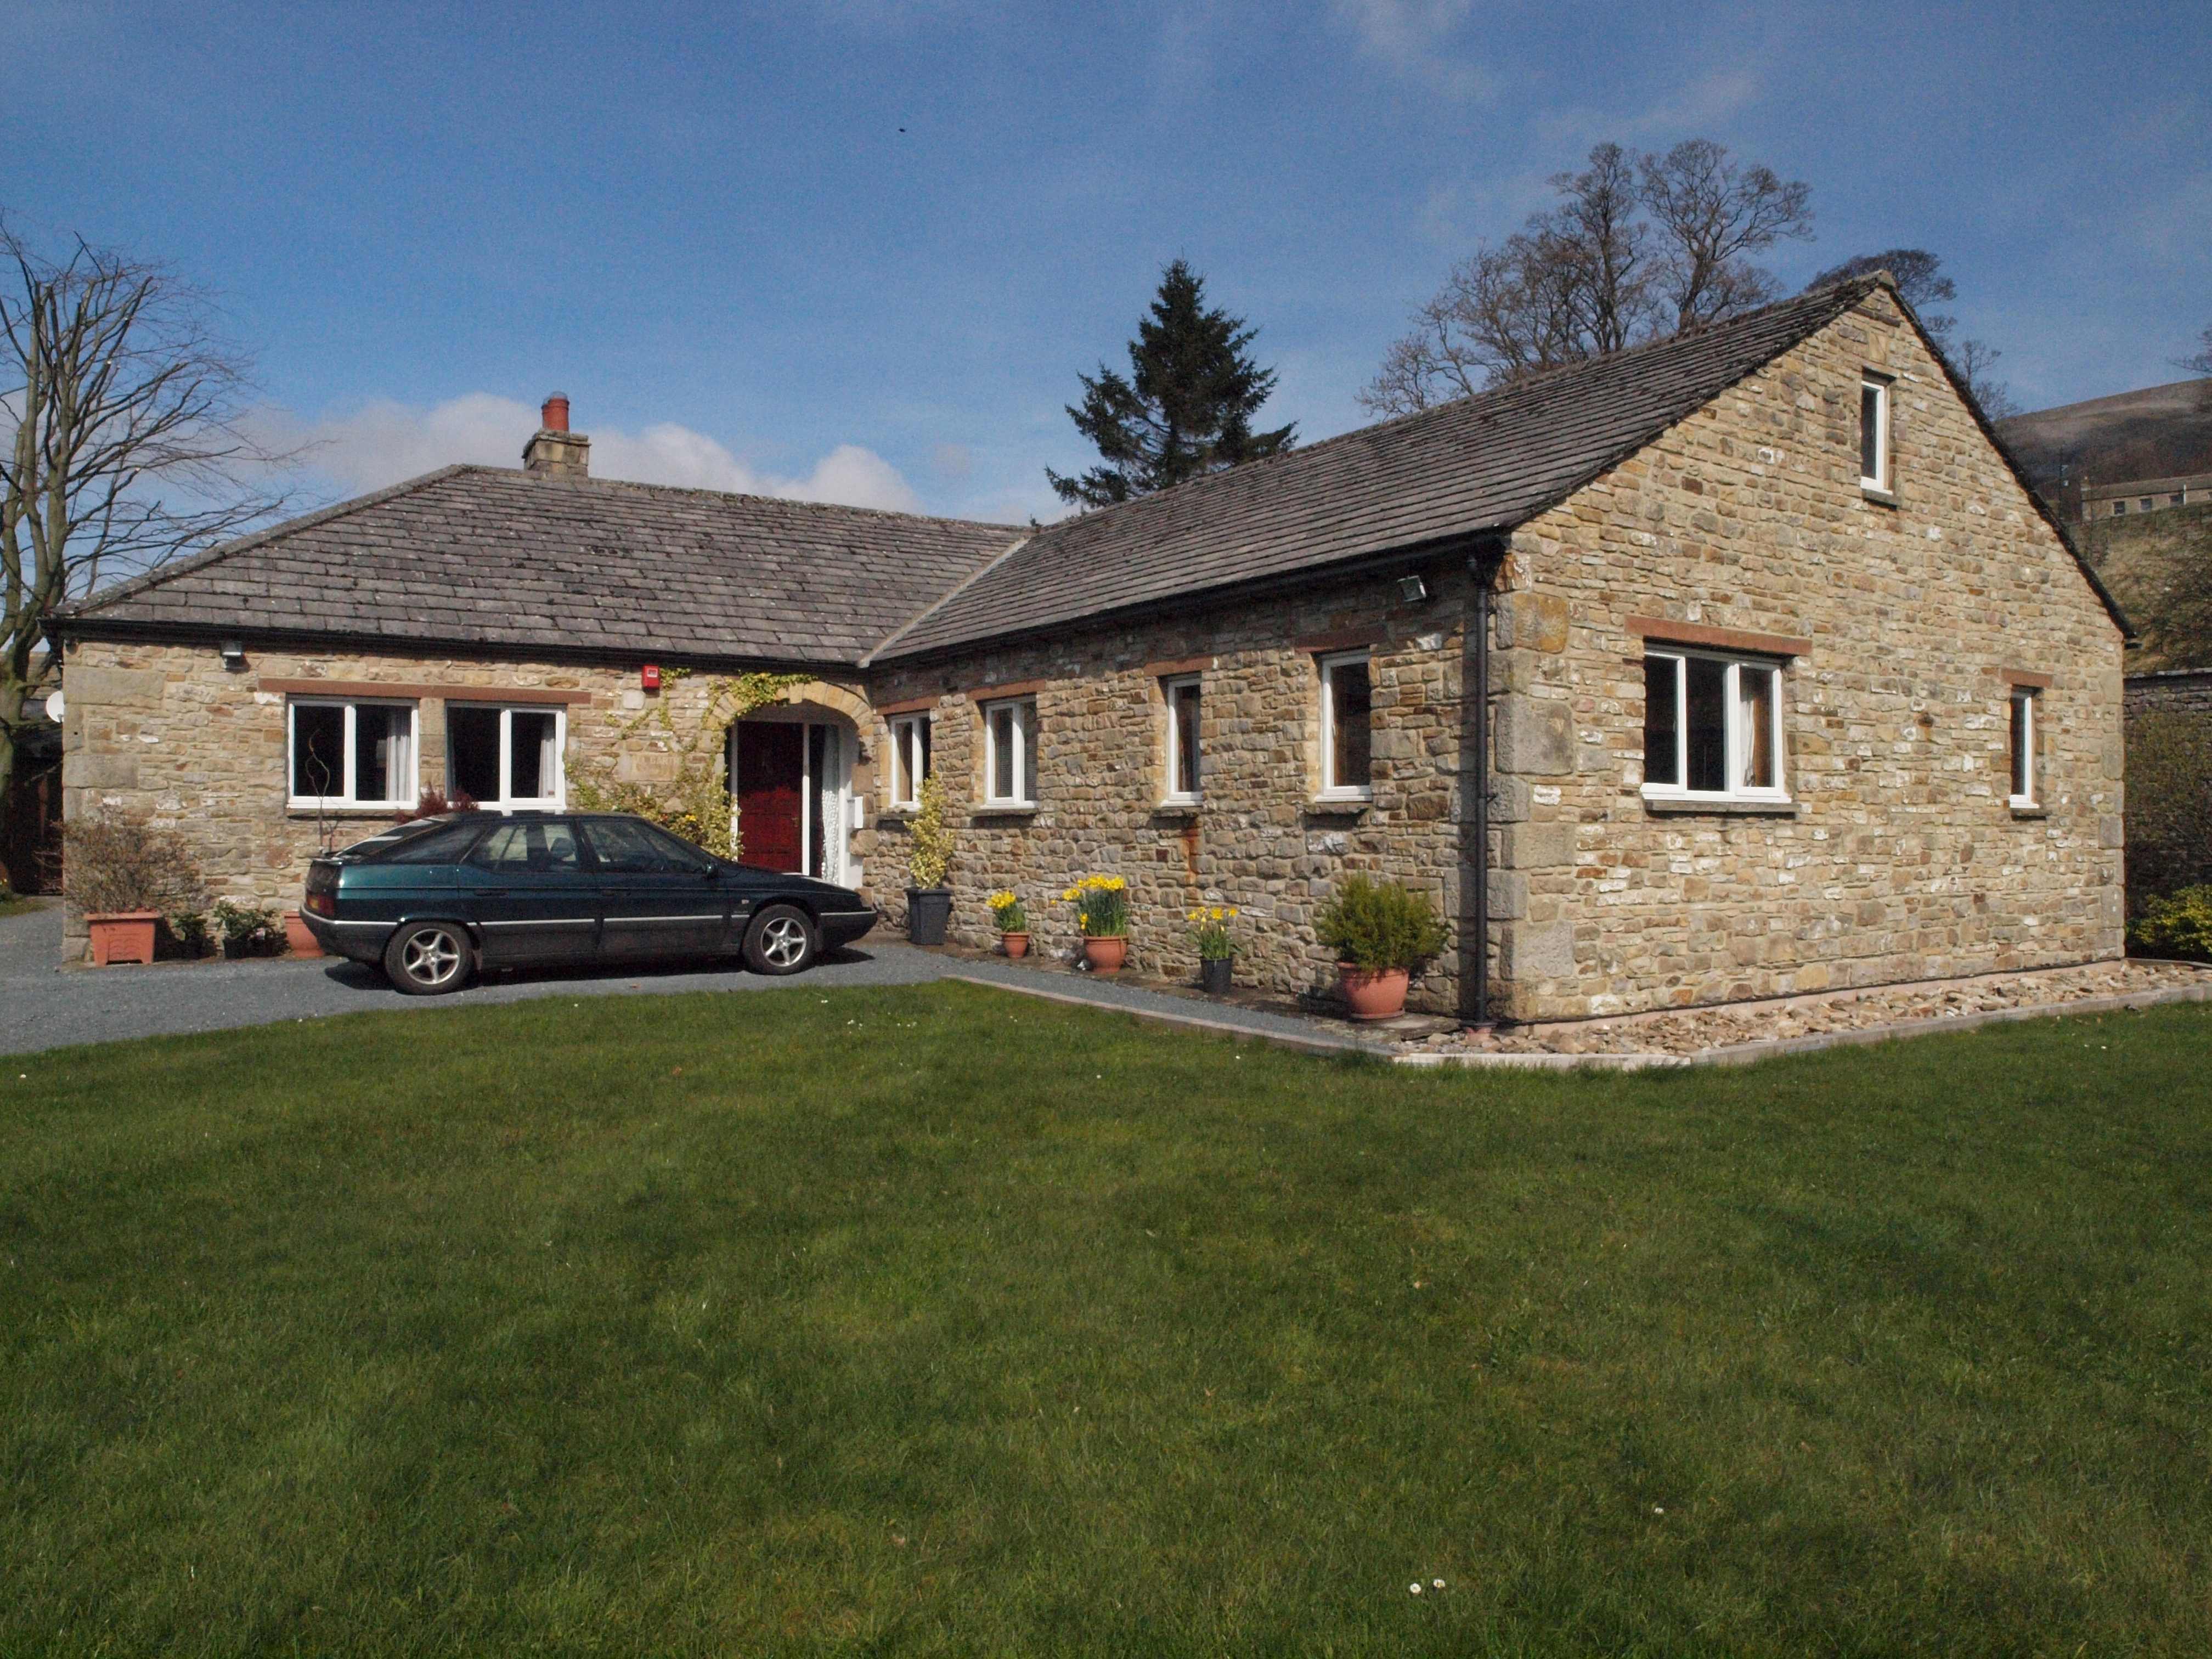
E-620 VIEWS: Here's a selection of E-620 images from various angles:
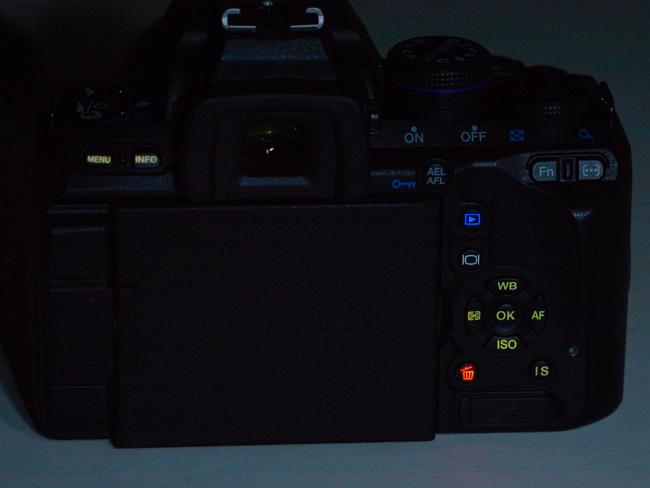
BUTTON ILLUMINATION: A new feature of the E-620 is illuminated control buttons. Each time you switch on or wake the camera up the primary control buttons on the rear of the camera light up for 8 seconds. This is a very useful feature and one that will be welcomed by many users.
BODY FINISH & HANDLING: When I previously reviewed the E-520 here , I was taken with that cameras heft and balance. It is more so with the E-620; I was instantly impressed with the E-620 size, shape and weight as soon as I took it from the box. It falls to the hands ideally. It feels so 'right'. My first impression of this camera is very positive and manufacturers get only one opportunity to get this aspect right. Those first few moments with a new camera are very important. The E-620 feels like an old friend. It is more compact than the E-520 due to the reduced size grip and its weight and balance instill confidence. To my eyes anyway the grip on the E-510/520 seemed too far extended to the left - almost like an afterthought; the new design puts this bit of aesthetics right. Although the new camera has the DNA of the E-500 it has evolved into a more hansome machine. When handling the E-620 for some strange reason I am reminded of the old Pentax ME Super 35mm SLR. The E-620 is finished in the now Olympus standard black 'crackle' type finish over a glass re-inforced plastic & part metal body shell/chassis. Its grip is smaller than the E-520 but recognisable as a true grip, unlike the E-420's raised 'bump'. It is nicely sculpted and rubber covered for comfortable grip. I think folks with larger hands may find it a tad small though I think it's about right for the size of the camera. The same rubber material insert is on the back plate indent below the control wheel for the right thumb. The left hand side of the camera rear has been redesigned due to the larger screen mount and hinge thus losing the vertical column of buttons we see in the E-420/520. The camera size and weight strike me as being just about perfect and with the smaller kit lenses fitted it is beautifully balanced. Weight (and size) saving comes at the expense of the more common BLM-1 battery which is replaced with the smaller BLS-1 unit in the E-620. Having experienced the BLS-1 battery performance with the E-400 & E-420 I have no axe to grind and welcome the weight saving. The E-620 has no dust or drip proofing as do the E-1 & E-3. This is understandable - the camera is a mid-range machine, not aimed at professional/serious amateur users. But, naturally, it does have the famous and extremely effective Olympus SSWF (SuperSonic Wave Filter) method of cleaning dust from the sensor, still the bane of many other DSLR systems as well as sensor based image stabilization (IS). The new model really hits the spot for those current E-420 users who like the size of the 420 but would prefer to have Image Stabilization on board and those current E-520 users who would appreciate a smaller and lighter unit. It cleverly sits between its two siblings. And the final finishing touch is the illuminated buttons on the back plate. A very thoughtfull design feature.
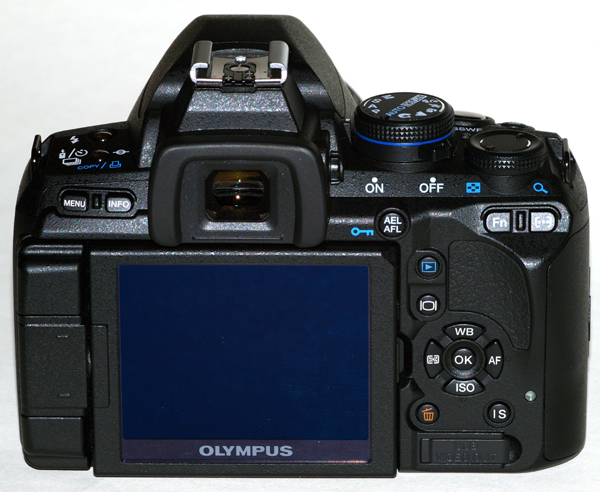
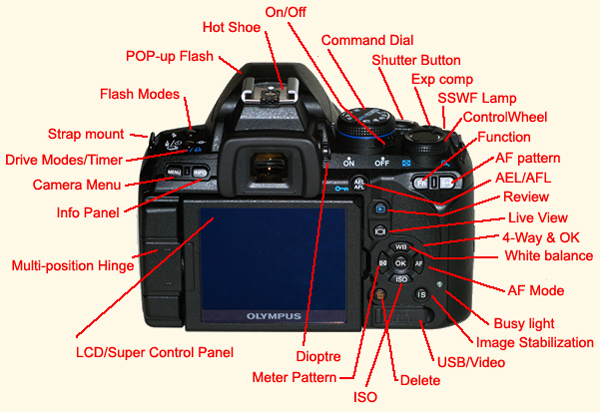
BACK PLATE VIEW with LEGEND.
BACK PLATE LEGEND: For your various points of reference here's a legend of the E-620 business side:
The layout of controls/buttons is typically 'Olympus'. There are a few differences due to redesign but there's nothing you won't be immediately familiar with. Of more importance is how it all works and the ergonomics. There's not much I can say about the layout; it's well though out and logical. If any single layout was perfect all cameras would be the same but they're not, and this is where ergonomics comes in; designers spend lots of R&D money trying to achieve good ergonomics. I quite like the vertical column design of the E-420s Review, Delete, Menu and Info buttons; it is functional and aesthetically pleasing. The E-620 poseable screen hinge has stolen the real estate this column occupied with the result these four buttons are now dispersed across the rear of the camera. I notice too that all buttons are slightly smaller than in previous models (for obvious reasons). I have had issues with certain models button layout/ergonomics (namely E-3) but I can say over the 2 weeks with the E-620 there's nothing I cannot live with - it works well.
E-620 INNOVATIONS.
E-620 INNOVATIONS/IMPROVEMENTS IN USE: VIEWFINDER: Many commentators have been critical about the small and 'tunnel-like' viewfinder of the entry to mid-range Olympus DSLR's. Personally I can't say this has bothered me unduly unless I'm using legacy manual focus lenses. When manually focusing, not only is the old screen small (and therefore the point of focus tiny), but the aerial image thereon does not 'snap to focus' as it did with 35mm film SLR cameras like the OM range. The E-3 went as far as possible to resolving this with its large and bright finder and the E-1 and E-30 are not too bad either. But the rest of the range lags behind. So it was with interest I took my first look into the E-620 finder. To be honest I couldn't immediately see any difference in screen size though the screen does appear brighter and clearer (I've been using my E-420 quite a lot recently so I'm used to the small screen). However, after directly comparing the E-420 with E-620, I can see a size difference but it is not at all dramatic. I believe the difference in physical and apparent size is about 4%. It's there but it's small. But there are other things at work here too that add to the visual enhancement of the finder. Firstly there's the AF marker points on the screen that have increased from 3 horizontal to 7 in an elongated cross. Because the eye naturally tracks across the centre line of 5 AF points you tend to visually explore the screen dimentions more. In addition the exposure information is now at the base of the finder rather than the right and this is the more natural place for it to be. It seems my eye can more easily scan downwards than to the right. Certainly, not only do I feel more comfortable scanning down than right, but the whole finder experience is now much improved because of it. I note there is no internal viewfinder shutter blind provided and we have to use those rather silly bits of plastic. I appreciate that cameras at this level are made down to a price but it seems a shame that the finder improvements are not complimented with a proper shutter. Oh well!! Moving the exposure information to the base of the finder is a vast improvement and one that's long overdue. Not only does it make for easier viewing but it provides a greater degree of information. All the above changes combine to bring improvements to your viewfinder experience. But please, do not anticipate an E-3 encounter!
SCREEN SIZE COMPARISON:
NOTE 1: When you see the approximate screens sizes together for comparison it's easy to see the small increase in size. In real life it's more difficult to make this comparison and the immediate impression is that the E-620 screen size is not that different from the previous model.
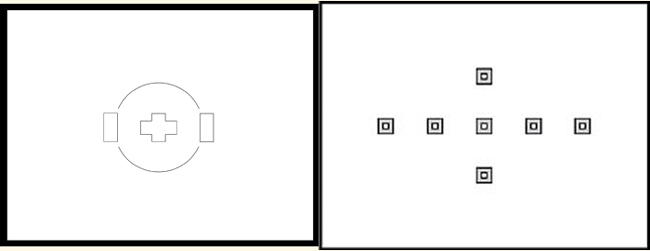
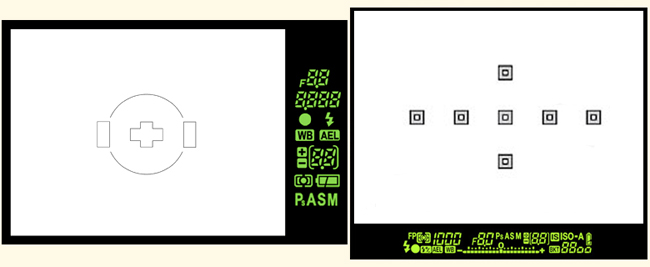
VIEWFINDER LAYOUT COMPARISON:
NOTE 2: The new finder layout certainly improves your viewfinder experience. Moving the exposure information to the bottom of the screen is one of the best improvements Olympus could have made. I'm hoping this will become the standard layout for all new models.
7 POINT AF SYSTEM: Olympus have also moved to a new AF system, again silencing the critics of the rather unsophisticated and slow 3 point system. This new development flows down from the E-3's 11 points. The E-620's 7-point dual AF system features seven distance-measuring points, five of which are cross-points (sensitive to vertical and horizontal aspects). It was designed to reflect hobbyist needs and the AF system was specifically developed to work easily and rapidly with Olympus' SWD lenses. (In practice it also marginaly increases the AF speed of kit lenses too when compared to their speed on previous models). The E-620 AF offers choice of single or 7 points with full selection of specific point via the control wheel or 4-way toggle and super control panel; choice of pointer illumination on or off, and sensitivity either normal or small. This is a huge advance over the previous rather antiquated system. In normal optical viewfinder use the new AF system works fine; it is responsive and accurate. With SWD lenses like the ZD12-60mm it appears to be just as speedy as the E-3. As with other models using this advanced system, the AF illumination point (red dot) serves only as an indicator of the chosen point and not as an indicator of focus achieve when it goes out. You still have to wait for the beep and the green dot in the viewfinder to confirm accurate AF. I'm genuinely impressed with the new AF system. For all its fewer AF points it is a fine system which seems solid in operation, though I did not have time to test it in every possible circumstance. Selection of AF point is simple, especially with the thumb-wheel. The new AF system alone will win many converts.
LV FOCUS: In Imager AF live view mode (with appropriate contrast detect lens - I used the 25mm pancake) focus is pretty quick, maybe a tad faster than the E-420 in LV mode (I have no way to measure CDAF), and there is no further delay waiting for focus confirmation from the AF chip behind the mirror. But, of course the mirror does it's acrobatics; the LV system is still not quick enough for moving subjects. As long as there is a mirror to flip out of the way of the image sensor there will always be this mirror down, up, down, up LV routine. With non-contrast detect lenses (ZD12-60 was used) LV AF becomes decidedly slow and 'jumpy' as the motor traverses the focus steps. And when focus is achieved (exhibits the green doughnut on the LCD panel) there is a further slight delay as AF is confirmed by the normal AF chip means.
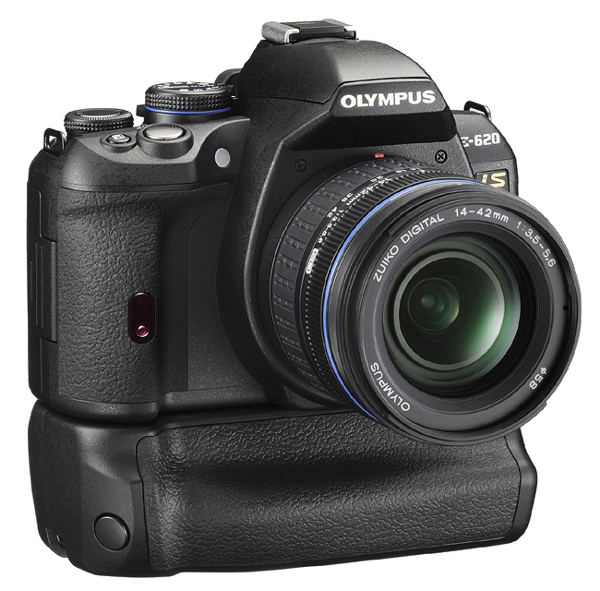
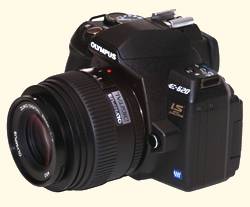
BATTERY & GRIP: The E-620 shares the smaller BLS-1 with the E-4XX series (most other E-system cameras use the larger and more powerful BLM-1.) This has allowed the designers to make size and bulk savings. Of course it comes at a cost - less battery life. I expect battery life to be slightly less than that of the current E-420 because the E-620 needs additional power for the image stabilization mechanism as well as enhanced processing, write and buffering speed. This is probably why Olympus have produced a battery grip specifically for this camera, the HLD-5 Power Grip. The review camera I have does not have the grip attached so I have no other information I can pass to you. I'm assuming the grip will use two BLS-1 units but how they are installed remains unknown. Here's an image from Olympus of camera and grip. I'm not sure how the twin BLS-1 batteries will sit in the grip; I'm assuming front to back ala HLD-4 for the E-3/E-30.
BATTERY PERFORMANCE: As said the camera I have does not come with the battery grip. I charged the BLS-1 battery when the camera arrived and have only needed to re-charge it once more in a week of intensive use - especially menu exploration and LV timings. I get around 350 'normal' use exposures including about 15% in LV mode (with high level of reviewing) from my E-420 and would expect the E-620 to provide slightly less than this. I'd estimate the battery life of the new machine to be around 300 'normal' use exposures with similar percentage of LV use and reviewing. I'm assuming the grip will effectively double this.
IMAGE STABILIZATION: In the short period of time I had the camera it was not possible to undertake any serious testing of the E-620's IS system. That said, the IS unit fitted to the E-620 is the same as the E-520/E-3/E-30 so I have no reason to believe its performance will be any different (although unlike the E-3, the E-620 does enjoy both horizontal & vertical panning). I did some testing of the E-3 IS system some months ago and you can read the results here (or click link to section 6 on the top menu). I concluded that the IS system works but perhaps not delivering the 5 EV stops advantage the maker claims. Demonstrating body based IS effectiveness is pretty difficult and most testing methods have been subject to criticism. I'd suggest you read the article written by Andrzej Wrotniak as part of his E-510 review (et al) to get a good understanding. You can go to that article here. Having now used three other cameras with IS (E-520, E-3 & E30) I am convinced it is a really useful additional tool in the photographers armoury to deliver clean shots. The IS system works, without doubt. However, and like others, I'm not convinced the benefit is quite as great as the advertising material might suggest. Even so there is plenty to suggest there is a demonstrable gain of around 2-2.5 full stops of EV, and for that I'm very grateful. This EV gain compensates those who consider E-system cameras do not enjoy the best of high ISO performance; in other words you can use lower ISO's and lower shutter speeds, with IS delivering a shake-free image. NOTE: The previous method of seeing IS work is no longer possible on the E-620 as the IS unit now only works at the point of exposure and not beforehand (as with E-3 for example). In some ways that's a shame as it was reassuring to see it in action. Of course this will save precious battery power.
MULTI ASPECT/MULTI EXPOSURE: MULTI-ASPECT:In LV mode you can select one of the following four Aspects Ratios: 4:3 / 3:2 / 16:9 / 6:6. The effect is achieved by masking the sensor in the camera software with an commensurate loss of pixels. It's ingenious and I can see the advantage of having the LV monitor show the chosen aspect for composition. Other than this I fail to see what doing this in camera offers over post-process cropping. MULTIPLE EXPOSURE: The E-620 offers the ability to take multiple exposures via a MENU (Camera 2) but is restricted to 2 frames only. In use an icon appears on the super control panel to warn of the selection. This icon turns green after first exposure. When the sequence is complete the images are superimposed on the monitor to show you the effect. The combined images are stored as one jpg. By default if the review button is pressed during the sequence, the multi-exposure facility is switched off. Otherwise you must remember to manually switch this feature off. I can see creative use for this.
ART FILTERS: These 'filters' or modes are an extension of the 'SCENE' modes. the E-620 offers the following: Pop Art: Enhances colours, making them stronger and more vivid to create high-impact pictures that express the happy, light-hearted feeling of the pop art style. Soft Focus: Creates a soft tone which gives pictures an ethereal, otherworldly atmosphere. It renders pictures as though they were veiled in heavenly light, without obscuring details such as the hair or flower petals. Pale & Light Colour: The foreground is enclosed in flat, gentle light similar to a flashback scene in a film creating a sense of déjà vu. Light Tone: Creates a picture with a gentle feel to it, similar to one taken under artificial lighting. Both the shade and highlight areas are rendered very softly to provide a sophisticated atmosphere. Grainy Film: This effect recreates the feeling of reality evoked by grainy, high-contrast monochrome pictures. The strong presence and dramatic atmosphere make the subject stand out impressively. Pin Hole: Reduces the peripheral brightness like an image seen through a pinhole. Added to this is a unique colour tone that results in a style that has an air of secrecy or portrays the feeling of being lost in another dimension or space. I have tried the Art Modes and they produce some quite nice image effects. I'm maybe not the best person to judge whether these will be popular but I suspect they will be with the younger generation of users. This feature allows for some creativity 'on the spot' with instant results and may be attractive to many. They have their place, but are they a serious photographic tool? I'll let you decide; perhaps I'm too set in my ways. SCENE MODES: In addition to the basic dial selection modes of P A S M and the now 'standard' 5 dial-in modes of Portrait, Landscape, Macro, Sport and Night Portrait, the E-620 is equipped with a further 13 predetermined scene modes. These are Children, High Key, Low Key, DIS (Digital Image Stabilization or high ISO) Mode, Nature Macro, Candle, Sunset, Documents, Panorama (requires xD card in slot), Fireworks, Beach and Snow, Underwater Wide and Underwater Macro. Olympus have not yet enabled user input that allows you to store personal settings for certain situations frequently used (Casio compacts have this feature). This would simply be a firmware addition that is currently available in some higher end compacts and a feature that some folks might welcome over and above the two more powerful and complex 'MyMode' (Re-Set) settings. Also, there are many who mourn the passing of the eight MyMode settings in the C-series cameras and those who would appreciate a single 'blank' position on the command dial as a user defineable 'favourite' setting or instant access to improved MyMode settings. Just a thought.
FACE DETECTION: Face Detect: The E-620 also facilitates 'face detection'. When enabled this feature recognises a face, frames it with a white box and gives preference to both focus and metering within this area thus ensuring the face is perfectly exposed. It is like a very clever spot exposure system. I did mess around with this feature in my wifes study where she has many photographs of family members. Sure enough the E-620 with the ZD12-60mm recognised up to 5 simultaneously and made the correct exposure. I'm not a family photographer and am not the best person to judge if this a a good feature or not but I can see it might be welcomed by many coming from the compact world. The face detect system works in any LV mode and with any lens including manual OM lenses, though, obviously, correct focus is up to the user.
SHADOW ADJUSTMENT TECHNOLOGY (SAT): SAT seems to be an integral part of the capture and processing capabilities of E-System cameras today. It is accessed through the GRADATION settings in the menu. These settings lump together High and Low key gradations with the less dramatic Auto setting. SAT (as delivered by the Auto setting) is another level of in-camera control and processing that is quite subtle but needs care in implementation. Of the four Gradation settings the 'Normal' setting produces no adjustment at all or it is so subtle I cannot see what it does. The Auto setting is the least intrusive and strangely the most contentious. High and Low key produce quite dramatic changes and should be used with care. The Auto Gradation setting does work and work well. It slightly underexposes the highlights of the scene and applies a slight lift to the shadow area levels producing results that might prove challenging to duplicate if you were relying on post processing. The secret is being able to recognise those circumstances where SAT (in particular Auto Gradation) will deliver. Anywhere you have both heavy shadows and 'normal' lighting will benefit from the AUTO Gradation setting. But it comes at a price and that is raised noise levels in shadow areas. As a general rule I only use SAT at ISO levels of no greater than ISO400, otherwise the resultant shadow area noise is too intrusive. But, as said, using the AUTO setting does produce high levels of noise in lifted shadow areas so use with care. Also, I am not alone in confusing NORMAL with AUTO; NORMAL is OFF, whereas AUTO applies changes. Personally I never use High & Low Key settings as there are easier ways to achieve the goal but I use Auto Gradation quite a lot and this is likely because I'm a great jpg fan. I rarely use the RAW format as I firmly believe that virtually all Olympus DSLR jpg engines deliver very high quality results straight out of the camera. But processing the RAW file can offer a greater level of control over the final results. I can and do process RAW images, and can produce results that do justify the overall time and effort involved. But if the camera offers an optional setting that will enhance its already excellent jpg engine, as does Auto Gradation, I'm all for using it. Choosing jpg output saves time, as does anything that enhances jpg's straight from the camera. I prefer to spend my time out and and about taking photo's rather than sitting in front of my PC processing RAW files. But, each to his own!
MONITOR: The E-620 has a new multi-position rear LCD screen of 2.7" with a resolution of 230,00 dots with 15 levels of adjustment available for both colour temperature and screen brightness. The screen is HyperCrystal lll, whatever that means. The screen definition is very good indeed. I believe Olympus has also improved the reviewing ability as I find this is the best screen so far of any of the cameras I've tested, for checking my images. On magnification more detail is called up as the factor increases making 10X & 14X very useful for checking for 'out of focus' images. When the monitor is used as the Super Control Panel its larger size and seemingly higher definition makes the menus easier to read and discern on bright days. During my time with the camera there was no occasion where I could not read the LCD rear screen; even in direct and bright sunlight all I had to do was create a touch of shade with my hand and I could read it fine.
SHUTTER & SHUTTER SOUND, FRAME RATE & CF WRITE SPEED, RM1: The shutter speed range reflects the E-4XX & E-5XX series ranging from 60 seconds to 1/4000th plus selectable 1, 2, 4, 8, 15, 20, 25 & 30 minutes in BULB and is quite generous for this level of camera. The E-620 shutter is not especially quiet and sounds to my ears identical to the E-4XX series. Frame rate when set to high is 4fps or may be user defined (1-3fps) when LOW is selected. Olympus state the buffer size will hold 7 RAW images. I found the rate stuttered after 6 RAWs and then continued at approx 1.5 frames a second thereafter. In LSF JPG the E-620 will shoot continuously in jpg at 4 FPS with only the slightest hint of slowing after about 8 frames, if you use a fast card. Write to Compact Flash: I used a 4GB SanDisk Extreme III CF (new 30mb/sec) card in the E-620. A single LSF file took 3 seconds to write and a joint RAW + LSF took 4 seconds. A burst of 5 frames in LSF took 4 seconds and a burst of 5 RAW + LSF took 11 seconds to write to card. These timings are the same as the E-30. Using an 8GB SanDisk Extreme 4 produced the same timings. I do not have the new generation of Lexar UDMA fast cards. With a standard 'M' 1GB xD card the whole process slows dramatically to the point of becoming ridiculous. Generally I find the whole performance of the camera simply excellent, nothing was delayed by internal processing - but I did not undertake sports events so cannot comment on that performance. If you are a RAW sports shooter you may find the frame rate and buffer performance in particular, a little restrictive. The E-620 works fine with the RM1 remote providing you enable this in the DRIVE setting. There are 2 remote settings; instant and 2 seconds. I use the remote a lot when testing, along with tripod and mirror lock-up to ensure vibration free shots. For anyone not familiar with the RM1 its 'Zoom' buttons control the shutter in BULB mode. The camera also worked fine with the cheaper Chinese copies.
MEMORY CARD(S): As with most other Olympus DSLR's the E-620 accepts (uses) either compact flash cards or xD. The E-620 can utilise the latest compact flash high speed writing technology. The xD slot can be used for emergency storeage/transfer as I do not believe anyone would use these memory cards as their primary DSLR card, today. The card door is the 'slide-out' type and does not have a separate lock or weatherproofing seals. It requires only a pull towards the user for it to unlatch and flip open. Inside are the two memory card slots with the standard grey C/F card release peg.
AF FINE ADJUST: This feature appeared in the E-30 and is repeated here. It is found in Menu Cog (i) 4. This allows the user to register known vagaries of a lens for +/- 20 steps (settings for up to 20 lenses can be registered) for compensation. I'm first to admit I tried hard to understand how to use this when I reviewed the E-30 and failed miserably. Nor have I found anyone who has mastered how to use this feature, so I'm not even going to try with this review camera! I think this feature might be one that Olympus may come to regret when lenses are mis-registered with the camera and subsequently sent back under warranty for focus re-calibration.
LOW LIGHT: As regards low light performance the E-620 I found it an improvement on the older series but not as good as the E-3 - as you might expect. With the strobe assist lamp disabled it did achieve focus lock in very dismal indoor conditions (amost dark with some artificial light seepage from open doors), but only after a few attempts and its performance was not consistent (I have no means of measuring light intensity). However, I was generally satisfied with the E-620 + ZD12-60mm in 'normal' indoor lighting without strobe assist - it worked quite well but there are limitations. With strobe assist the system works in almost pitch blackness but of course the strobing light can be a real nuisance. With the FL-50/FL-36 (& R series) the IR beam provides the focus assist light (a cross pattern of repeated lines) and this works quickly and efficiently and is less intrusive than the flash strobe. As said, the camera integrates with the FL series flashguns and with the 'R' series will provide wireless communication with up to 9 'R' flashes for complex lighting. It is not possible to use both on-board and secondary flash (ala E-330), but off camera use of the FL series flashes can be enabled with the flash cable FL-CB5 (About £50.00). Alternatively you can use a light activated hot shoe synch plug providing much greater flexibility but no TTL control, for about £10.00.
USE OF ME-1: It seems expedient to try the ME-1 on the E-620. While it fits the camera and increases the size of the percieved image by 1.2x I found it rather detracted from the new finder by forcing the user to scan around the frame as well as alter the eye position to read the exposure information. For a non-spectacle wearer it is better to use the finder unaided. Also, the ME-1 provided no significant advantage when using manual focus or legacy lenses either. I think the new prism and screen are ringing the death knell for the ME-1. Not recommended.
MENU; LIVE VIEW in USE; LV INFO SCREENS; LIGHTBOX MODE; MANUAL FOCUS with LEGACY LENSES.
E-620 MENU SYSTEM: The screen menus in all Olympus DSLR's were updated around the time of the E-3. They all follow a similar basic format but some have more choices than others, camera dependent. The E-620 menu displays some changes, the major of which is that SPANNER 1 is replaced with a cog icon and the user can choose whether or not to have this section displayed when the menu button is pressed. I suppose this is to protect some of the more customizable settings from careless changes. I'm choosing not to detail the menu in this review; the advanced manual (downloadable from this article) explains each menu choice.
LIVE VIEW in USE: GENERAL BENEFITS OF LV (HISTORICAL): The main benefits of LV are: (1) the user sees precisely the image about to be captured, (2) there are occasions when it is more convenient or less intrusive to use the camera screen to compose, (3) LV offers a level of familiarity to those coming from the compact world.
THREE LV MODES: Three choices for LV operation are offered via the main menu; AF Sensor, Hybrid AF and Imager AF; (earlier iterations of this technology such as the E-3 offered only one method, AF sensor). Remember, regardless of which mode you select, pressing the LV (monitor) button flips up the mirror.
AF Sensor: In this mode no AF takes place regardless of half pressing the shutter button. Instead AF can be achieved by pressing the AEL/AFL button. Pressing the AEL/AEF button invokes a flip of the mirror to achieve accurate AF via the AF sensor behind the mirror before the user can finally compose and capture. Effectively this involves 2 cycles of the mirror flip, one to enable AF and another to actually capture the image. This is the slowest method of capture using LV.
Imager AF (default): The E-620 has this feature with certain lenses only. In this mode AF is achieved by using an 11 point contrast detect AF system superimposed over the feed from the imaging chip. This allows direct and accurate AF in Live View without the need to further flip the mirror. The user half presses the shutter button and can see AF taking place on the screen. When happy with the composition a full press of the shutter flips the mirror down to capture the image and back up again. This method only involves 1 flip of the mirror. This is the fastest method of capture using LV though this method of AF is not instantaneous and is slightly slower than using the true AF sensor.
Hybrid AF: As its name suggests this mode is a mixture of the other two modes. In Hybrid AF an approximate focus is achieved by a half press of the shutter button but true AF is taken from the cameras AF sensor behind the mirror during the mirror flip when the actual image is taken. If you use lenses that do not support contrast detect for integration with LV in Imager AF mode, that is all but the ZD9-18mm, 14-54(II), 14-42, 40-150 and new 25mm pancake, the camera defaults to Hybrid AF to allow an on screen approximate focus but with the true focus taken from the true AF sensor in the camera body prior to exposure. This method too only involves 1 flip of the mirror to capture the image; it is therefore, faster than AF Sensor method.
SCREEN (MONITOR) INFORMATION in LV: The INFO button assumes a different function in LV. (1) On accessing LV by pressing the MONITOR button, the initial screen is an uninterrupted view through the lens subject to whichever aspect ratio you have enabled in the menu (4:3 / 3:2 / 16:9 / 6:6). The monitor is simply masked at the appropriate format. Don't forget that if you are recording in JPG only the image is processed with those areas of masking missing so you end up with a smaller file. Only RAW capture records the full frame scene. Subsequent presses bring up: (2) Whichever composition overlay you have enabled - GRID; GOLDEN SECTION; SCALE; all three will cycle! (3) AF target that can be moved around the scene and enlarged by pressing the OK button and enlarged 7x or 10x. (4) Live Histogram in bottom left of screen. (5) Four small repeating reproductions of the scene with live representations of the effect of under or over compensation +/- 5 stops. AND by pressing the WB button and UP arrow key:- (6) Four small repeating reproductions of the scene with live representaions of the effect of changing the white balance across the 11 presets + 1 custom WB (this software is a carry-over from certain compact models and is known as 'Perfect Shot EV or WB Preview'. (7) Basic shooting information such as shutter speed, aperture, AF mode, metering mode, aspect ratio, file size, memory card and frames remaining. Certainly these options are very useful in the studio or when doing macro work; it is good to know that Olympus are making the most of its LV feature. You can also use the preview button (when enabled) to check DOF etc while using the 'Perfect EV or WB' screens in LV mode. If the conditions are too dismal the camera endeavours to turn up the signal (gain) to maintain a decent image on screen but ultimately this will degenerate into a B&W quite grainy image but only on the screen. The captured image will be fine. My only observation to this point is that there are so many functions available and so many choices I begin to wonder if we are reaching saturation.
LIGHTBOX MODE: A feature that has been offered previously in some Olympus DSLR's (particularly the E-3) is the ability to view images, magnified or not, side by side on the LCD - great for checking details. It is simple to access this feature with the E-620; enter review mode by pressing the review button and then press the AF Area button [---]. This places the next image on the card next to the one on the screen you have just been reviewing and you can cycle through the card contents with the 4-way controller just as you do when reviewing your images normally. Excellent!
MANUAL FOCUS WITH LEGACY LENSES: I know there will be interest in the potential use of manual lenses on the E-620 and how well its new viewfinder fares against other E-Cameras. I have used my OM 90mm Macro indoors and to me, manual focus with the E-620 is only marginally better than with the E-4/5XX series - which was pretty poor. Yes the new screen is slightly larger and certainly brighter, but it is simply not good enough to accurately focus manually. But for tripod work you have the benefit of LV and its 7/10X magnification for really accurate focus. And this is what I use when doing indoor studio/macro work with OM lenses. I'm not saying you cannot use your old OM lenses via the optical viewfinder; I am saying that if you do, exploit the benefits of depth of field and hyperfocal distance to your advantage to give you the best chance of good focus. You cannot rely on the screen. For those interested in my previous work with OM Zuiko's on the E-1 you can go to that article here .
WRITE SPEEDS WITH DIFFERENT CARDS: WRITE SPEEDS The E-620 takes advantage of the latest read and write speed technology both in-camera and on-card. There is definite advantages in choosing high speed Compact Flash cards. I set the camera to M mode; Shutter speed 1/250th and aperture = 2.8; MF focus; LSF jpg; ISO 200. I shot a burst of 5 frames and measured the time the 'busy' light glowed from start to finish. Here's the results of some testing I did with various cards including the Olympus/Fuji xD ones.
1. With 1GB xD 'M' Type Olympus Card = 21 seconds - pedestrian! 2. With 2GB xD 'H' Type Fuji Card = 14 seconds - better than I thought. 3. With Kingston Elite Pro 133X 4GB CF Card = 8 seconds - that's better. 4. With SanDisk Extreme III (Mk II 30MB/sec) 4GB CF Card = 5 seconds. 5. With SanDisk Extreme IV (type 1) 4GB CF Card = 3.5 seconds.
I've said it before and I'm going to say it again; xD cards are fit only for back-up in an Olympus DSLR. Please do not use them as your primary card. Why go to the bother of equipping the E-620 with a 128MB buffer and super fast processing and write/read ability to have the whole thing strangled by the out-moded xD card. Why are Olympus persisting with the xD card slot when either another CF slot or a SD slot would offer so much more by way of choice AND speed? Now that xD tecnological advances have ground to a halt (we were promised more capacity and speed) surely it's time to assign these horrible little cards to the history bin? The Olympus compact and bridge camera range would be better off without them too as the new generation of SD cards is simply better than xD by a country mile.
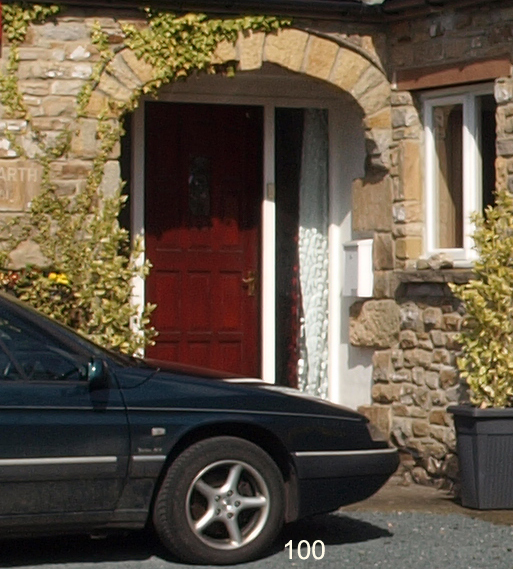
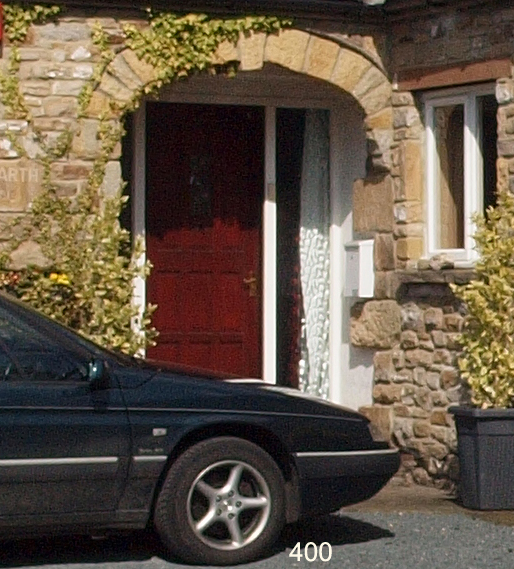
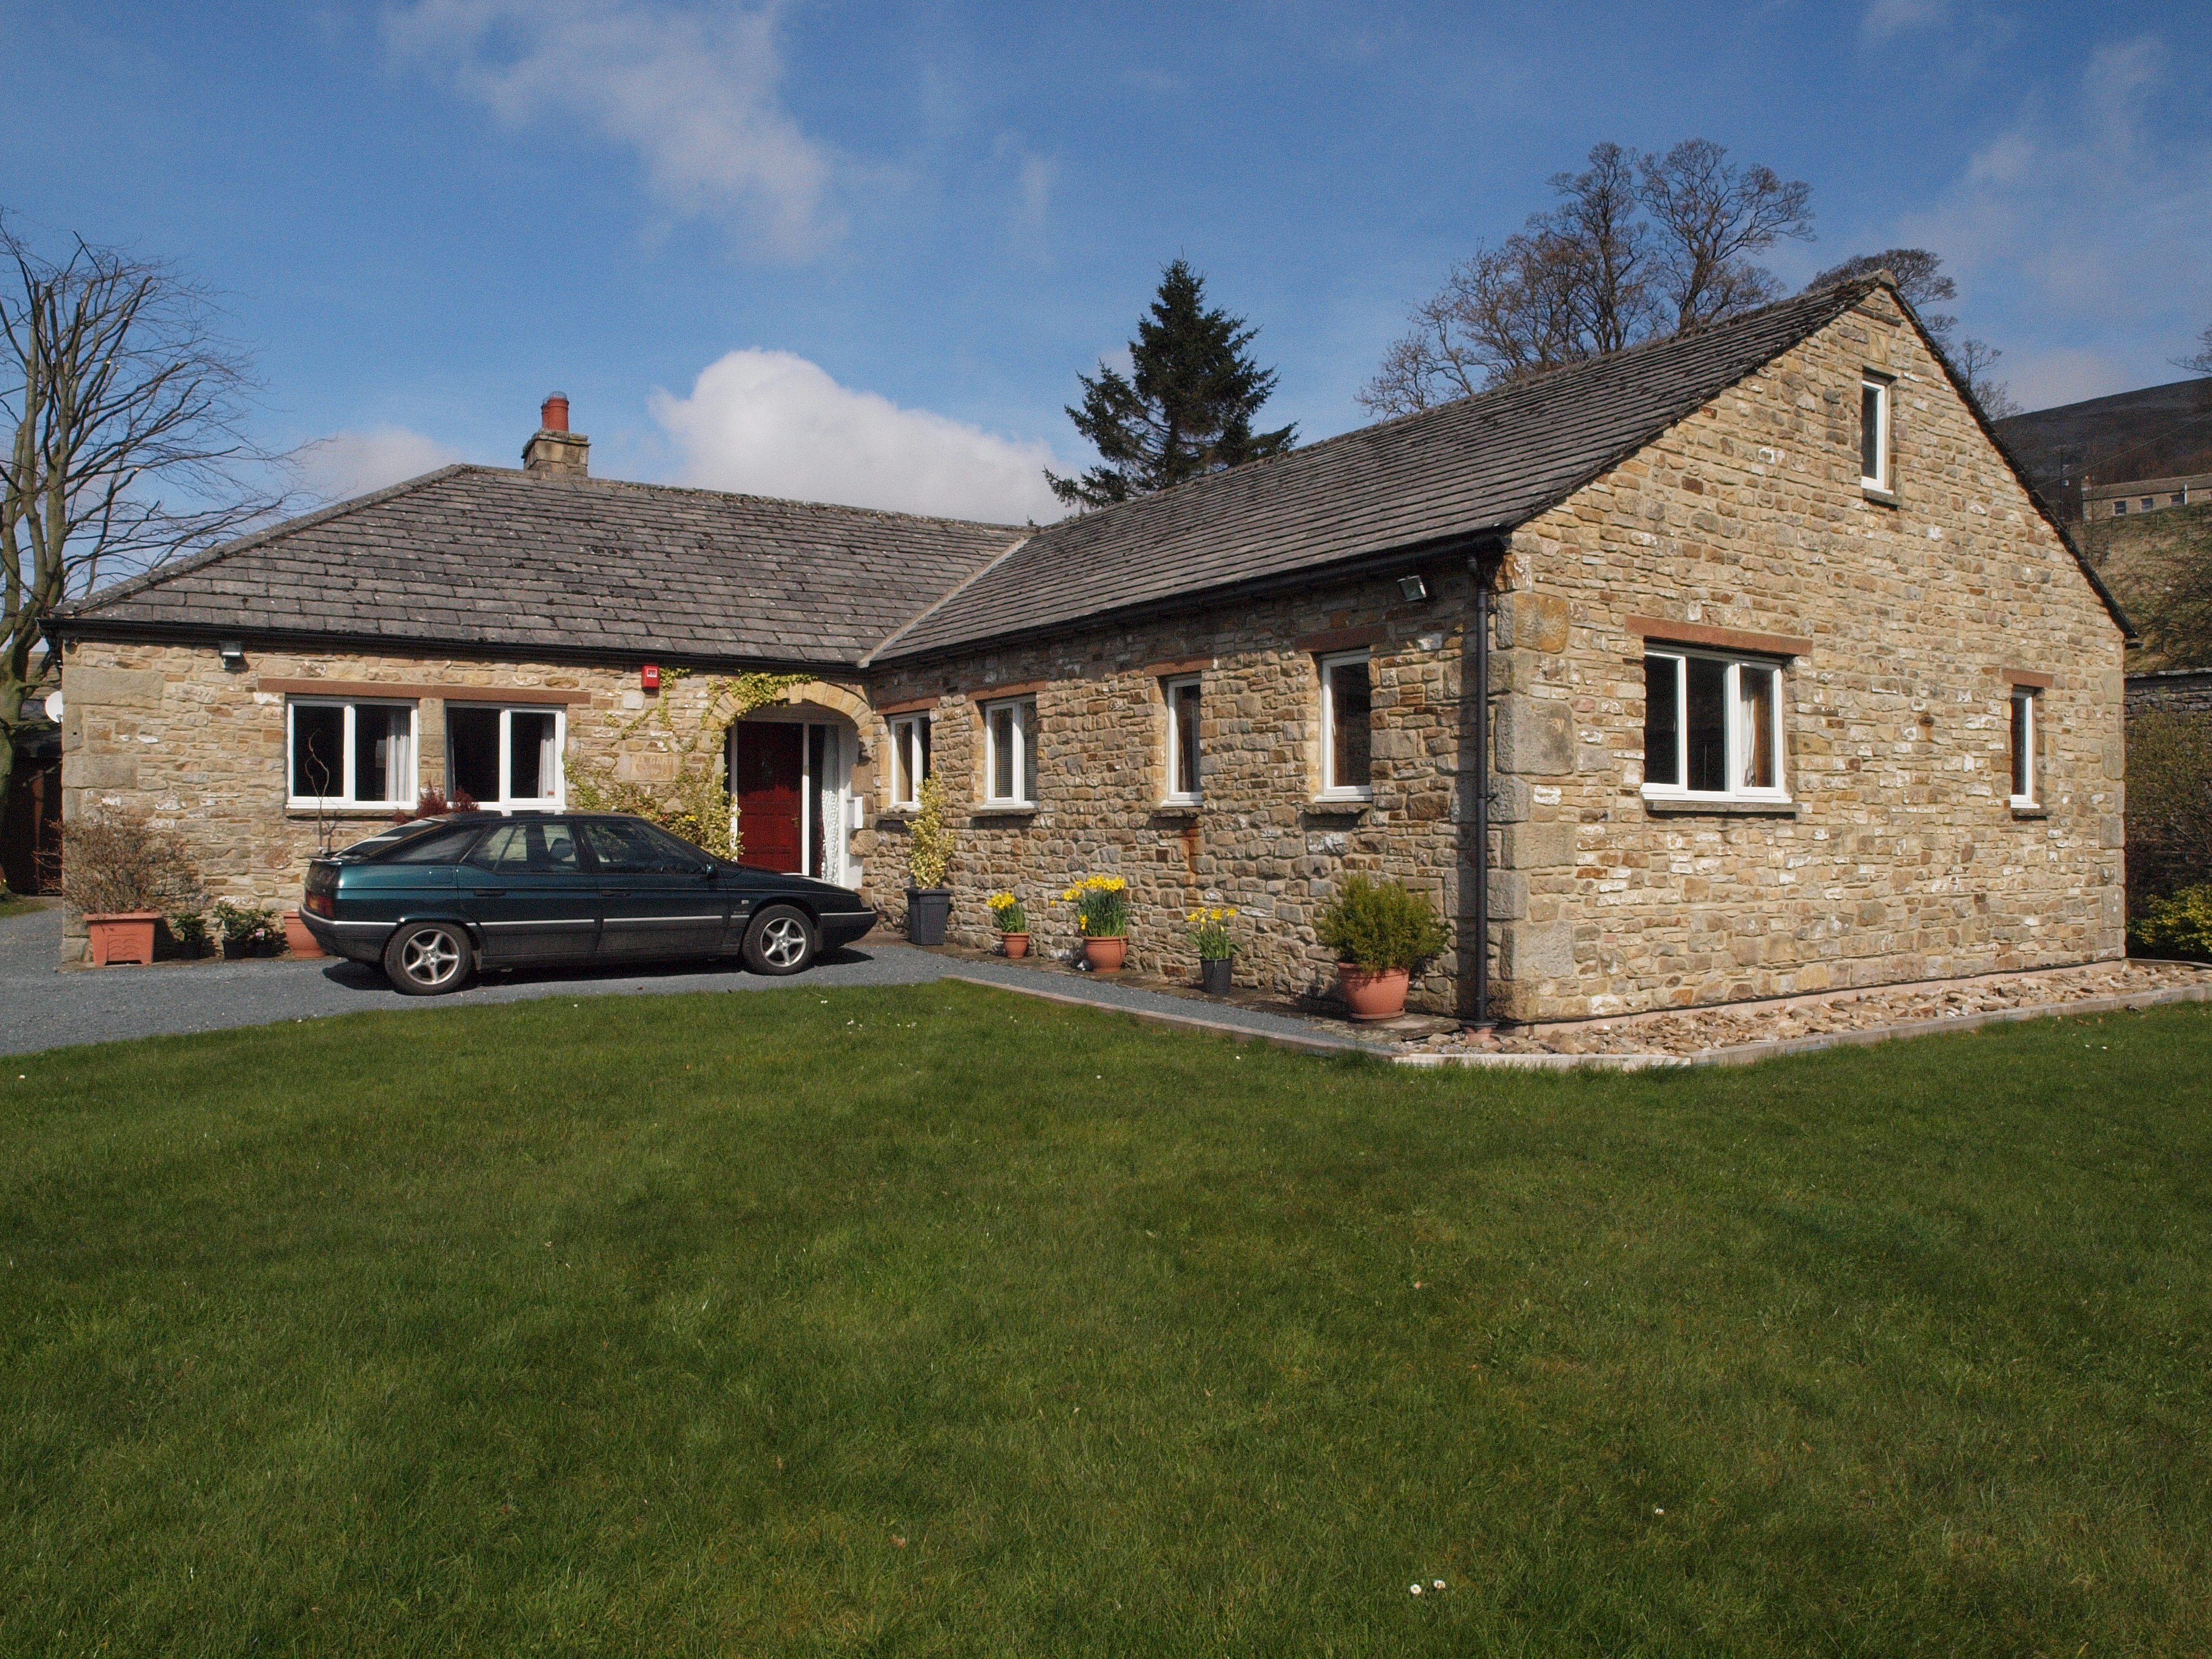
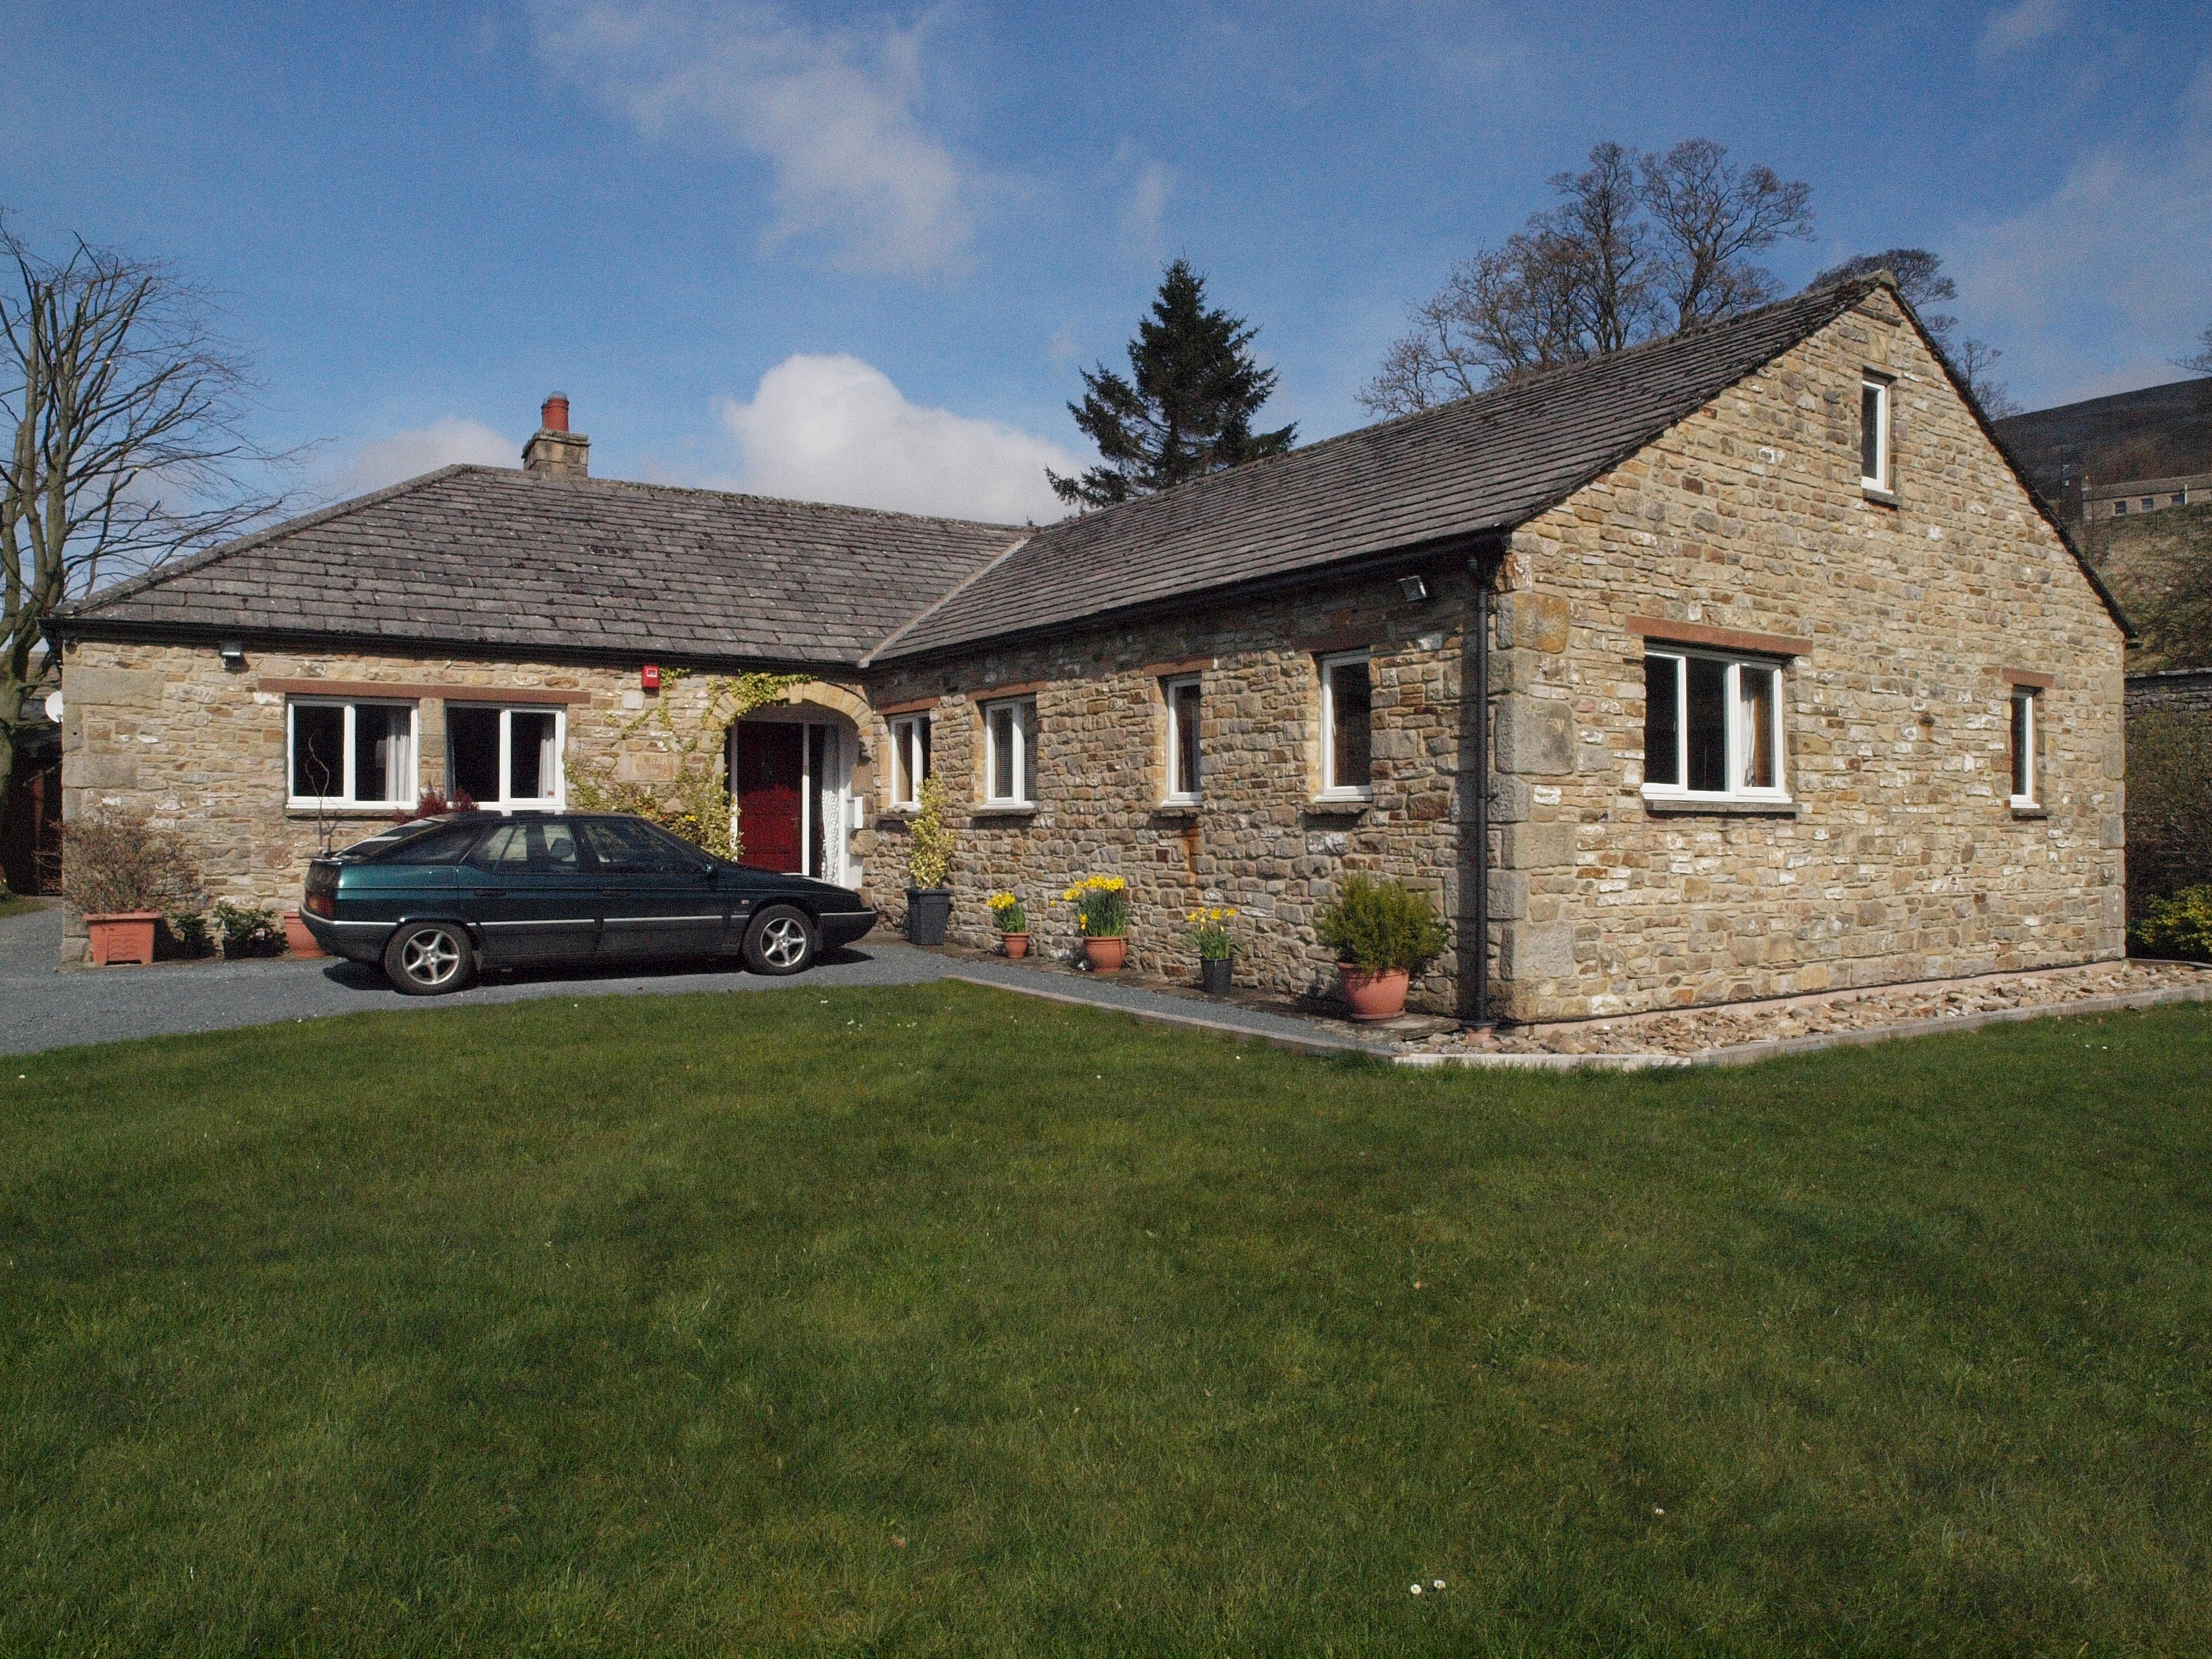
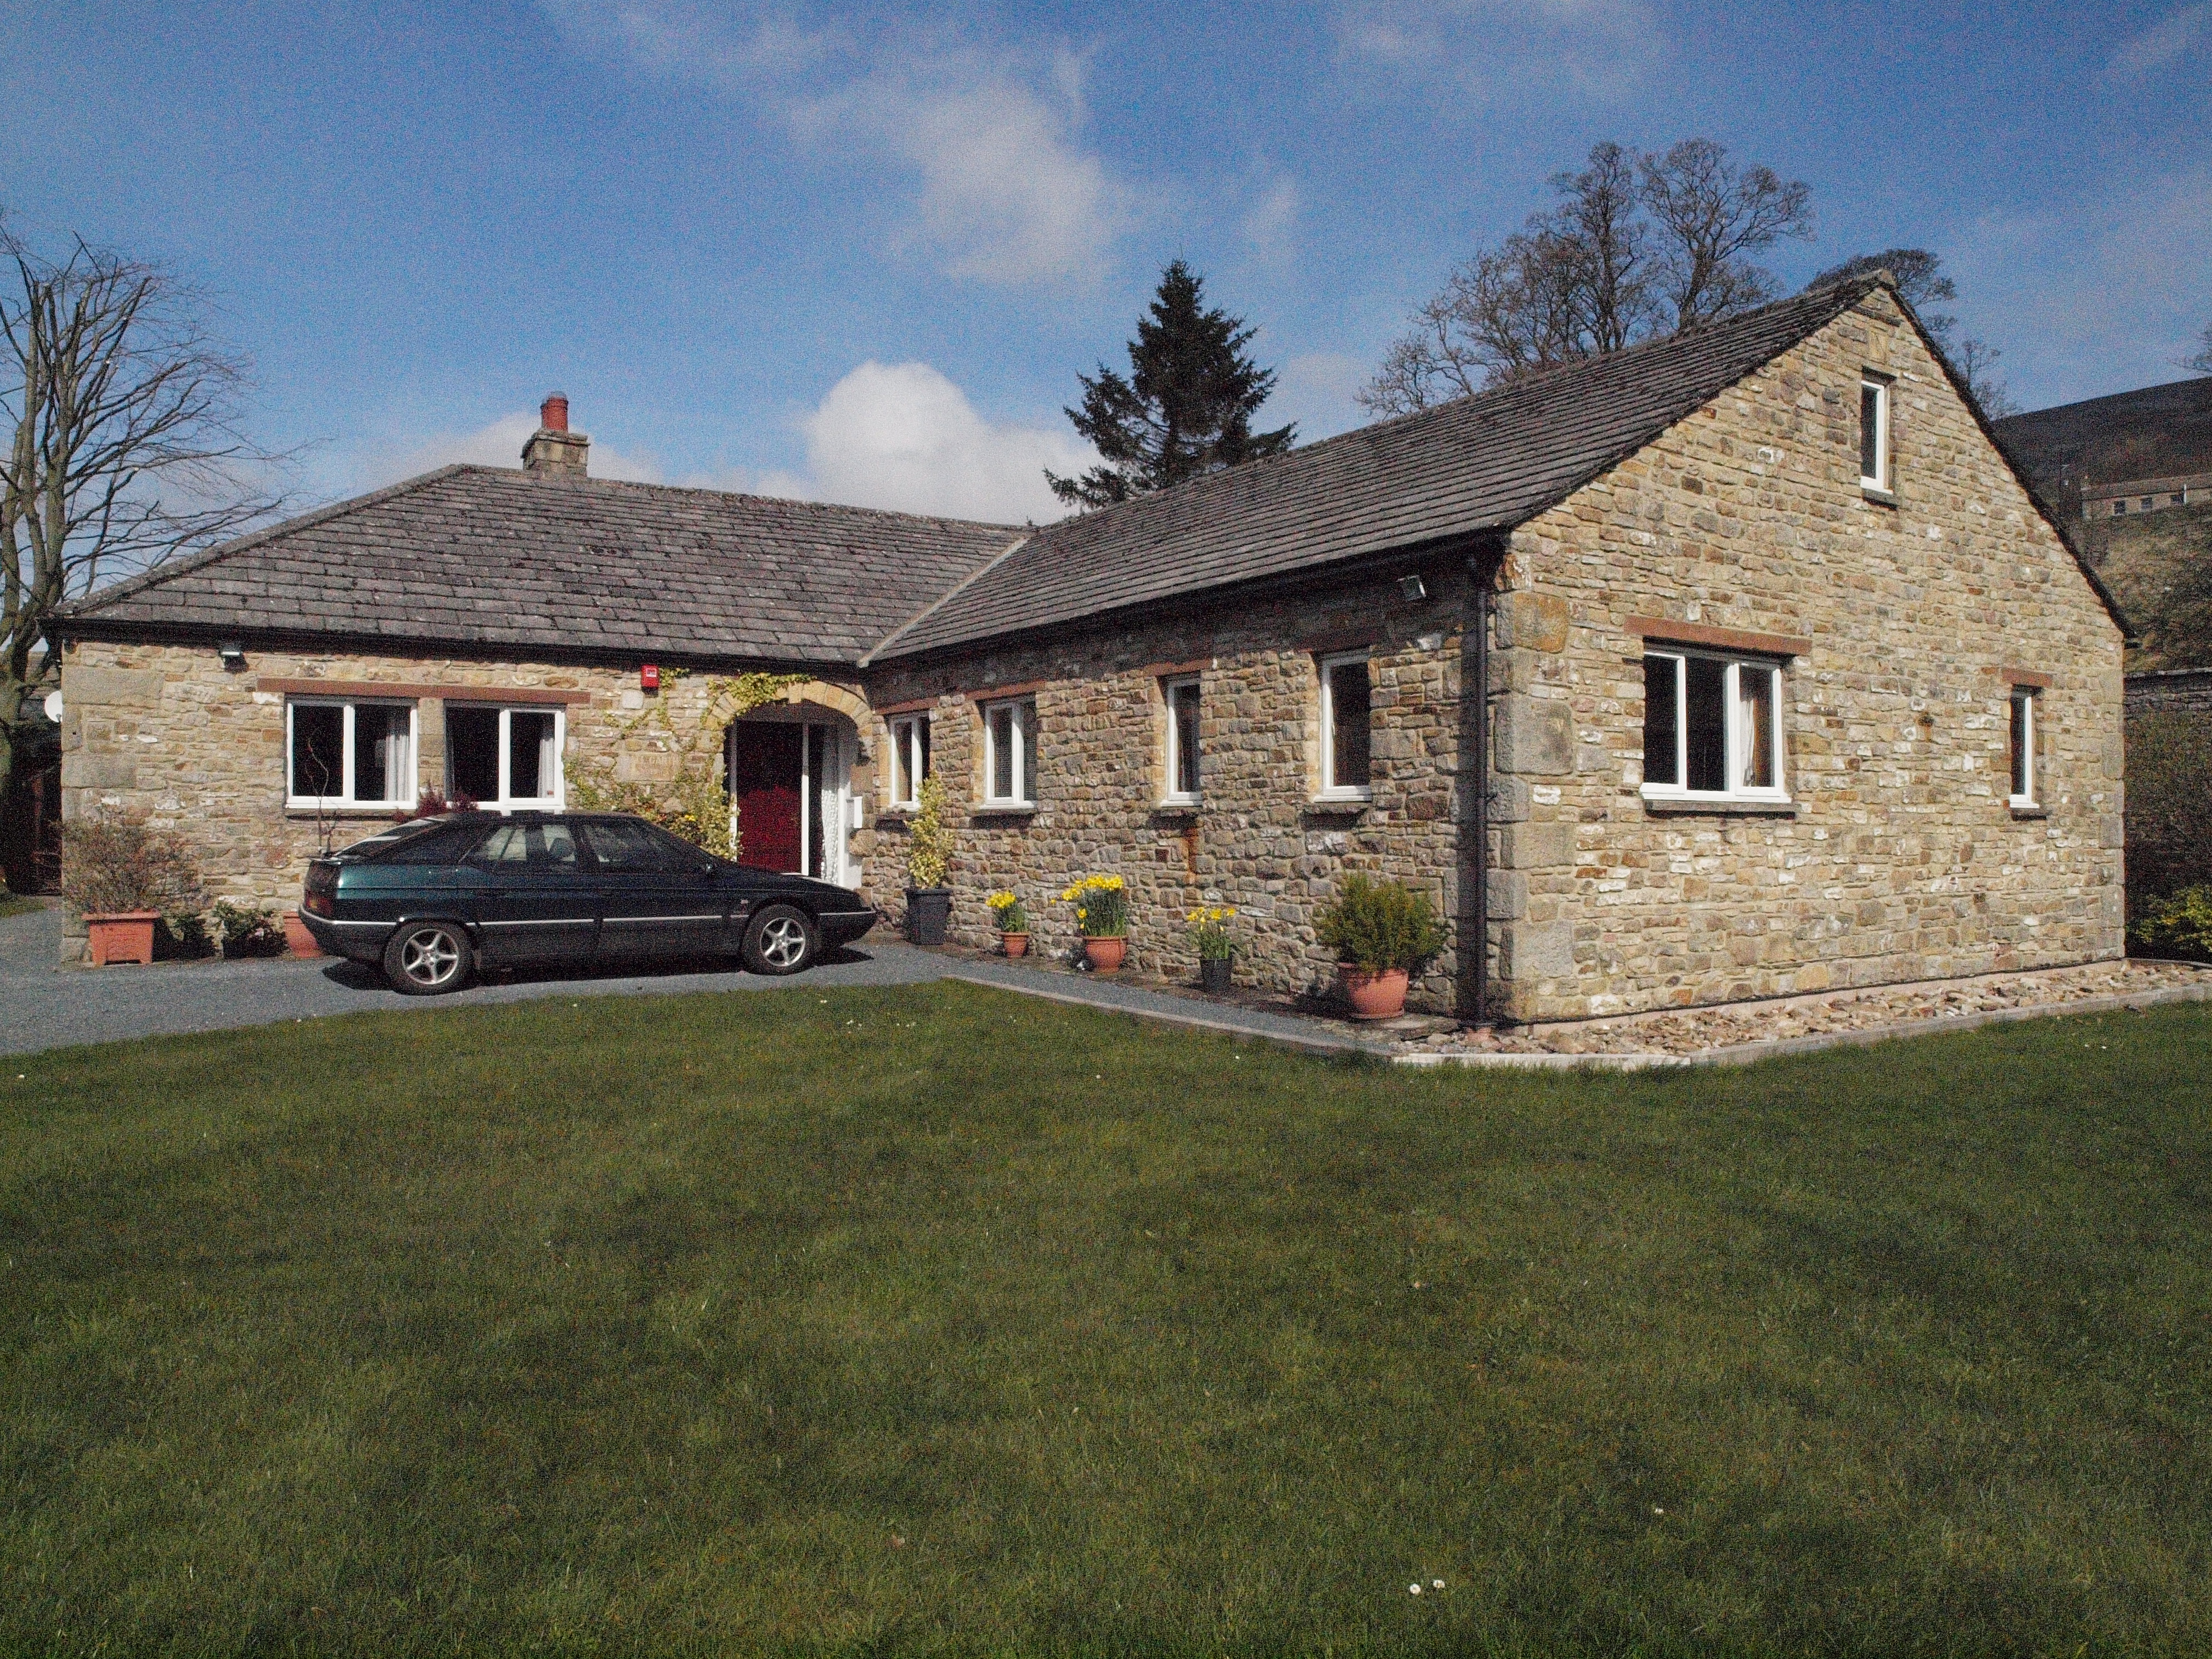
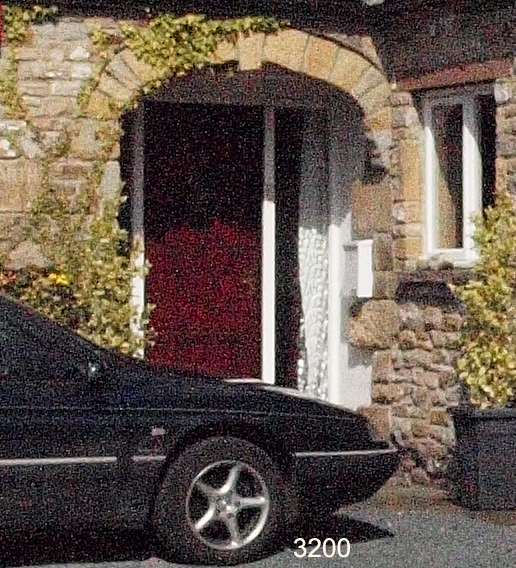
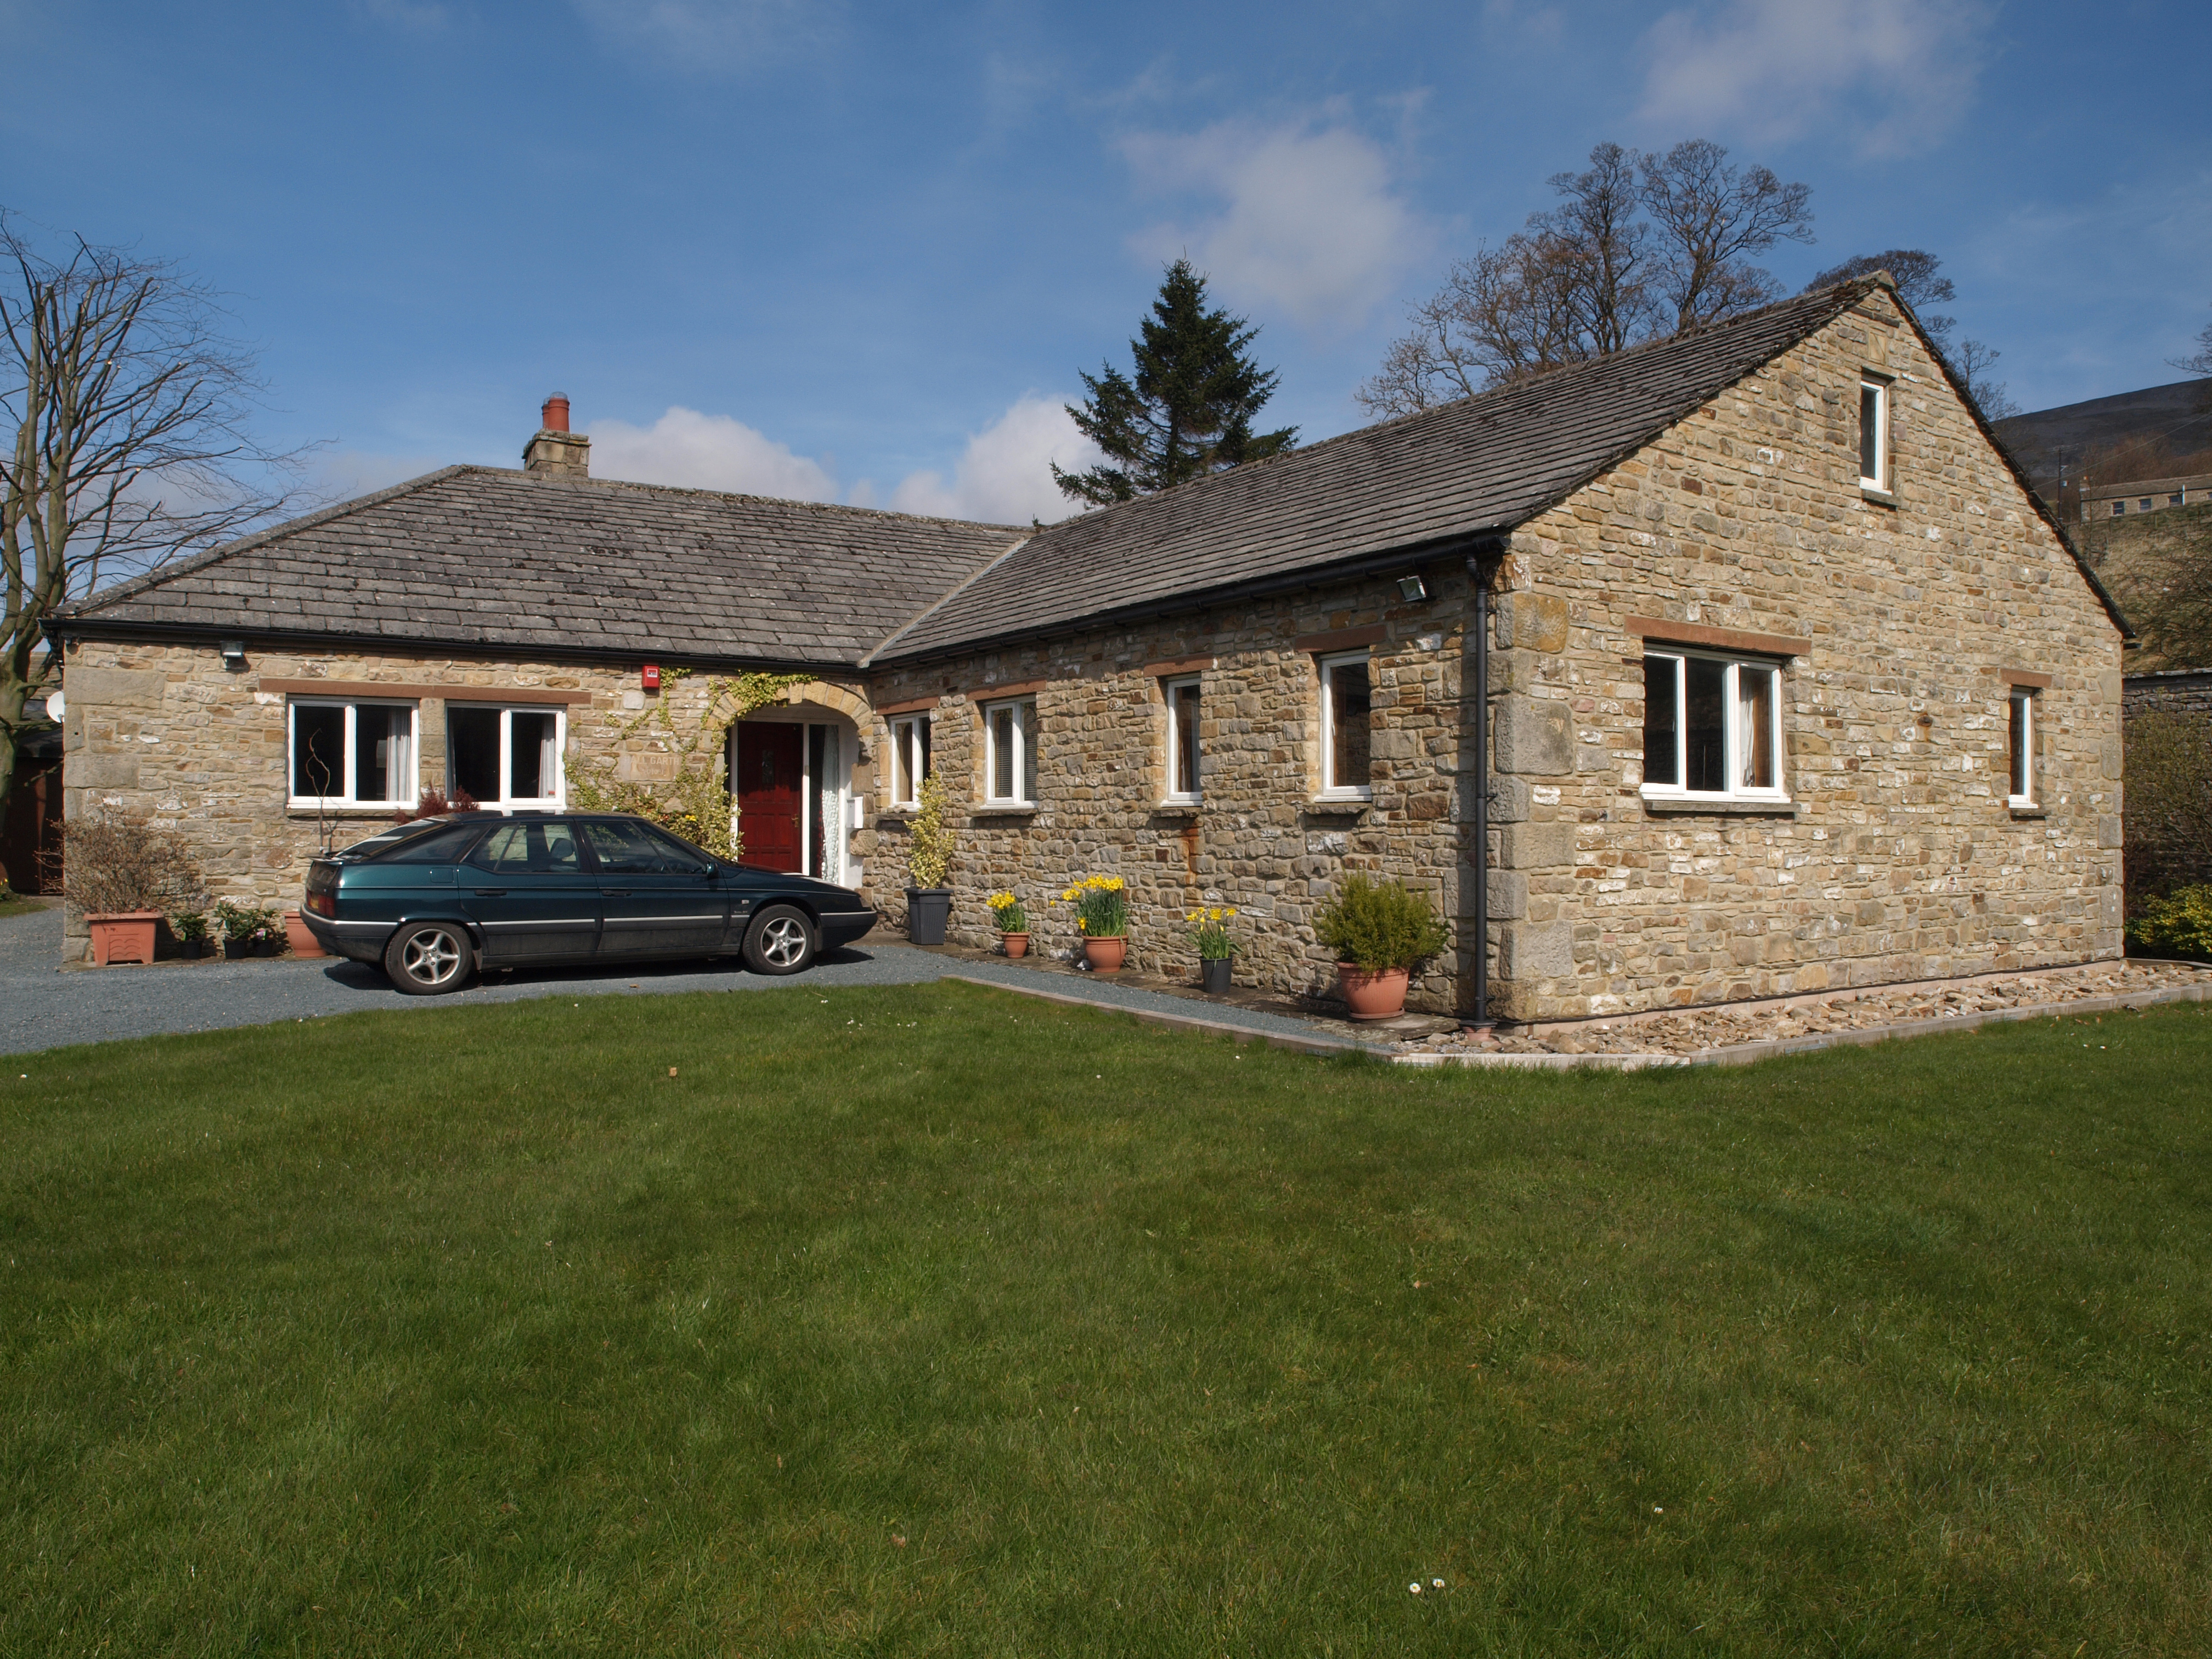
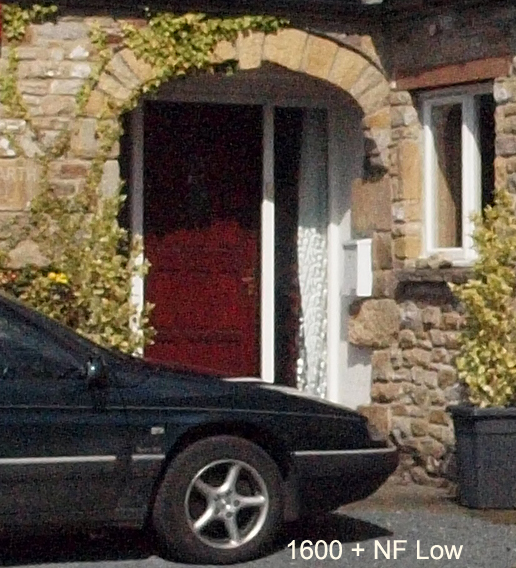
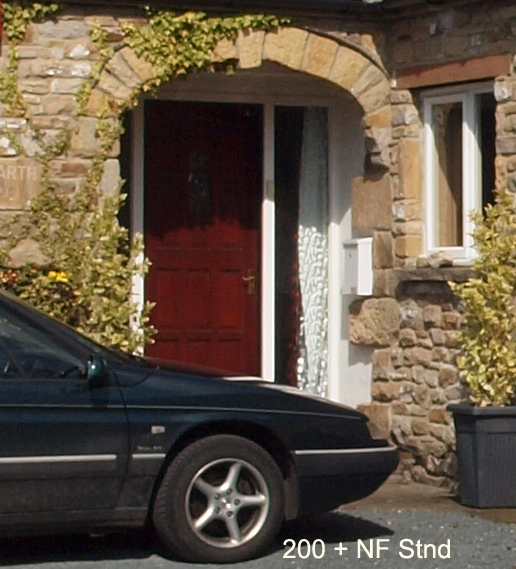
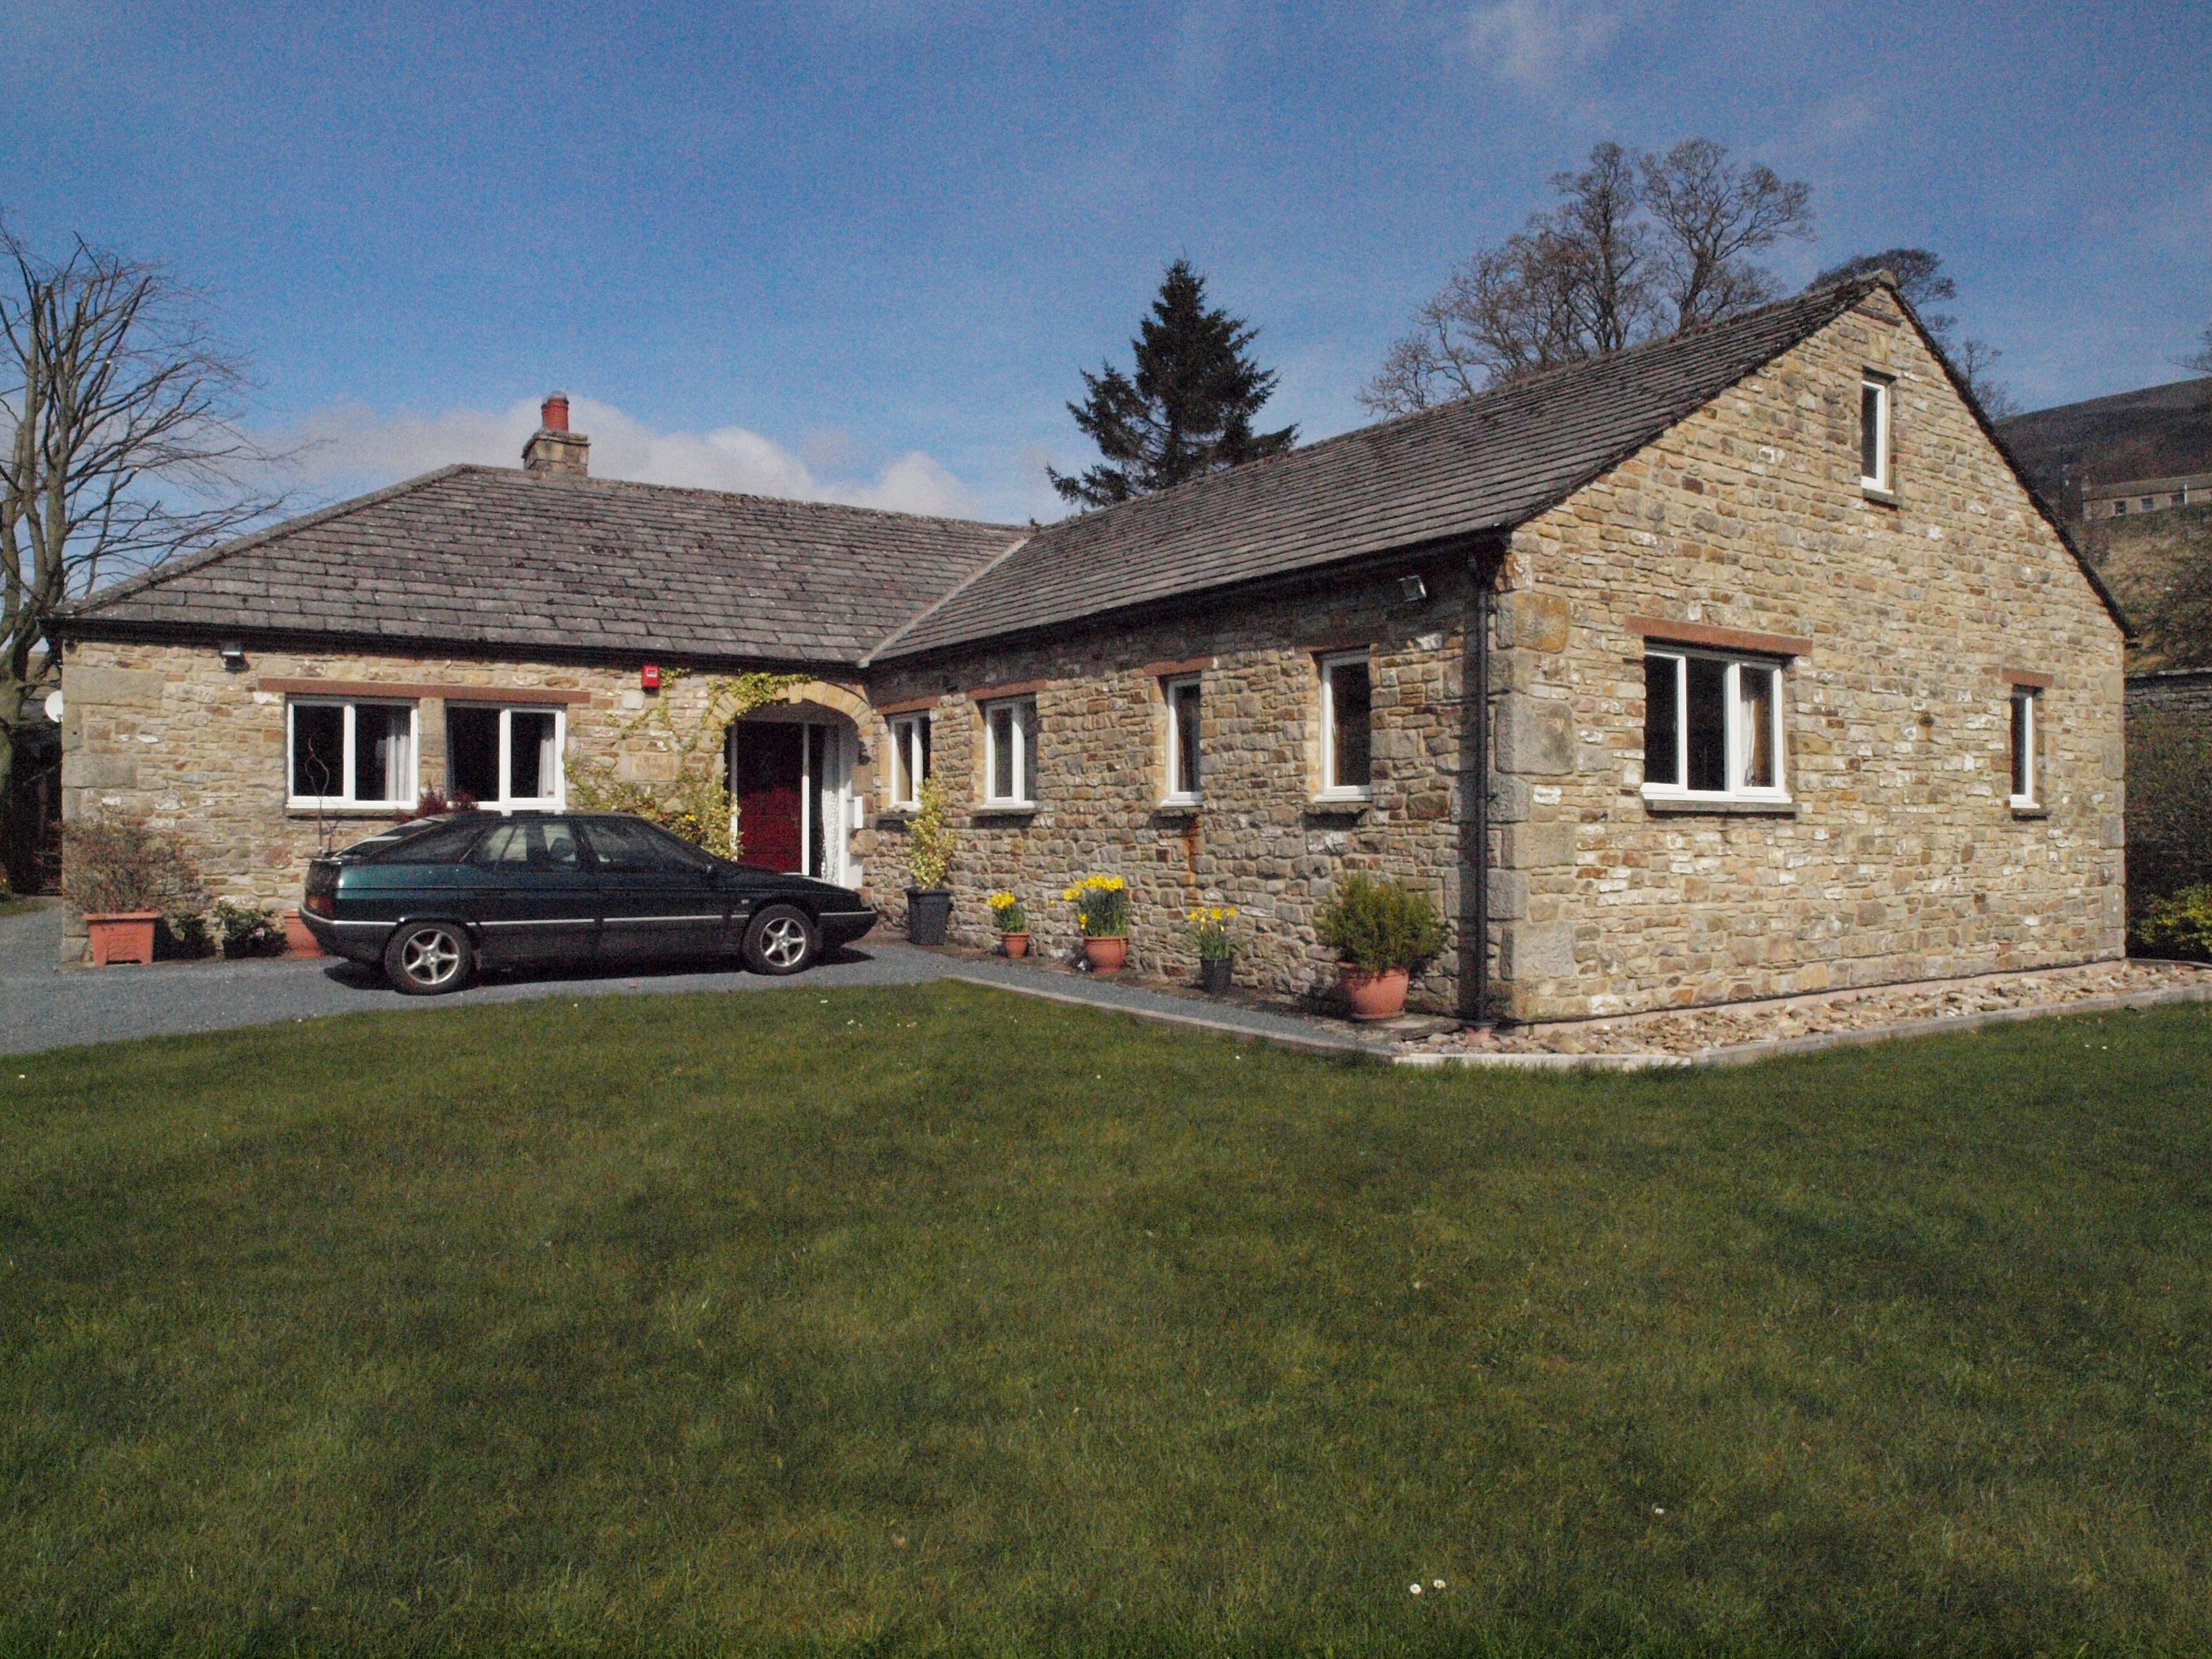
TEST IMAGES; CRITIQUE; IMAGES FOR DOWNLOAD - JPG & RAW. E-620 - ISO PERFORMANCE - FIRST SERIES, NOISE FILTER OFF: The first set of images is to show ISO performance throughout the range; 100, 200, 400, 800, 1600, 3200. The images were taken using the ZD12-60mm at 12mm, f=13, (to avoid running out of shutter speed at high ISO), IS=OFF, ESP metering, no compensation, noise filter off, noise reduction off, gradation normal, all else default setting. File setting RAW+LSF. Camera is tripod mounted and shutter tripped with remote control. I repeat, this series was taken at f=13 so I can maintain exactly the same settings throughout the series, otherwise I'd run out of shutter speed on reaching high ISO values in these particualr lighting conditions. Also, the purpose of this series is for you to decide if the various parameters you are examining, noise, filtering, banding etc, meet with your expectations or otherwise, so please don't email me asking why I didn't apply compensation to make the subject 'look' better. You have lots of files straight from the camera set more or less to default, in RAW so you can apply various changes in your processing software to see the results yourself. I have cropped out a section around the front door that shows highlight and shadow to show how the sensor deals with each end of the spectrum. If you click the image and enlarge it will show it at full size. You may also download either LSF jpg or RAW file for direct comparison yourself. Yes, I agree this is boring (I was bored putting this section together). However, it is the best way to directly compare how much noise the sensor produces at various gain settings and how the on-board software filters the noise. From the RAW files you can judge for yourself if your current RAW developing software can deal with E-620 files, how much headroom there is left for any highlight recovery and which third party noise reduction software you wish to deploy.
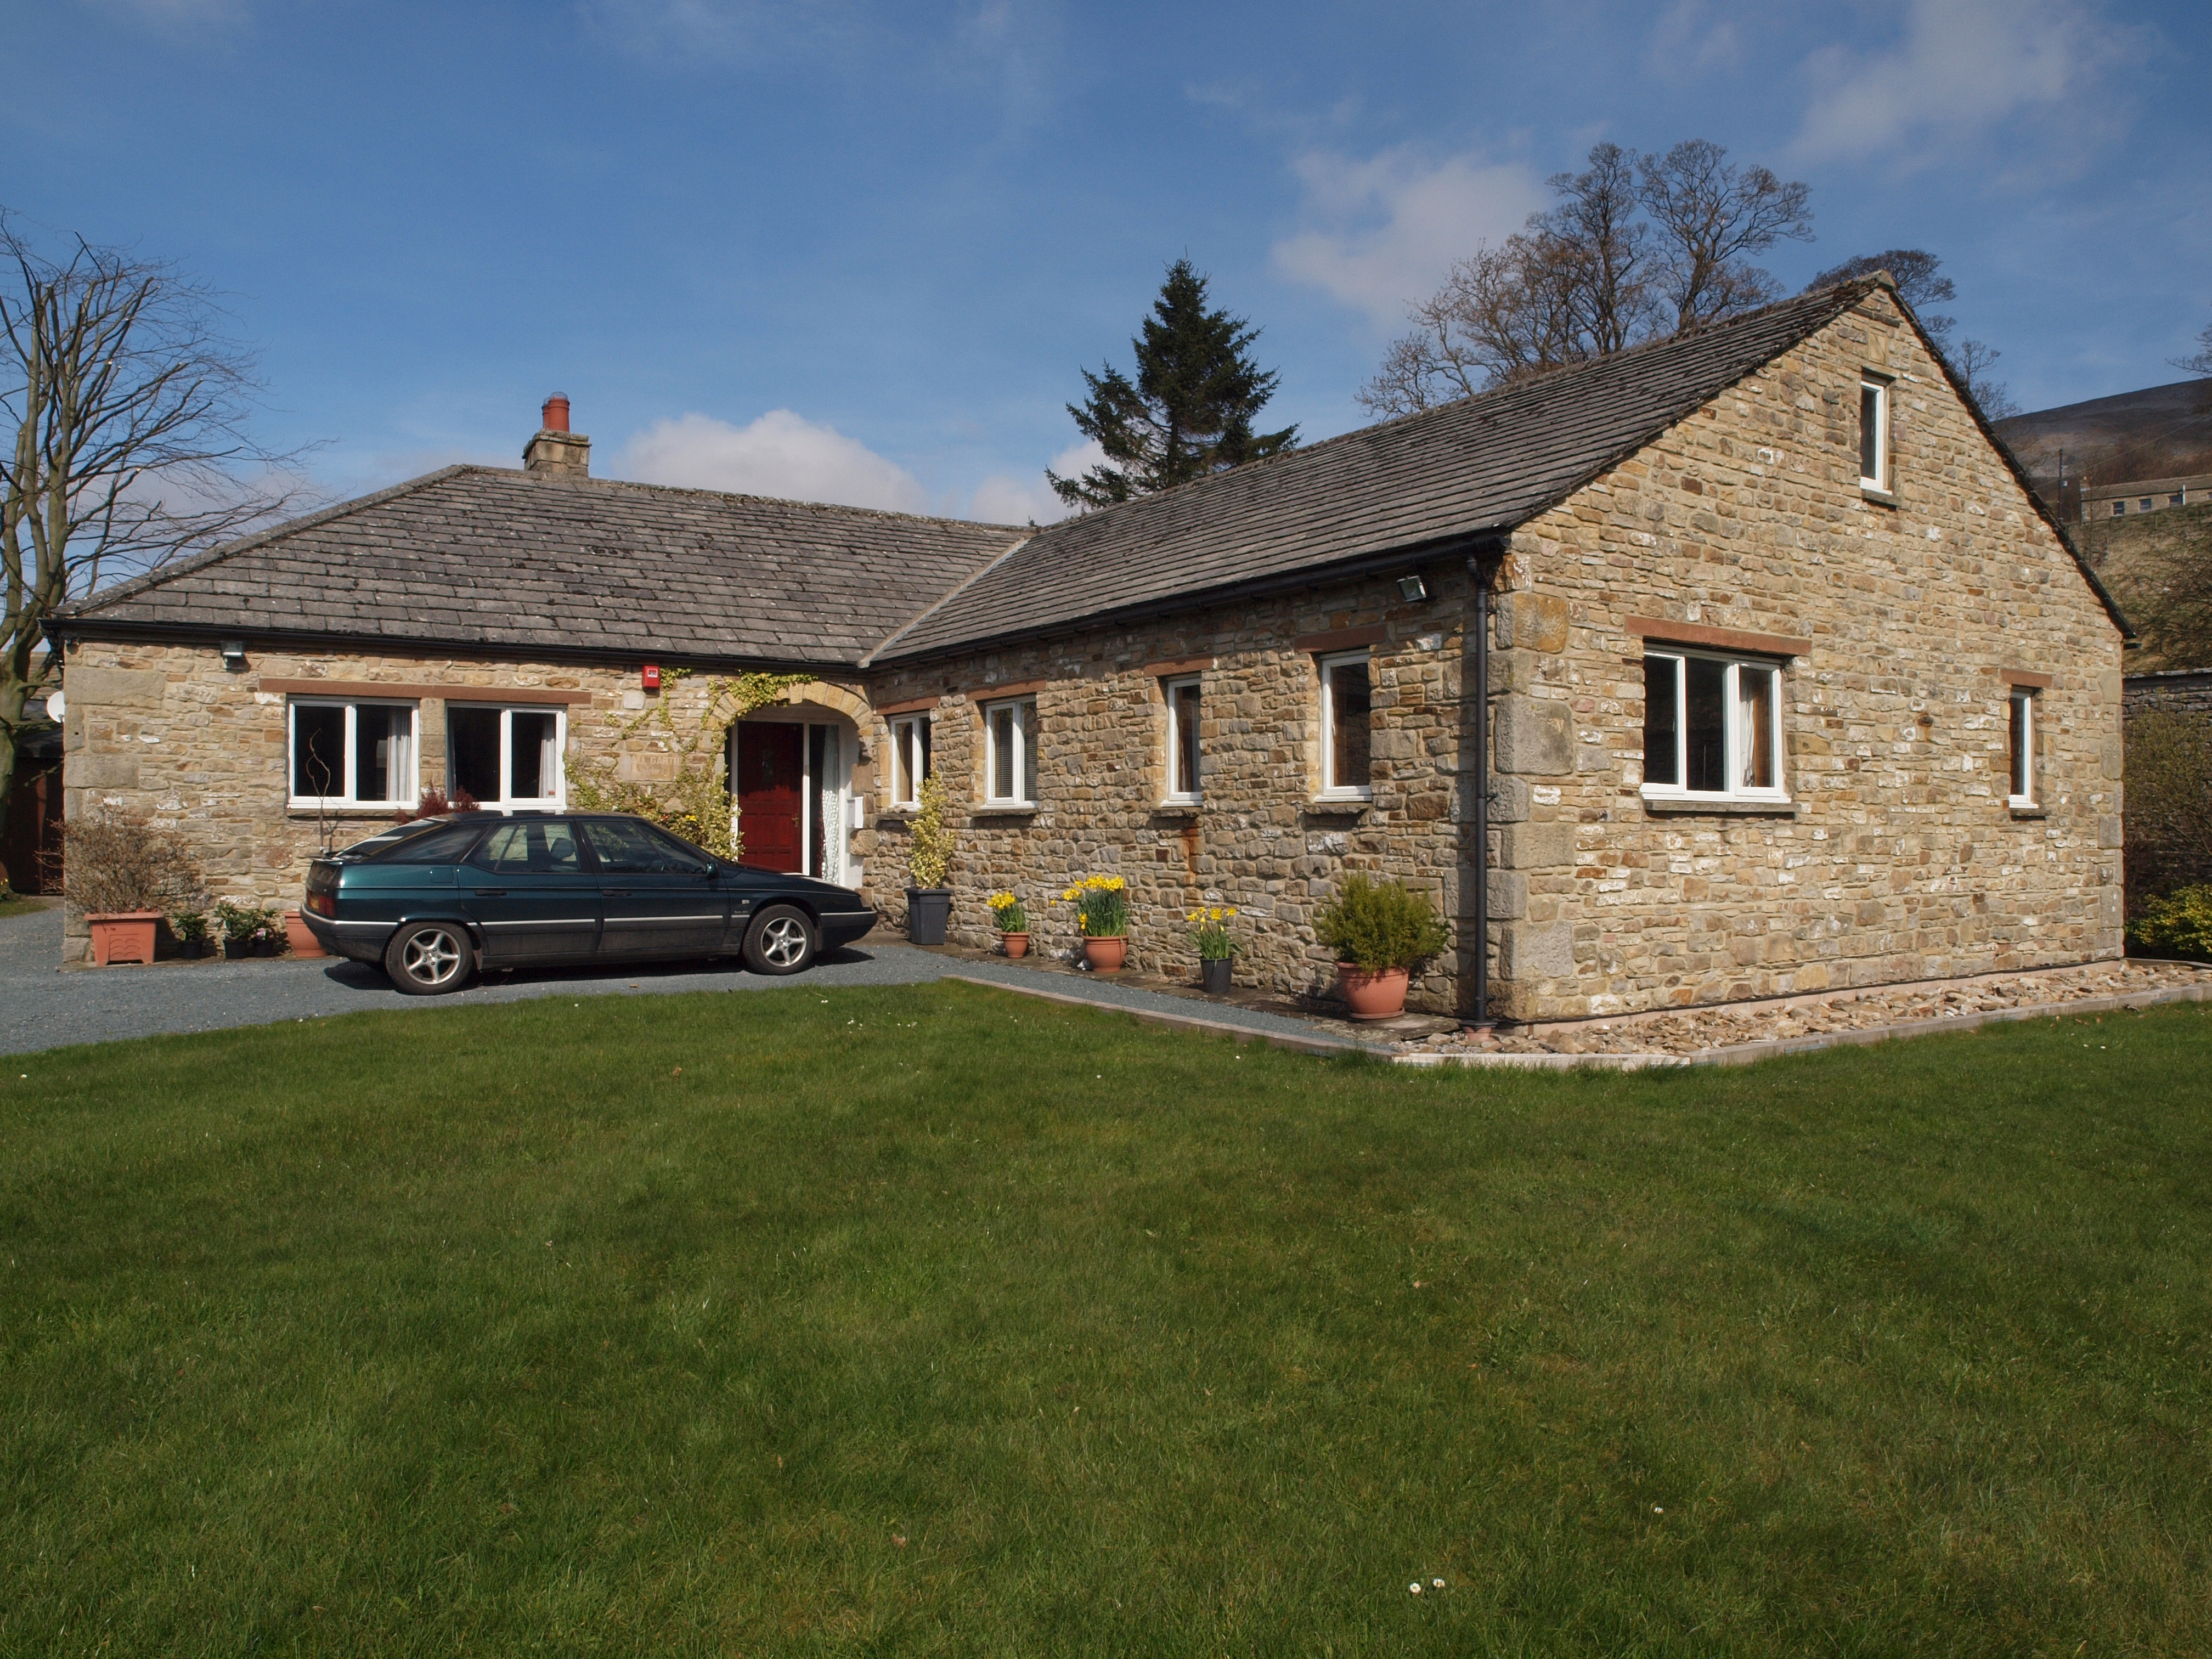
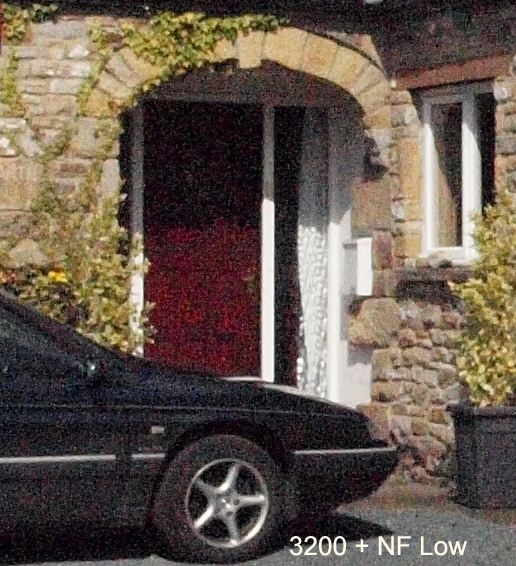
SECOND SERIES, NOISE FILTER SET to LOW (all else as above): Is a straight duplication of the above set of images with identical camera settings but Noise Reduction set to LOW.
| |||||||||||||||||||||||||||||||||||||||||||
|
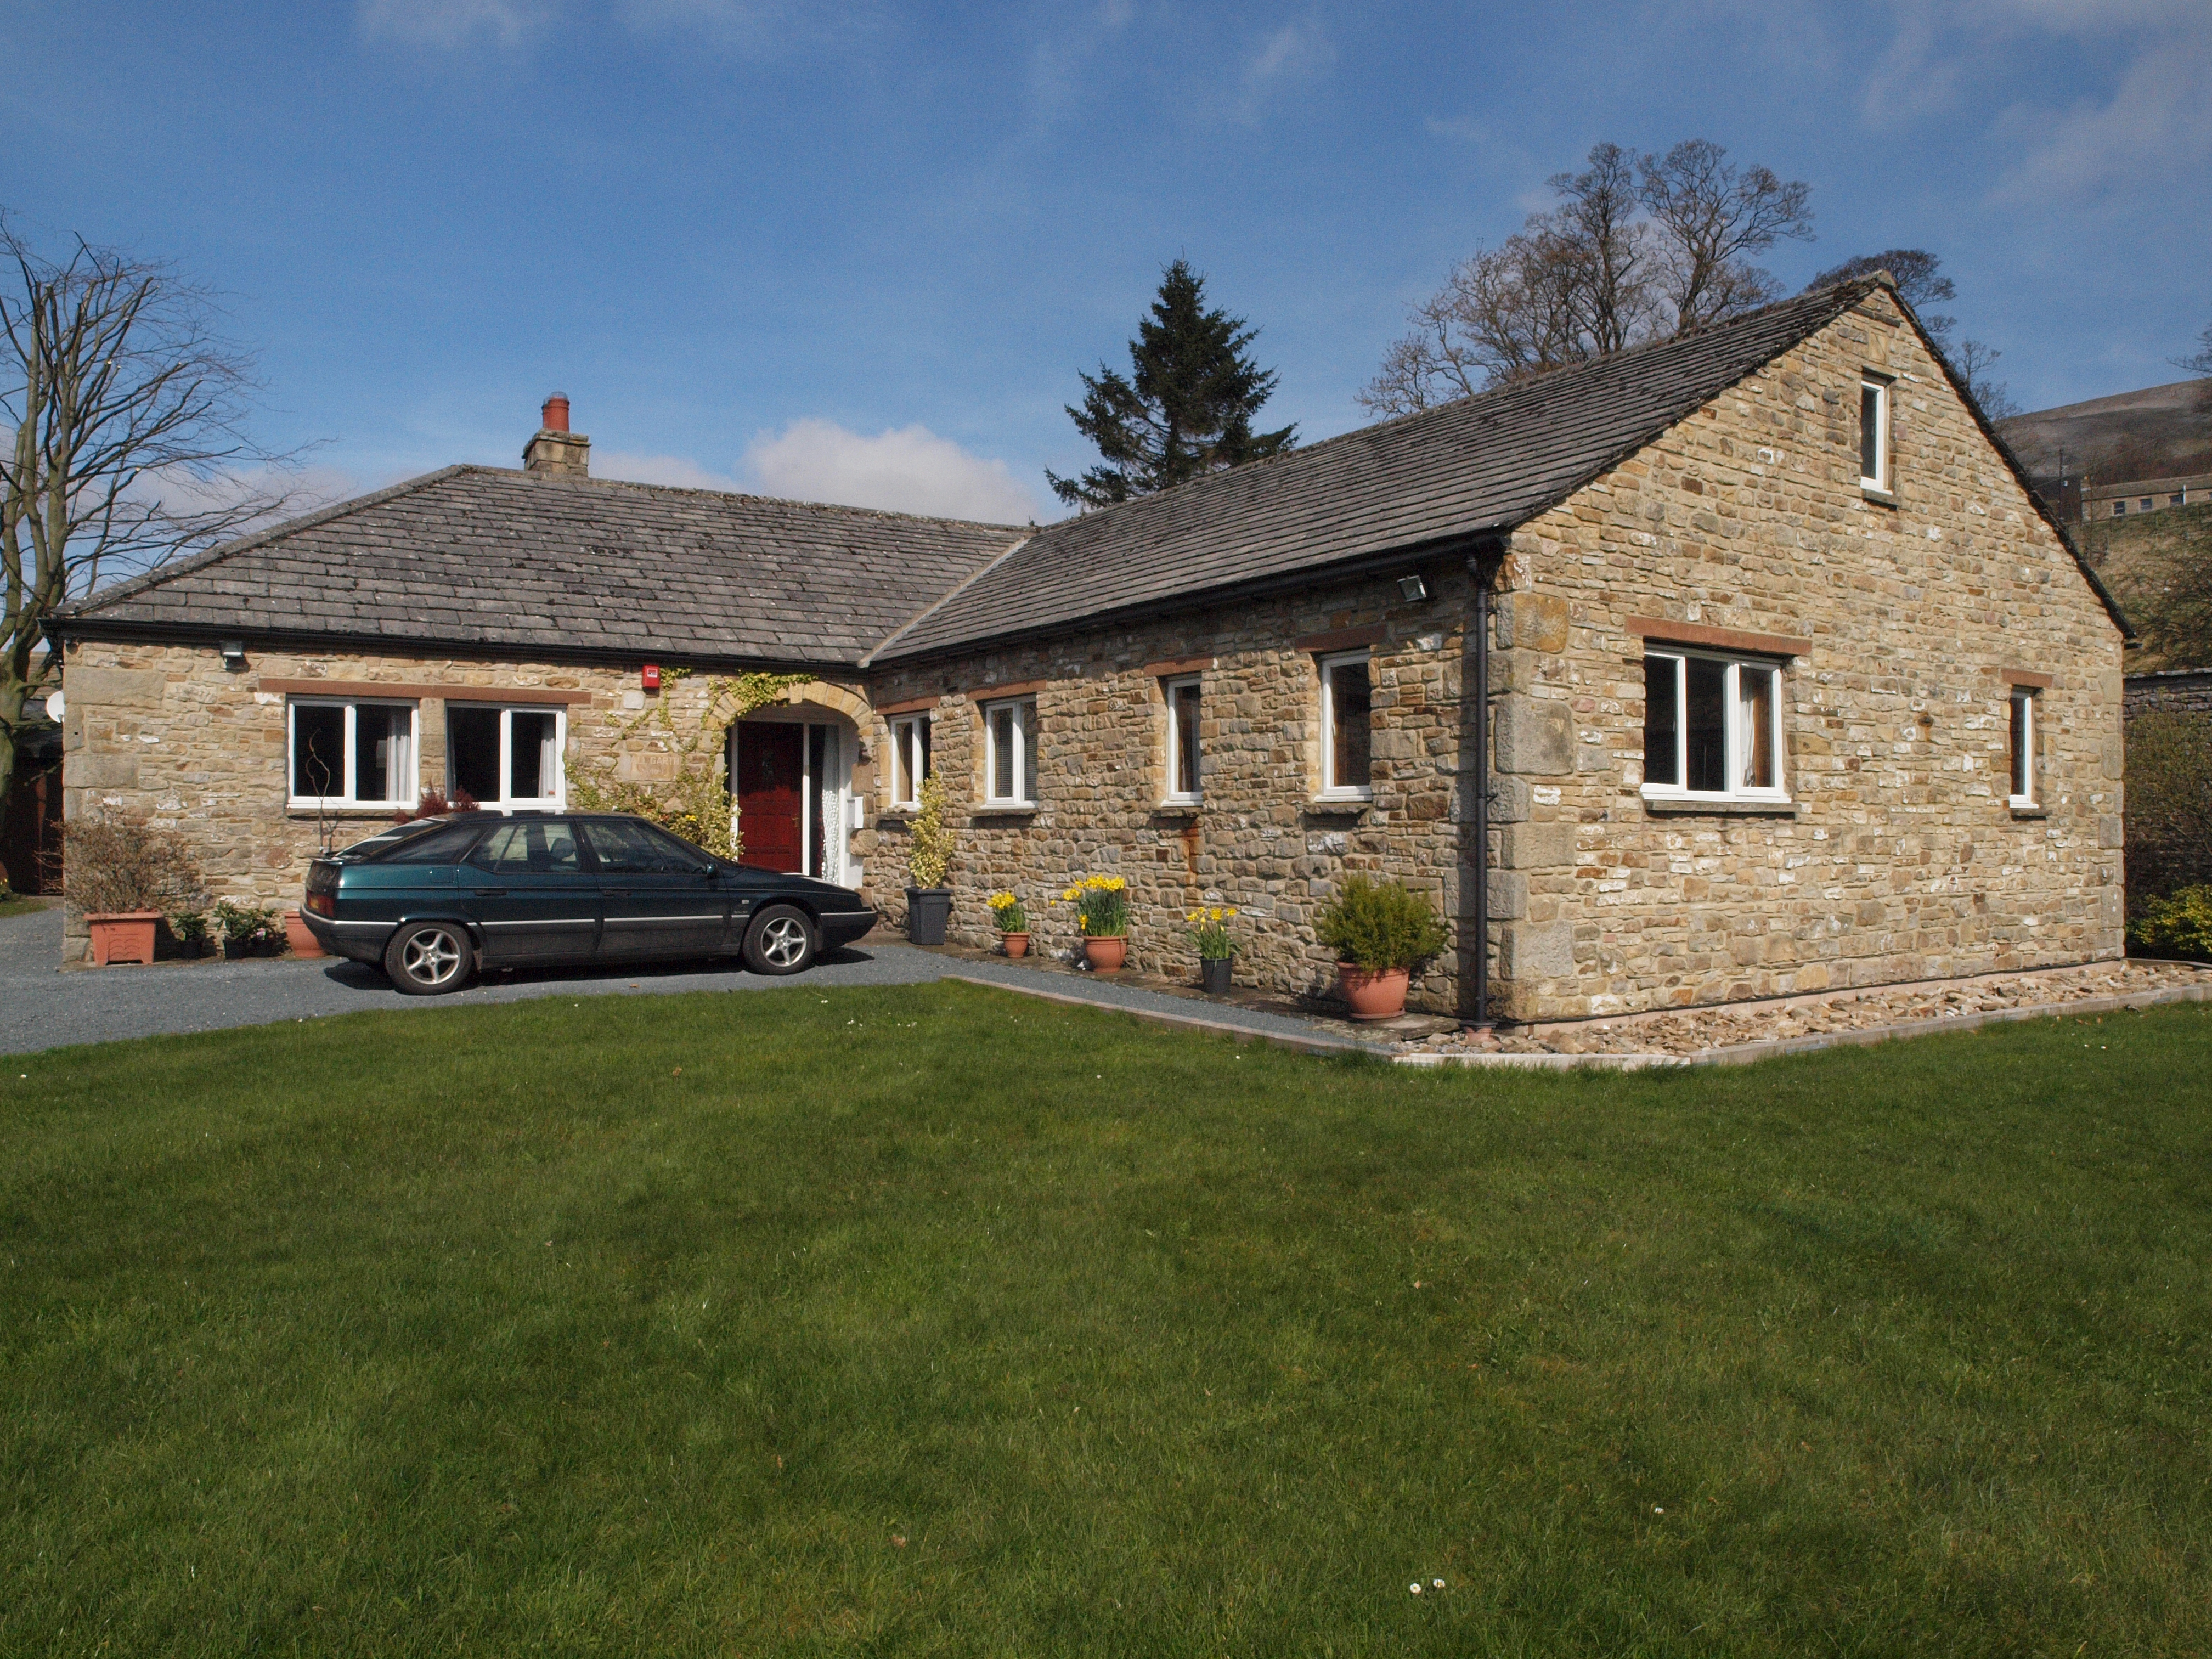
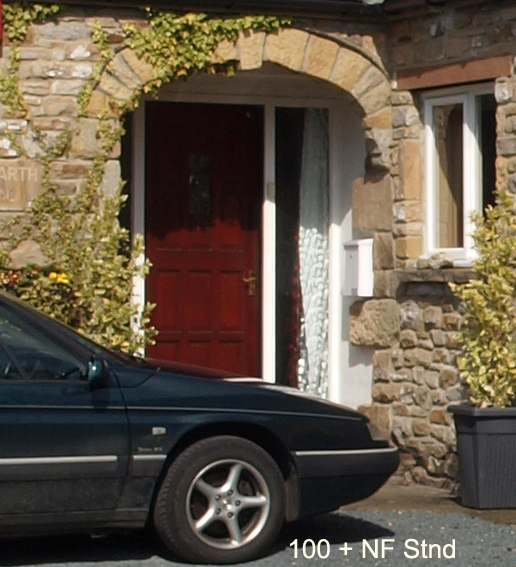
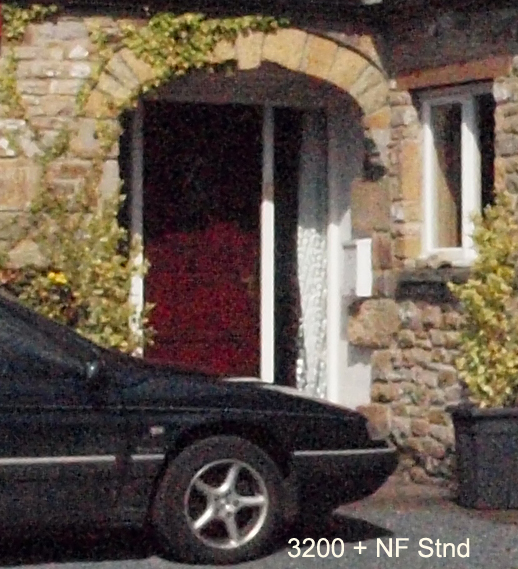
THIRD SERIES, NOISE FILTER SET TO STANDARD (all else as above): Is a straight duplication of the above set of images with identical camera settings but Noise Reduction set to STANDARD.
I did undertake a series with the noise filter set to HIGH but as I genuinely think no-one will use that settings in anything other than experimental circumstances I haven't included the results. (If you want the files please email me). As a guide imagine the results fom the high noise reduction as twice the magnitude (i.e. softness) as the 'standard' results above. Personally I think the E-620 general noise level is quite acceptable up to ISO 800 and quite useable at ISO 1600. Its upper level should be left for all but emergencies. I've also cropped out the upper left corner of the sky (always a good place to look for sensor noise) from the images taken with Noise Filter set to OFF. It shows the general transistion across the ISO levels:
The sky crops do show the presence of noise starting at ISO 200. But it is subtle and very much like film grain rather than the multi-coloured speckles and therefore much less objectionable. I have no real issue with its noise up to ISO 1600. But please download some of the high ISO images for your critical examination. Or you can put them through your chosen noise reduction software to see how they fare.
| |||||||||||||||||||||||||||||||||||||||||||
|
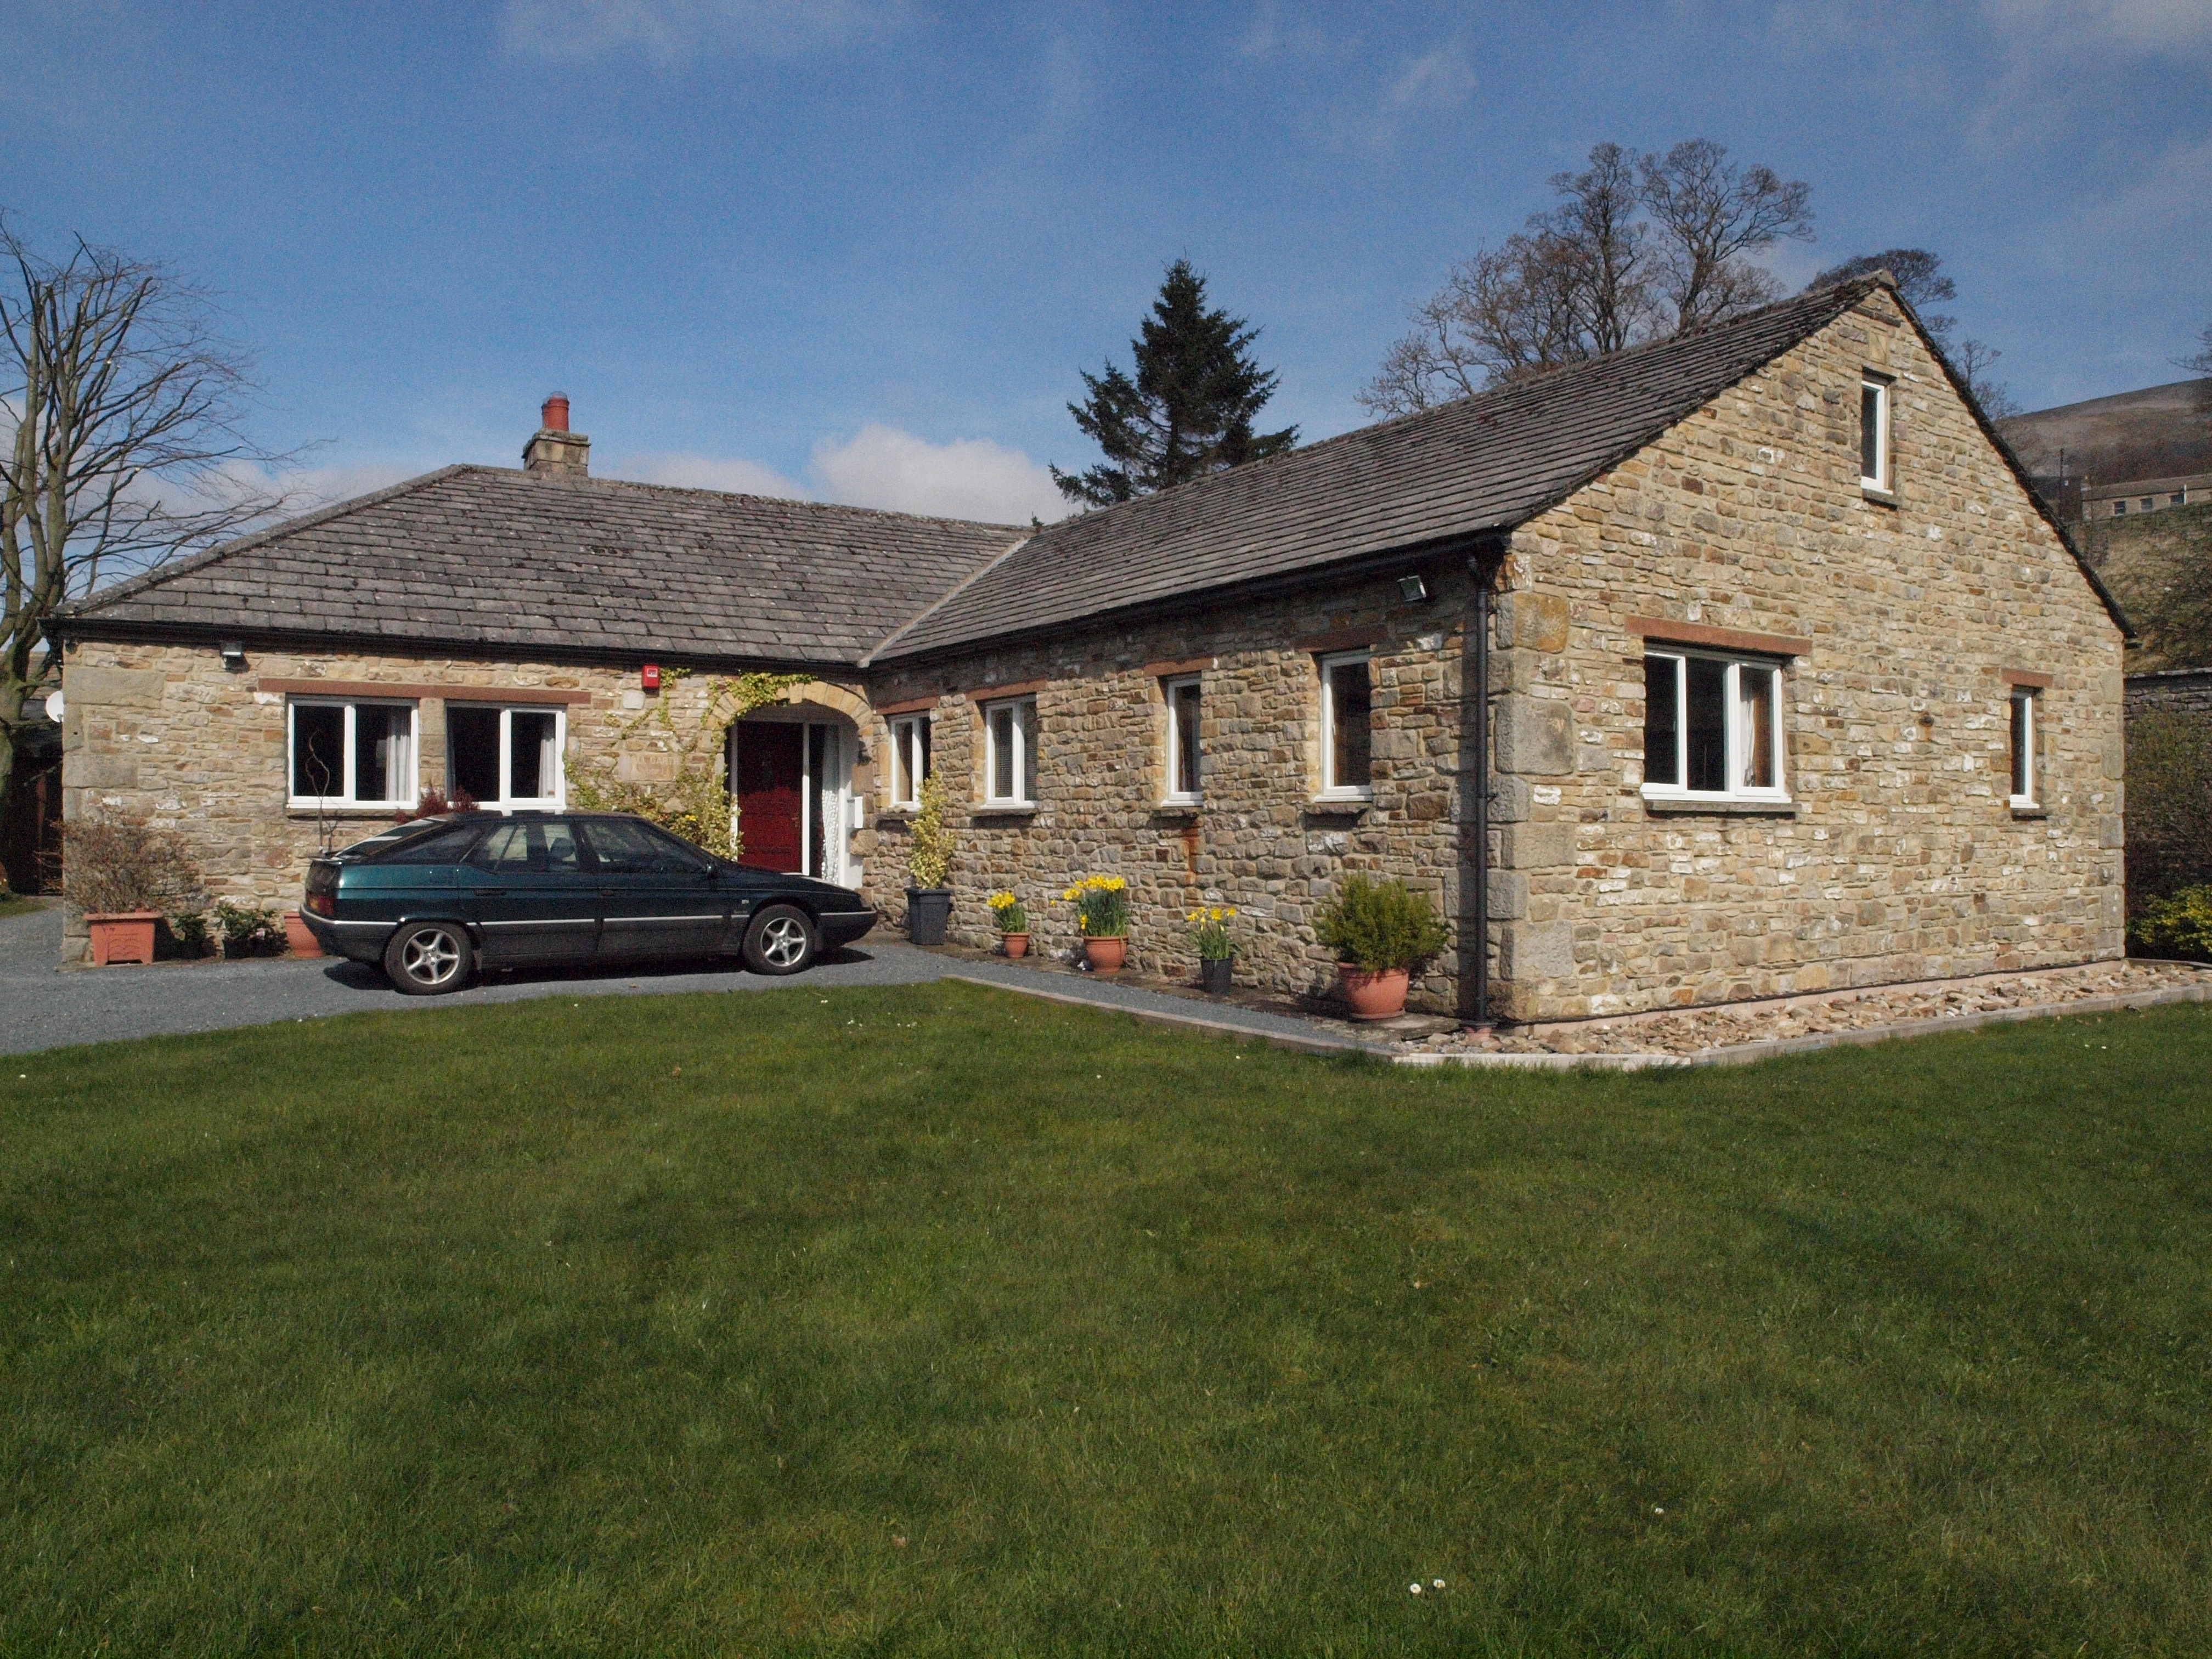
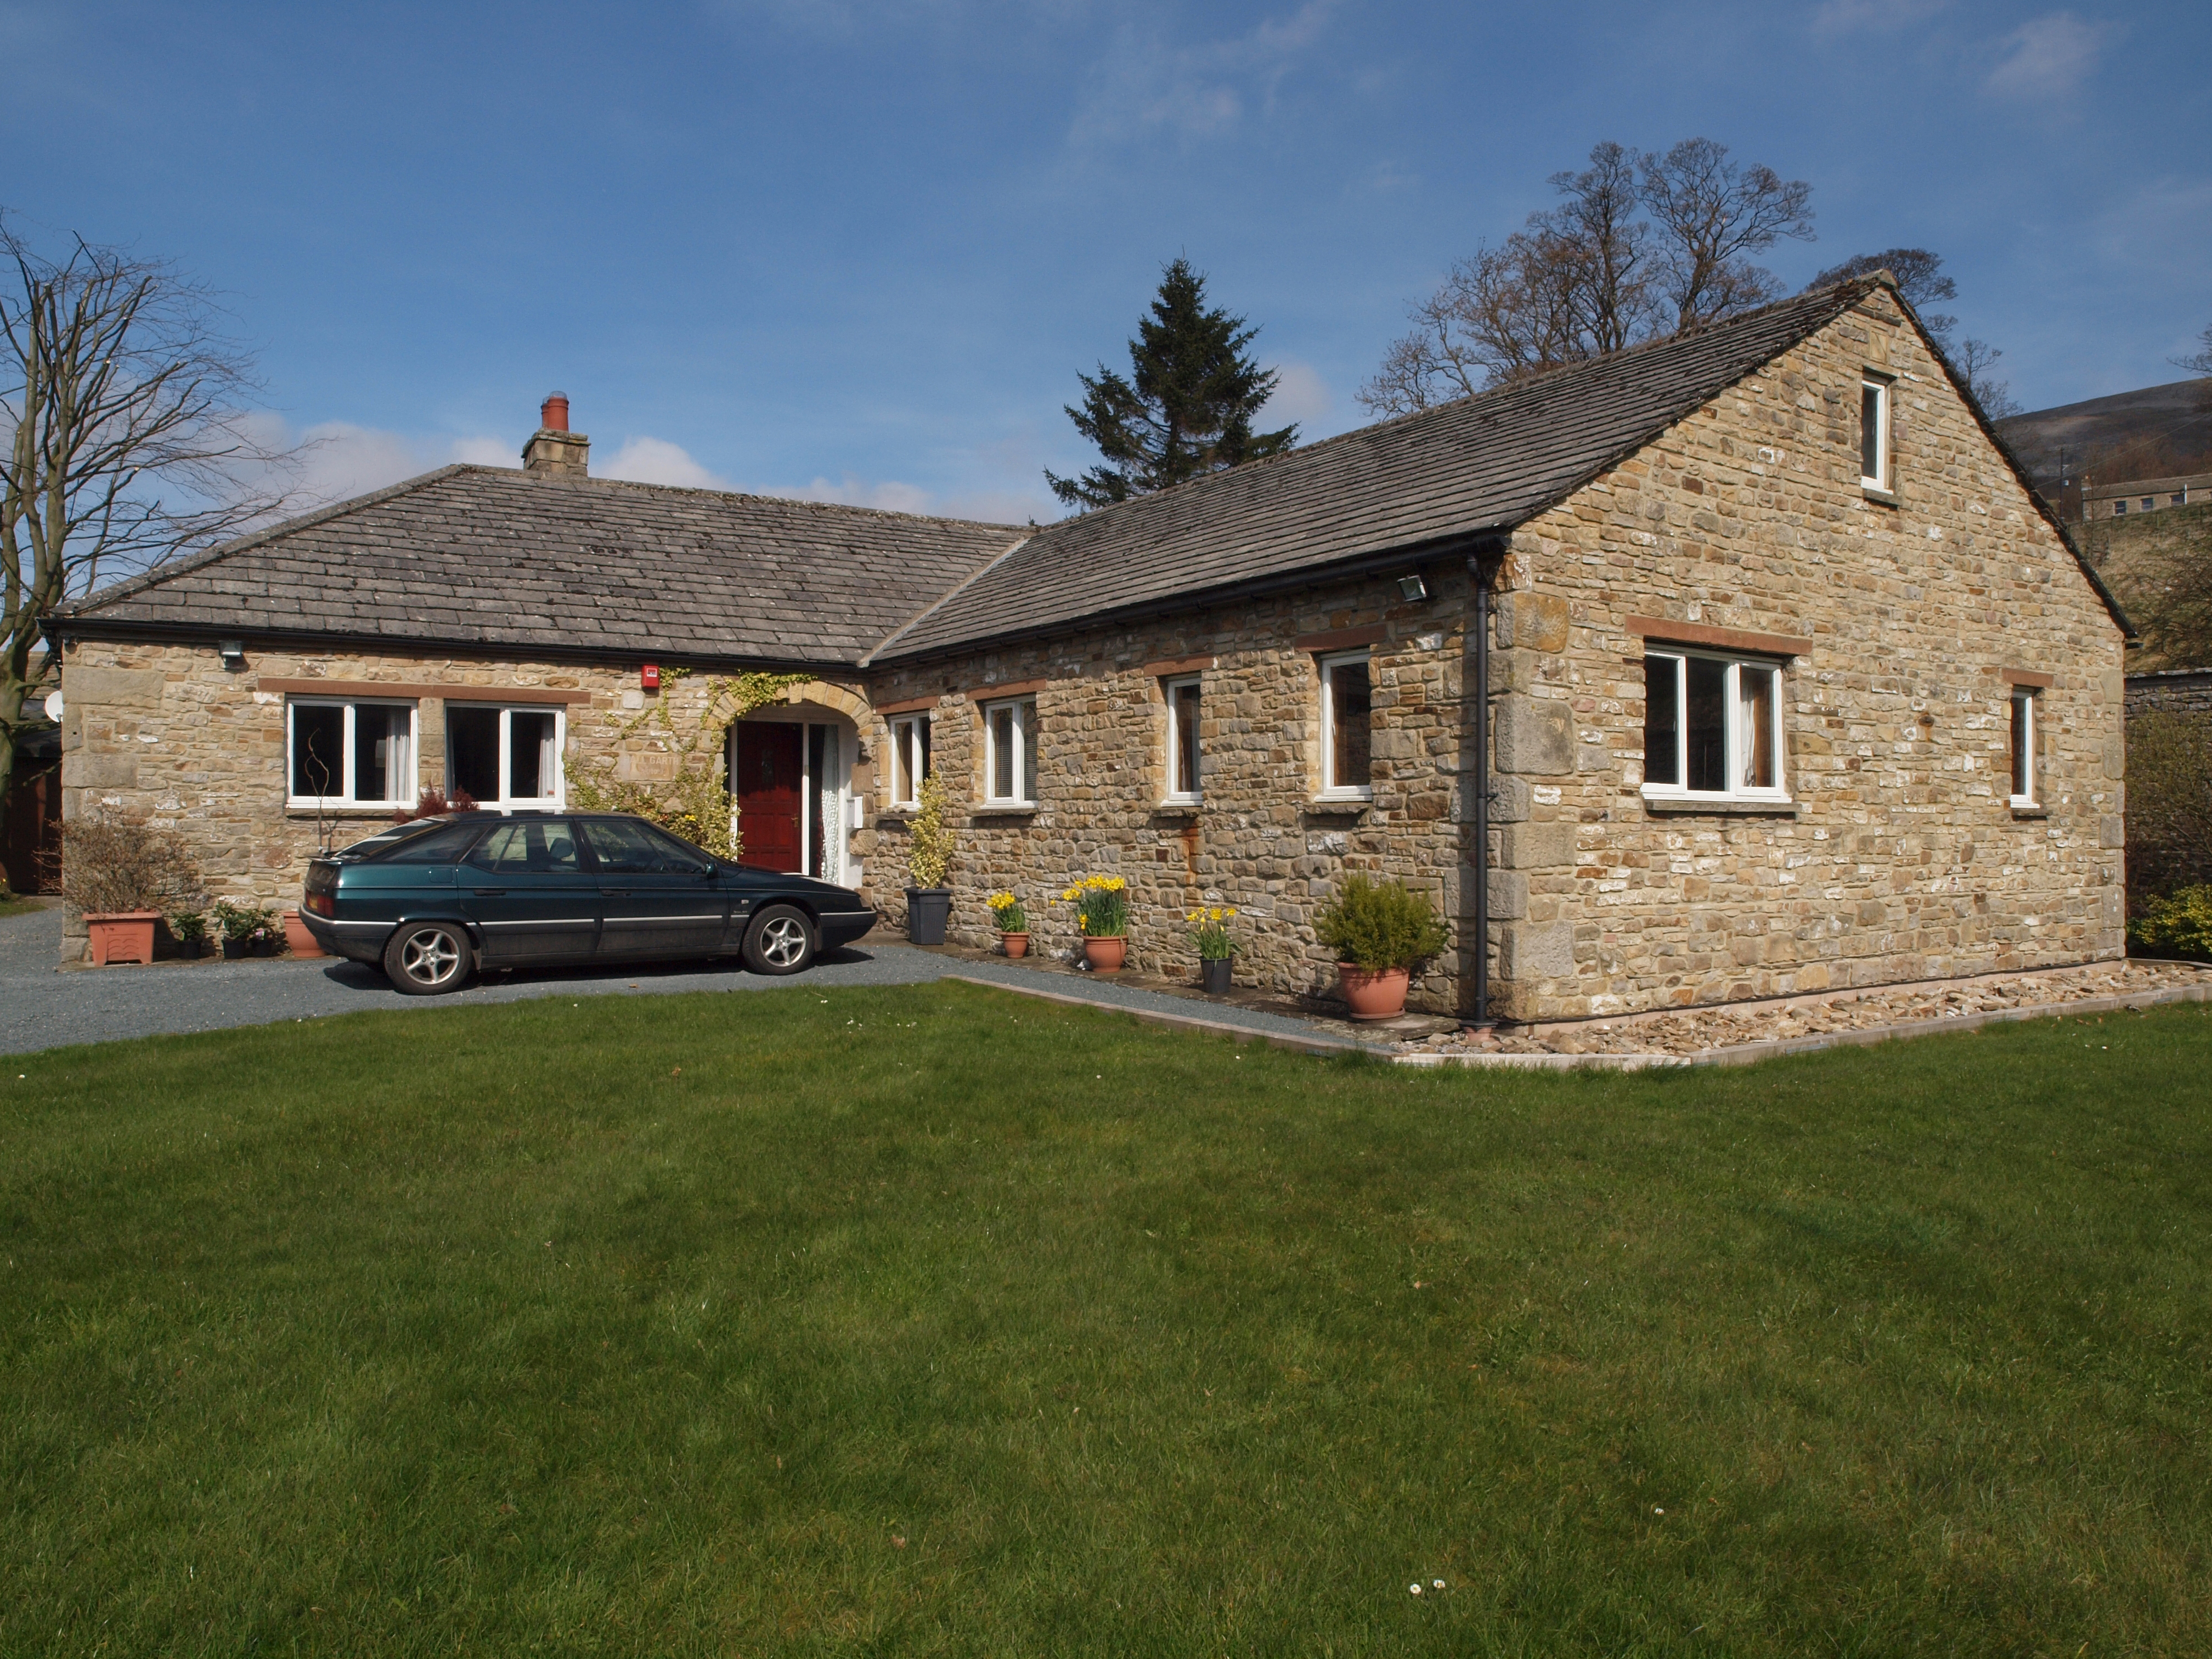
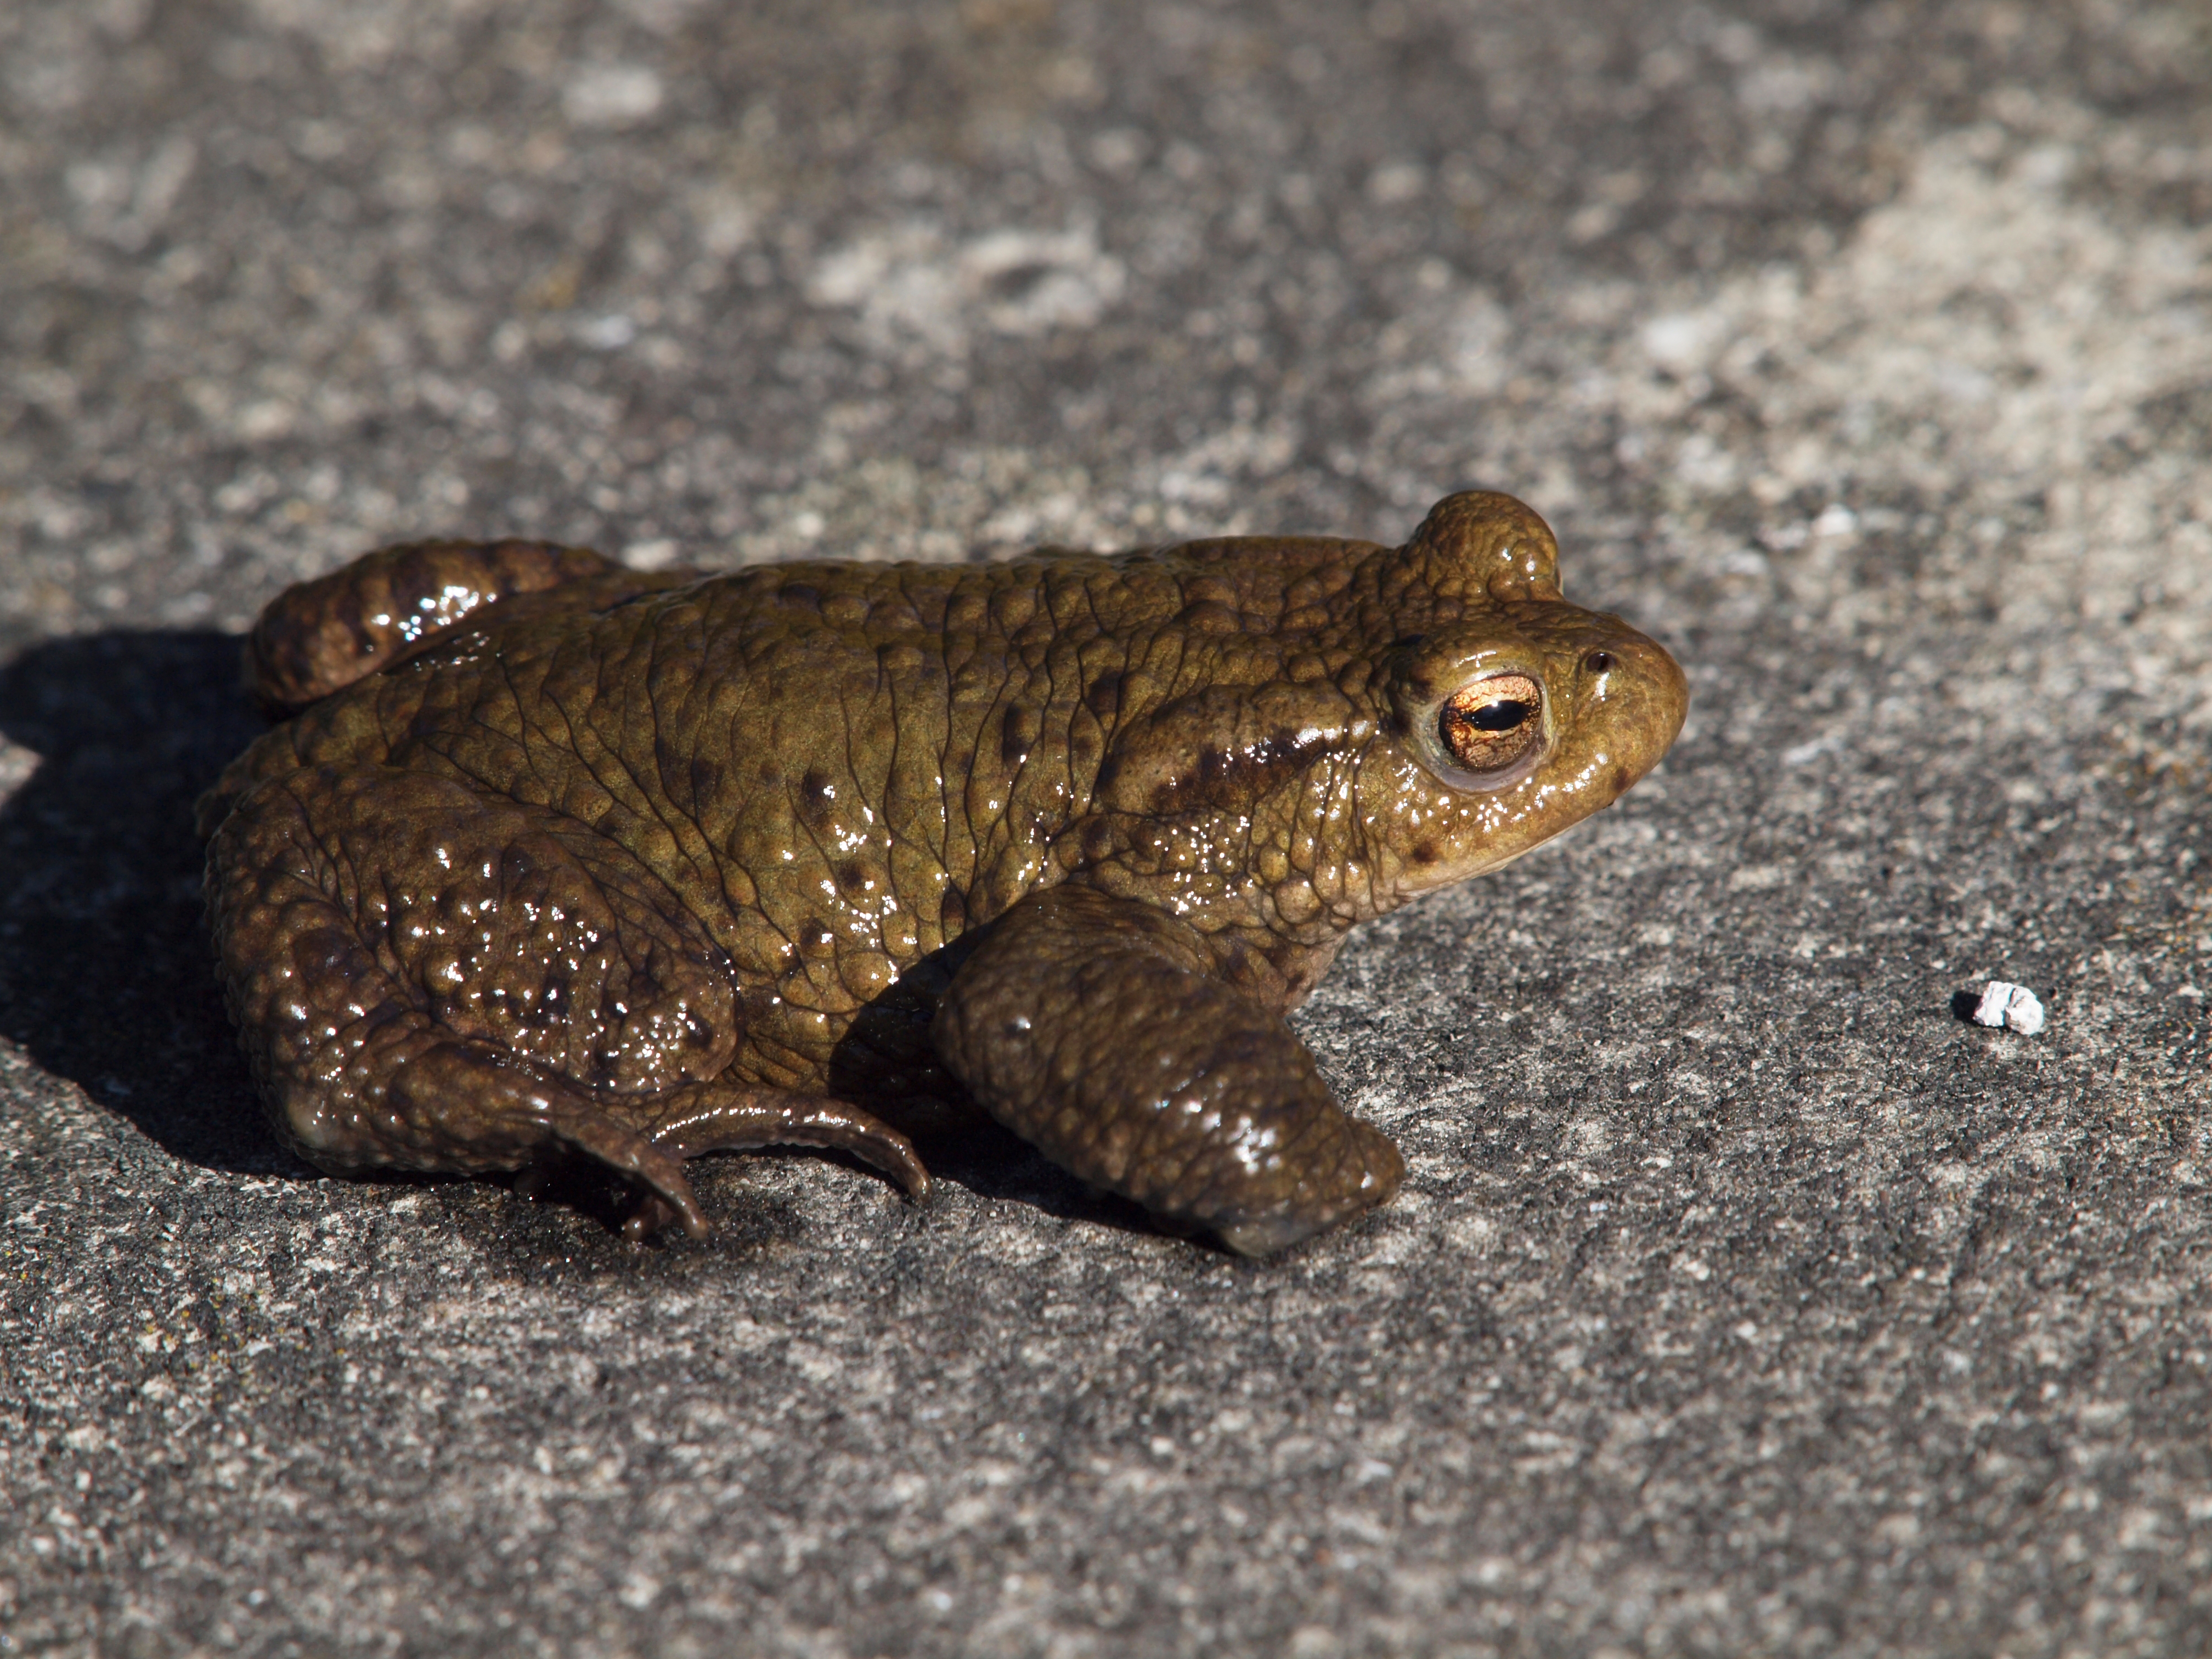
OTHER IMAGES: Here are a few other images for your perusal; I will add a few more in due course. But the review is about the E-620 and not the ZD lenses so I've concentrated on sensor noise and noise filtering. In addition, looking at the download stats from other reviews such as the E-30, it seems the majority of the readership wants to be able to directly compare the same image, whether by the comparisons I make on site or by subjecting the RAW file to their own processing software.
| |||||||||||||||||||||||||||||||||||||||||||
|
CRITIQUE: GENERAL. The E-620 shares the same sensor and processing as the E-30. It also has a very similar ISO performance characteristics as the E-3 in the lower levels anyway, though it does not surpass the E-3. The above results are perfectly OK up to ISO 800, quite acceptable to ISO 1600 and a 'little' ugly at ISO 3200 with no Noise Filter applied. With the application of the Noise Filter, sure enough, noise does diminish but at the cost of detail. This has always been the case though I think it's marginally greater in the E-620 with its 12MP sensor than from the 10MP models. Of course this makes sense as there are more photosites on the E-620 sensor and more potential for noise. But, the levels are not dissimilar and it's testimony to the engineers that the more or less the same (higher) ISO characteristics have been maintained with no apparent loss of detail by any 'stealth in-camera processing'. NOISE FILTER. With the Noise Filter set to low the results are pretty good with minimal loss of detail. Naturally loss of detail worsens as the filter is applied at stronger settings. To my eyes the loss of detail resulting from Noise Filter set to Standard on the ISO 3200 images is too savage and perhaps you might be better applying a noise reduction in post-processing rather than in-camera. In fairness, the ISO 3200 images that have had some noise filter applied will print out fine and you'll be hard pressed to see intrusive noise at say 8" x 10". BANDING. You will no doubt notice that there is no banding present in any of the above images, regardless of any in-camera processing. Good; the E-3 does suffer a little from banding if you insist on high ISO exposures and noise reduction. That the E-30 and E-620 have overcome this issue is good news for the sensor/unseen stealth processing. NOISE. Of course, looking at noise (or any other attribute) in isolation is not wise. We all know the 4/3rds chip is more prone to noise than larger sensors and if high ISO noise-free imaging is your goal then you must look elsewhere. But the company has made progress with each new sensor and Olympus also offer other features like in-body image stabilization that allows you to use much lower shutter speeds (and therefore lower ISO) to deliver clean imaging. You need to look at the Olympus package in the round, so to speak. Smaller and lighter bodies, built-in body based IS for any lens, compact and high quality lenses right down to 'kit' level, inherent sharpness and fidelity and the famous Olympus jpg processing delivers beautiful and accurate colours; these things conspire to produce top quality imaging straight from the camera. OTHER FEATURES. If time permits I will explore some of the other in-camera features that affect image production. Please keep looking back.
CONCLUSION. CONCLUSION: I genuinely believe this camera is a tipping point for Olympus. The E-620 will become a very popular DSLR. It offers almost the same compact body size as the very well received and best selling E-420 plus many of the technological benefits from the E-520 and E-30 at a mid-level price. Combined with the superb Zuiko Digital lens range the E-620 represents a real 'added value for money' camera. I felt instantly comfortable with the E-620. Everything seems just about right - size, weight, feel and heft. It fits the hands well; the ergonomics come naturally and there's little I'd want to change. Its multi-position LCD panel brings to life the real benefits of Live View making macro and low ground shots a breeze. The new prism, screen and AF system is a great improvement and a welcome advance on the previous E-4XX & E-5XX series of machines. The prism is slightly enlarged and I dare bet this improvement is as far as the designers can go within the constraints of the overall camera size without requiring a re-design of the entire top-plate. Against this background they have done a great job and the new design should satisfy 99.8% of potential buyers. BUT, I'm a little disappointed - I thought the difference in the viewfinder would have been more dramatic. It is still not good enough to manually focus my OM primes; this remains the territory of the E-3 and E-1 to a lesser degree). BUT being completely fair to the company, there are not a great deal of potential users out there remotely interested in using legacy lenses on the new DSLR cameras. The illuminated buttons are more than just a gimmick; they will be of use to many photographers who use their camera in dismal places like theatres and nightclubs. The availability of Art Filters will appeal to some though I have my personal doubts whether they add anything to photography. Lack of body weatherproofing (by this I mean dust and drip proofing) will be an issue to some potential users but, I suspect for the majority of buyers, this will not be a deal breaker. My only major criticism is the placement of the delete button; when used in combination with the 4-way and OK buttons it makes quick deletion of files uncomfortable. Would I buy one? Yes, without doubt. Should you upgrade? Those liking the E-420 size will benefit from IS without gaining too much in the size/weight stakes and improve on the older finder/AF system. For those with E-510/20 it's a greater decision; you get a smaller camera with a much better viewfinder/screen/AF system. For those with E-500 I'd say the E-620 should be high on your shopping list. To me the E-620 represents a watershed for four-thirds. This camera now defines what four-thirds can offer to the everyday photographer - excellent imaging with no compromises; sensible body and lens sizes; a great finder and improved AF system; quick and responsive processing; super ergonomics; huge feature set; IS for all lenses; fully useable Live View operation with poseable screen; lots of artsy opportunities. And all at a reasonable cost. Without doubt, Olympus has a winner on its hands.
OTHER INTERNET REVIEWS/RESOURCES Ian Burley at FourThirds-User.Com has a great review with lots of downloadable images. I recommend you read it. Go to Ian's review here . Tony Spore at Four Thirds Photo.Com has also looked at the E-620 and provided a hands-on review with plenty of images. It too is well worth the read. Go to Tony's review here . (Thanks to Lee for spotting this incorrect link.) The long established DCResource.Com also has a nicely detailed review of a pre-production camera here .
|