|
GLOSSARY of ABBREVIATIONS:
I have been asked to provide a small glossary of the more common abbreviations I use throughout various articles appearing on this website. Abbreviations, while useful can be difficult to understand, especially for those whose native language is not English.
AEL/AFL = Auto Exposure Lock/Auto Focus Lock
AE = Auto Exposure
AF = Auto Focus
BLINKIES = Visual interpretation of Histogram, orange = over exposed, blue = under exposed
CCD = Charged Coupled Device
CD AF = Contrast Detect Auto Focus
CMOS = Complementary metaloxidesemiconductor
CSC = Compact System Camera
CW = Centre Weighted (metering)
CWB - Custom White Balance or Custom WB
DOF = Depth of Field
DPI = Dots per Inch (relates to printed image)
DSLR = Digital Single Lens Reflex camera
EFL = Equivalent Focal Length (on a 24x36mm film camera)
ESP = Electro Selective Pattern (metering)
EVF = Electronic Viewfinder
Fn = Function (1) (2) etc
fps = frames per second
GN = Guide Number (flash)
HDD = Hard Disk Drive
HDMI = High-Definition Multimedia Interface
HDR = High Dynamic Range
I.S. = Image Stabilization
LCD = Liquid Crystal Display
MP = MegaPixels/Mega Photosites
MILC = Mirrorless Interchangeable Lens Camera
MZD = Micro Zuiko Digital (lens) for m4/3rds bodies (native lens)
OMZ = OM Zuiko (lens)
ORF = Olympus Raw File
OVF = Optical Viewfinder
PD AF = Phase Detect Auto Focus
RC = Remote Control
SCP = Super Control Panel
SSWF = Supersonic Wave Filter (body feature)
SWD = Supersonic Wave Drive (lens feature)
TTL = Through The Lens
USB = Universal Serial Bus
YMMV = Your Mileage May Vary
ZD = Zuiko Digital (lens) for 4/3rds bodies
BACKGROUND
Two of the most popular articles on this website were 'How to Set-up/Customise your E-420 & E-620'. The arrival of the OM-D E-M1 as the replacement for the E-System 4/3rds cameras, with its extensive MENU system gives me the opportunity of writing a similar guide for the E-M1. So I've done just that.
However, I will only be discussing customisations relating to stills photography as I have little experience of movie recording. Hopefully someone well versed in movie making might add their own thoughts. Please contact me if you wish to add a movie section.
Of course no single set of customisations will suit everyone's needs or requirements and indeed as we get to know and understand our cameras better, our choices may well change; but this article will get your new E-M1 set up to perform at an optimal level with further fine-tuning of the parameters up to you.
For each setting I normally discuss and explain the options and how they will affect the performance/output of the camera, but firstly I strongly urge you to carefully read the manual and secondly, please familiarise yourself with the menu structure.
This article deals only with setting up your E-M1 and the choices involved. It is not an operating manual.
It's not practical to define sets of button/dial/lever customisations; we all want our cameras to operate differently.
OM-D E-M1 SET-UP - NAVIGATION INDEX:
This is a lengthy article so I've split it into the 5 MENU sections with links for ease of navigation. These are:
NOTE: The MENU system for the E-M1 is long and quite complex with many settings affecting and/or depending on other choices elsewhere. It would be crass of me to think I have covered every eventuality or discussed every nuance. This article discusses well over a hundred settings, configurations and customisations and has taken well over a hundred hours to compile, but even so it cannot be considered definitive. And there is at least one setting that either doesn't work on my example, or is buggy, or I simply don't understand (Half Way Level - see section 4j (vi) below).
If you discover something I have missed or got wrong please let me know so I can update this article for the benefit of other Olympus users. You can contact me here.
UPDATES: This article will evolve as long as I have the (loaned) E-M1, or from readers comments. I'll note any updates here.
02/12/13 - Section 4b (i) Button/Dial/Lever; added some comments about the 4-way pad.
02/12/13 - Section 5 (vii) E-M1 Firmware update to version 1.1 and MZD lens updates - timings.
05/12/13 - Section 1b Reset; Note about altered MySet data being lost on power off.
08/12/13 - Section 4c (viii) Some information on Release Lag Time included.
08/12/13 - Section 5 (v) Observations on Wi-Fi settings and infra-red control.
08/12/13 - Correction of typo's and many small alterations suggested by J-Marc Guillemaut.
16/12/13 - Section 4d(iii) Detail on quickly changing assignable functions to various buttons.
28/12/13 - Added "GLITCHES & BUGS; QUIRKS & IDIOSYNCRASIES" at the end of the article.
29/12/13 - Section 4j (vi) Suspected bug now resolved by firmware (1.1) update.
02/01/14 - Section 4d (x) Frame Rate; Resolved why this menu selection item gets greyed out.
06/01/14 - Section 4d (ix) Live View Boost enabled when using with studio lighting.
13/01/14 - Sections 2c(i) AE Bracket, 2g RC Mode, 4a(iv) Reset Lens etc suggested by Gary Aitken.
22/01/14 - Section 1b Clarification/further explanation of the Set/Reset and MySet procedure.
29/01/14 - Section 4f (ii) Flash slow limit reduced to 1/30th to lower Auto ISO selection from P Kelen & others.
20/02/14 - Section 4a (iii) Separate focus from shutter release (AEL/AFL to: S3/C2/M3) from Karl Grunwald & others.
20/02/14 - Section 4b (i) Notes on using Magnify function with [...] HP (Home Point) from Karl Grunwald.
GENERAL NOTES: Please enjoy your reading and research: once you've completed the initial set-up, try not to tweak too many settings at once as you can soon lose track of what you've changed (and why).
Don't forget to read the E-M1 manual at least once. There's a PDF here you can place on your desktop.
You should aim for a set-up that means as little menu diving as possible in normal use (once it's all set). Often used features should be customised to the many buttons, levers and wheels as possible. The ultimate test is to be able to use your E-M1 without reference to the menu and without taking your eye off the viewfinder. It's unlikely you'll manage this first time!
When using the MENU system keep your eye on the bottom band of the screen. Here you may see a small icon showing a page with a cog to the right. This indicates there is another menu setting that relates to this feature and tells you where - Cogs.
CAMERA (SHOOTING) MENU 1
Camera 1 Menu
|
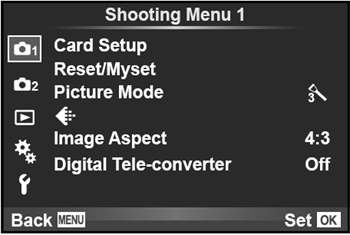
CAMERA Menu 1:
Has 6 primary headings; Card Setup, Reset/Myset, Picture Mode, Record (file type & size), Image Aspect, Digital Tele-converter.
1a CARD SETUP (All erase, format)
Card Setup allows you to delete or format the SD type memory card.
1b RESET/MYSET Reset (Full or Basic), Myset 1, Myset 2, Myset 3, Myset 4 - set or reset to defaults or to the settings of your choice.
NOTE: 22/01/2014 - this section largely re-written.
Of all the menu options this is one of the most potentially useful and a tad confusing. Simply it gives you the option to store 4 sets of your preferences (MySets) and either overwrite them with updated data OR be able to restore the camera to one of two settings - a full factory default reset or just basic settings. You can setup 4 restorable settings with various choices from most of the E-M1's menu/settings. Seemingly, setting Mysets 1~4 only work in modes P, A, S, & M.
There are five RESET menu choices; first is reset FULL or reset BASIC. FULL resets every function except date and language (and some unrecorded settings) to factory default. BASIC resets only the basic shooting parameters and leaves all else as previously chosen via the MENU or Control Panels. RESET is available in all modes. Ideally you should set your preference for Full or Basic reset before progressing to the MySet data slot(s).
Next there are 4 Myset slots. If these are greyed out the camera is in one of the five modes other than PASM. Each MySet slot will show either NoData or Set (meaning you have registered a data set in this slot). Be aware you can achieve three functions here;
(1) Register a data set - NoData > Set;
(2) Deregister a data set - Set > NoData;
(3) Overwrite an existing data set - Set via Yes/No > Set.
IMPORTANT NOTE: If there is no MySet data set in a slot (shows NoData) only the right arrow works; the OK button does nothing even though the screen says otherwise. Therefore the camera takes you to the Set/Reset screen where you select and press OK with no further confirmation.
However, if there is a MySet data set in a slot you have two options:
(a) exactly as above using the right arrow with the same result or
(b) using the OK button which brings up the confirmation screen Yes/No.
Only when you have registered a data slot AND you use the OK button will you get the confirmation YES/NO screen.
This is somewhat confusing to start off and I'd recommend you practice a few times before using Set/Reset/MySet for real.
HOW TO USE:
(1 - Register) If you select a NoData slot and press the right arrow (because the OK button does nothing in a NoData slot) you are given the choice - Set or Reset. (Before using the RESET option consider the two options offered in the above Reset; Full or Basic). Ensure you really want to proceed and choose Set or Reset; there's no further confirmation required by the camera software - it just does it!
(2 - Deregister) If you select a Set slot (previous data registered) and press the right arrow button rather than the OK button which now works, you will receive the Set/Reset box as above. If you select RESET the previous data is lost and the camera returns to the default status you decided in the Full/Basic choice above and the slot returns to NoData. BUT if you select SET the existing data is overwritten with your new data and the slot remains Set.
(3 - Overwrite) If you select a Set slot (previous data registered) and press the OK button rather than the right arrow, you will receive a YES/NO confirmatory box. If you select YES the existing data will be overwritten and the slot remains as Set. BUT if you select NO the existing registered data remains as is and the slot remains Set.
It is important therefore to know the correct button to press especially when overwriting an existing data set as the OK button provides an extra step with a confirmatory box but using the right arrow does not.
ASSIGN A MYSET
Once you have set your preferences (Myset 1 for example) you now need to assign that data set to either a button or the MODE dial so you can access it quickly. Personally I use the MODE dial rather than a button (see below) as there are certain functions on the dial I will never use such as iAUTO and Photo Story. And you may wish to alter any of the PASM settings with your own preferences registered thereto. There are plenty of opportunities on the MODE dial to add your MySet data.
Mode Dial v Button There are good reasons not to assign a button to a MySet. There are only a few assignable buttons; the Mode Dial has potentially more assignable detents. If you assign a MySet via a button and load this by pressing the assigned button, it can be easily lost by the camera going to sleep or the user entering the menu or accidentally pressing the button again. If you have a MySet activated by an assigned mode dial detent you cannot load another MySet data via an assigned button; the button will not work. The mode dial assignment takes precedence.
To assign your MySet to say any of the mode dial choices you don't use, go to CogsB/Button/Dial/Lever - Mode Dial Function and assign the set to any of the following: P, A, S, M, MOVIE, PHOTO STORY, SCENE, ART, IAUTO. You can also assign a MySet to any of the customisable buttons in the same menu area. But please try assigning your MySet to the MODE dial first as there are so many other customisations available you will probably need the other buttons.
Once you have registered your MySet data you access the settings (if you choose) via the MODE dial. The screen shows an icon with MySet 1-4 to tell you. Unfortunately you cannot name your own MySet data so you will have to remember what each of your MySets means and to which assigned dial position. I'm hoping Olympus may be able to address this in an upgrade. Until then I suggest you record your preferences on a sticky label and place on the back of the camera underneath the screen.
Whilst this function offers wonderful customisation it can be confusing if you haven't got it all recorded somewhere. Proceed slowly and note everything down for each MySet (see available Excel spreadsheet E-M1 settings). For further information on what functions can be set and/or reset please refer to pages 142~147 of the camera manual. There are approximately 88 separate functions assignable so the list is extensive. I'm hoping to produce a spreadsheet of MySet customisable functions in Excel for readers to download (when I get time). NOTE: This has now been done by Greg Bloor as is available here.
NOTE: 05/12/13 If you call up a MySet data set via your assigned button/dial and then alter one or more settings, these altered settings will remain current as long as you do not power the camera off; if you do your altered settings will be lost. The only way around this is to re-write the altered MySet data or register the settings to an unused MySet data slot. I can see the logic of this approach - the MySet data is preserved but temporary alterations to it are lost and/or if the alterations are important you are likely to save them to a MySet.
OBSERVATIONS: All customisations are a matter of personal preference. The MySet function is the ultimate customisation. My own data set will not suit your needs and vice versa. Proceed in a logical fashion and write it all down. Please also refer to 4b (iv) MODE DIAL FUNCTION, below.
You may also find the customisation spreadsheet (Excel) useful for both setting up your camera and recording MySets. Download it here.
1c PICTURE MODE: i-Enhance, Vivid, Natural, Muted, Portrait, Monotone, Custom, e-Portrait, Colour Creator + 12 Art Filters
Picture Modes are more than just a choice of output. Within their settings you can configure the amount of sharpening, contrast, saturation and gradation that is applied to your jpegs. These are fundamental settings so study them carefully. There are no other 'global' settings for sharpness, contrast, saturation and gradation, but you can change them individually via the Super Control Panel (but not Live View Control).
The designers of the Picture Modes have applied their own interpretations to each mode before setting those levels as factory default (i.e. 0) so any parameter override(s) you apply will be in addition to those factory set. In other words the engineer has already decided what set of parameters produces each of the Picture Mode images and they are all subtley different.
In essence this function allows you to impose your own preferences (offering manifold adjustable profiles) to almost all of the 21 Picture Modes available. The adjustable settings vary from mode to mode. I divide the PICTURE MODE choices (starting at iEnhance) into three; the first 7 are the most likely you will use in everyday photography and offer the most customisability. The next 2, e-Portrait and Colour Creator are specialist and have no adjustable settings. The remaining 12 ART Filters offer a selection of differing photographic techniques/effects and filters.
For example I might wish to have a half-way house between Vivid and Natural. I can do this in two ways. I can adjust the settings in either Vivid (toned down a little) or Natural (enhanced a little) and either of these will then be applied to every image taken in each mode. Or I can select any of the first 6 Picture Modes and alter the parameters to suit my intention and register them to the CUSTOM mode. This means my preferences will only be delivered when in CUSTOM mode. I can see this being useful in the studio where the photographer may like the overall effect of PORTRAIT mode but might like to have a little less sharpness applied for his older clients. It offers innumerable choices.
So how does it work (first 7 modes)? You select the mode you wish to change and you are offered at least 4 parameters to alter (depending on the mode selected). These are Contrast, Sharpness, Saturation and Gradation. You then dial-in your preference via a screen offering -2 -1 0 +1 +2. In other modes there are additional parameters to adjust; in MONOTONE for example you choose your B&W filter (neutral, yellow, orange, red, green) and Picture Tone (Neutral, Sepia, Blue, Purple, and Green over hues) that simulate attached filters with B&W film and other special effects.
A NOTE ABOUT GRADATION (Auto, Normal, High key, Low key): Gradation works with jpg's only; it does not apply itself to RAW data. Gradation is a combination of very slight exposure compensation plus manipulation of one or more zoned tonal curve(s) when the jpg is produced in-camera. What it does is manipulate the highlight and shadow areas of the image across those zoned areas to produce a more contrast balanced image, suppressing the highlights and lifting the shadows. Here's my best description of the strength of each setting:
NORMAL - No (or very little and/or subtle) effect on output.
AUTO - As indicated the automatic application of slight exposure compensation to protect the highlights and gentle lifting of the shadows in processing. The result of the AUTO setting between ISO 200 and ISO 1600 is quite acceptable; over ISO1600 leads to heightened noise in the shadow areas to the point where it is obvious and intrusive. At ISO 3200 for instance the results of the shadow noise generated by AUTO gradation become objectionable. I'd recommend you only use AUTO with great care.
HIGH KEY - Application of over compensation and additional processing to accentuate the highlit areas of the image. Can be effective when photographing brightly lit subjects in bright conditions. You can achieve the same results with the compensation button by applying +1.0EV. Better at lower ISO values. Similar results can be obtained in SCENE MODE 10.
LOW KEY - The opposite of the above and useful when photographing primarily dark subjects in darkened conditions. Particularly sensitive to higher ISO values. You can achieve the same results with the compensation button by applying -1.0EV. Similar results can be obtained in SCENE MODE 11.
GRADATION OBSERVATIONS: Be wary of gradation especially if you shoot only jpg as once gradation is applied it cannot be undone. Unless you are aiming for a special effect avoid using HIGH/LOW KEY settings. AUTO works reasonably well between ISO 200 - ISO 1600 and can help where there is high contrast situations such as lots of brightly lit areas and deep shadows but it comes at a price - more noise. Additional noise occurs in the darker areas of the image where the in-camera processing has 'lifted' the tonal curve of the darker areas accentuating the noise level. On balance I'd recommend you leave gradation set to NORMAL (which is effectively, but not quite, OFF). You can make just as good adjustments yourself in post-processing. Many users, including myself, have made the mistake of confusing AUTO and NORMAL modes; I repeat NORMAL is more or less OFF. If you are sure you want the camera to apply the least gradation as possible make sure you set the relevant Picture Mode(s) you use to NORMAL (default).
In the ART Filter modes the choices are mainly to do with available effects and framing.
You are offered these choices so you can simulate the effects of differing films you might have used in the past by adjusting the parameters. Or you can simply refer to them as they are - i-Enhance (compact-camera like results - punchy), Vivid, Natural, and Muted, Portrait, Monotone and Custom, each with either its own default or your specified combination of contrast, sharpness, saturation and gradation etc., to suit your expectations
Changes made to the Picture Modes are a matter of your personal taste but the default settings reflect what is generally held to produce acceptable images in each of the first 7 modes. If you choose to alter these settings my advice is to do so judiciously or your results may look over-done. Also, set them only one at a time until you are happy with that particular parameter, then move to the next parameter.
Contrast settings: be careful lowering the contrast as this can lead to flat looking images. Until you are familiar with contrast levels leave at default. The new Sony sensor has a good Dynamic Range.
It is a great pity that the Olympus engineers did not include the Noise Reduction and Noise Filter settings within the Picture Modes as an additional parameter, thus giving each mode 5 parameters. To me this would have been the most logical place as these too affect final jpg output. Noise Reduction and Noise Filter are normally accessible via Custom Menu E in the camera's menu and discussed at 4e (ii & iii) below.
I am unsure if the camera remembers any imposed settings through a camera reset (I suspect not). If you discover otherwise please let me know.
Alternatively you can register your choices within a MySet data set.
OBSERVATIONS: You need to study the 4 parameters (Sharpness, Contrast, Saturation & Gradation) that are configurable in the Picture Modes you use most. If you are happy with the output leave at default values. Some folks consider the default sharpening applied by the camera is a tad too aggressive though I am quite happy. If this is your case then turn the sharpening down by a notch in your most used Picture Modes. I tend not to alter Contrast or Saturation though some find the colour rendition a little overdone. However you judge your output make sure your PC monitor is calibrated.
I rarely move from Natural or Vivid and I have a Custom setting for portraiture. Some of the ART Filters are fun to use and some of the SCENE modes also have their place (Fireworks for example). However, their use for me anyway, is infrequent.
1d FILE FORMAT & COMPRESSION, STILL & MOVIE: RAW; RAW & JPG; JPG; MOV & M-JPEG JPG.
Here you determine the format in which you wish to record your imaging and ultimately how many files you can get on your SD card. This enables you to quickly change between recording formats. You use this menu section in conjunction with Cogs/G/Set; in this Cogs section of the menu you specify the quality and compression of your recorded files; you set 4 sizes as you wish. These determine the size; L (large) M (medium) or S (small) AND the compression rate; SF (superfine) 1/2.7; F (fine) 1/4; N (normal) 1/8; B (basic) 1/12. You need to set the pixel count and compression first (or rely on the default settings) to show in this first part of the menu, the various choices you made in Cogs/G/Set. Yes it's a little confusing.
Much depends on whether you wish to record and process the RAW file or rely on the JPG output of the camera. You can process the RAW file with Olympus Viewer 3 (provided) or several other supporting software's. However, it is time and space consuming and you have to learn a new software. On the other hand having a RAW file means you might be able to rescue an otherwise lost image due to bad lighting etc.
The RAW image is the whole image data off the sensor compressed losslessly into an ORF (Olympus Raw File) with virtually no in-camera processing. JPG images are subject to overall size, dimension and compression plus other choices you make regarding exposure, contrast, sharpness, saturation, gradation etc.
I use RAW + JPEG for stills photography. I also set the file size and compression at 1:LSF, 2:LF, 3:MSF, 4:MF and set to record in LSF+RAW. This choice gives me the best JPEG output from the camera with a RAW file to fall back on if the exposure conditions compromised the shot. I also set the pixel count for M (middle) at 3200x2400 in section 4g (ii) below.
NOTE ABOUT FILE SIZE & COMPRESSION RATIOS: As a CSC user I'm assuming you want to get the best image quality (IQ) from your E-M1 as possible, otherwise you'd still be using a compact. That being so then you will probably select either RAW or Super Fine JPG (or both) as your basic choice. (I'm not going to enter the RAW vs JPG debate). RAW files come with their own lossless compression over which the user has no control. JPG's have four compression ratios (you determine) to choose from; none of them are lossless. Each time you re-write a JPG there is, theoretically, some loss of fine detail because the data is compressed and the tighter it is compressed the higher is this detail loss. When you compress a JPG too much the data loss can be seen in the image as artifacts, and we want to avoid artifacts at all cost. For all your JPG images always select the highest quality compression ratio. If you are desperate for memory space then drop to the next highest but don't drop below LF. With memory so cheap these days it's hard to see why anyone would want to skimp on IQ (but there may be times such as on holiday when you are taking more images than you anticipated).
OBSERVATIONS: Much depends on personal preference. Though I rarely use (process) RAW files I do keep a copy. For most of my work I choose to exploit the excellent JPG engine Olympus offers in-camera and keep post processing to a minimum. So as said I record LSF+JPG. There is an argument that memory (flash cards) is currently very cheap and therefore not a constraint. While this is true (hence choosing the highest resolution and lowest compression of JPG) RAW data is larger, takes up more space on your memory card and hard drive and needs to be processed into a JPG anyway. On the other hand many class RAW data as the digital negative which should be kept ad-infinitum to take advantage of improvements in RAW processing software as it progresses. The choice is yours.
1e IMAGE ASPECT: 4:3, 16:9, 3:2, 1:1, 3:4
This feature works by the camera software applying a 'mask' to the JPG data to coincide with the image aspect. The masked area appears on both the rear screen and EVF. Your choice is between the above 4 image aspects. The menu selection screen also shows the affect of your choice on the jpg size of the recorded image (the size of the jpg is reduced). When you apply an image aspect the RAW data does not change from the native 4:3 but the jpg data is smaller. For example if you record in 4:3 the RAW data will be 4608 x 3456 pixels as will the LSF jpg; if you choose 1:1 the RAW data is still 4032 x 3024 but the LSF jpg drops to 3456 x 3456, and so on.
Those shooting in RAW+JPG will have to choose between the 'finished' JPG in the chosen aspect, or develop the RAW image and then crop to the desired image aspect. That being so, the feature is aimed more at the JPG shooter.
OBSERVATIONS IN USE: The E-M1's EVF provides an advantage over the traditional optical finder in that the aspect ratio is reproduced in front of your eyes making composition easy. I used to shoot medium format 6cm x 6cm and grew to love that particular aspect ratio.
This feature offers a small advantage over what you can achieve in post processing and allows you to get the 'feel' of a particular aspect ratio by using the masked screen/EVF. It is a very convenient way of achieving a different image aspect and therefore adds to the appeal of the camera. And for those who wish to do as little post processing as possible it is certainly useful.
OBSERVATIONS: I rarely use anything other than 4:3, but if you want to make the best of the screen real estate set to 3:2.
1f DIGITAL TELE-CONVERTER: On/Off
When enabled the camera takes a 50% crop from the centre of the frame and presents and records this as your final image. It is a run-off from compact cameras though I'm not disparaging it for that. It mimics the effect of using a 2x tele-converter on the front of whatever lens you are using, but much more conveniently. The sensor resolution is now large enough to afford a centre crop. The cropped image is the same size and compression ratio as uncropped image, meaning that the camera's software is up-sizing the cropped image to full jpg size, depending on your choice of jpg settings. Of course this means some loss of resolution in the up-sizing algorithm. When you look at the RAW file the crop area you saw magnified in the EVF is framed; this allows you to accurately crop and up-size the image to your specification, in post processing. I have it on good authority that when used in movie mode the recorded images are not diminished at all in apparent resolution.
OBSERVATIONS: I see uses for this, maybe in macro work or street photography and movies. Even more useful if you assign it to a dedicated button. I have this enabled and assigned.
MENU - CAMERA (SHOOTING) 2
Camera 2 Menu
|
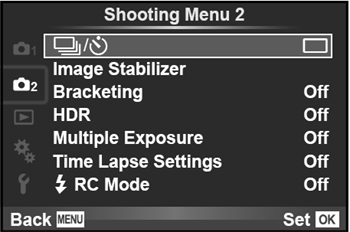
CAMERA Menu 2:
Has 5 primary headings; Sequential and Self-timer, Image Stabilizer, Bracketing, HDR, Multiple Exposure, Time Lapse settings, RC Mode.
2a SEQUENTIAL & SELFTIMER SETTINGS: Single frame, High fps, Low fps, Timer 12 secs or 2 secs, Custom timer.
This allows you to quickly switch between rates of sequential shooting (frames per second - fps), set the delay rate of the in-built self-timer and to set up your own custom self-timer.
Sequential Shooting part requires you to input your desired fps rate (or leave at default L(ow) fps = 6.5; H(igh) fps = 10). Once you set the L & H fps the camera will behave in accordance with this. Your choices are Single frame; High fps and Low fps. Be aware that fps settings can affect other important settings such as bracketing and the availability of continuous AF and Image Stabilisation. See Section 4c below.
Self Timer; you can chose between a delay of 12 seconds or 2 seconds (from pressing the shutter to exposure). OR you can set up your own CUSTOM timer within these parameters: between 1~10 frames; between 1~30 seconds; with an interval rate of 0.5~3 seconds between frames. This could be useful if you were setting up a shoot for high depth of field macro work where you need multiple exposures of the same scene at differing apertures for stacking.
OBSERVATIONS: Set as desired. You can change these parameters in either shooting control panel.
2b IMAGE STABILISER: S-IS.1, S-IS.2, S-IS.3, S-IS.Auto, S-IS.Off
Here you dictate how the Image Stabilization works. As far as I can work out it is:
S-IS.1 = IS works in all directions including pitch and yaw.
S-IS.2 = IS in vertical only; hold the camera in landscape format (horizontally) and pan/shoot horizontally.
S-IS.3 = IS in horizontal only; hold the camera in portrait format (vertically) and pan/shoot horizontally.
S-IS.Auto = IS decides which axis to stabilize according to camera movement.
S-IS.Off = IS powered off.
OBSERVATIONS: As I see it S-IS 1 for normal use (including pitch and yaw) and S-IS AUTO for use when panning in any direction - it will automatically sense the orientation of camera and direction of the pan. S-IS.2 is for horizontal pan holding the camera in landscape; IS3 is for horizontal pan holding the camera in portrait. There must be subtle differences in the computational matrices applied to each setting for Y & Z axis depending on orientation. I'd like to think that in any case the unit will only work IF there is movement when enabled; however there will come a point when shutter speed will 'make redundant' the IS function, which is why it shouldn't be enabled at high shutter speeds. As a rough guide to shutter speed requirements use: shutter speed = 1/2x focal length of lens. Example: if using the 50~200mm @ 200mm shutter speed should equal 1/400th sec. If you are using shutter speeds higher than 50% above the equation switch the IS Off.
2c BRACKETING: AE, WB, FL, ISO, ART Bracketing
Here you determine any bracketing you require the camera to undertake.
2c(i) AE (Auto-exposure) bracketing: Off, 2/3/5 frames @ 0.3/0.7/1.0 EV; 7 frames @ 0.3/0.7 EV.
A very useful feature providing plenty of choice of frames and EV. Use when critical exposure is required or when undertaking certain HDR subjects. Camera takes first shot normal, second - EV, third + EV. If you set only AE bracket, you have to press the shutter 2/3/5/7 times. But if you simultaneously set sequential (not multiple) exposure i.e. L fps/H fps, the camera will do the counting for you - handy - but don't forget to switch back to single frame (thanks Gary). Some HDR exponents would like more than -/0/+ 1EV say up to 2EV. This may be good for HDR but for normal photography may be a step too far.
Also note that AE bracketing cannot be set or combined with FL bracket. If you set either it is immediately cancelled when the other is set.
OBSERVATIONS: For normal photography set to OFF. Best used with sequential shooting turned ON. Some consider Olympus bracketing (AE) settings not diverse enough for HDR. To address this the E-M1 has its own HDR settings with greater EV differences and is dealt with later.
2c(ii) WB (White Balance) bracketing:
As far as I can determine the E-M1 has only an internal WB sensor (unlike the E-3/E-5 & E-620 that had an external sensor too; there seems no room on MFT bodies). However it appears to be very accurate and you can set your own custom WB at the touch of a button. To me WB bracketing seems a waste of time and effort. If you are experiencing particularly difficult mixed lighting that may give rise to WB issues I'd suggest you need to be shooting in RAW anyway and adjusting the WB to your satisfaction in post-processing.
OBSERVATIONS: Leave this setting at OFF.
2c(iii) FL (Flash) bracketing: Off, 3 frames/0.3EV, 3 frames/0.7EV, 3 frames/1.0EV
I'm struggling to envisage a situation where flash bracketing might be useful; more correctly where other compensations will not deliver the right exposure. Remember, you can flash compensate locked with exposure compensation which will surely give you the same results. Maybe I'm not understanding the relevance of flash bracketing.
Also note that FL bracketing cannot be set or combined with AE bracket. If you set either it is immediately cancelled when the other is set.
OBSERVATIONS: To me this setting is of dubious use and I'd suggest you leave it set to OFF.
2c(iv) ISO (Sensitivity) bracketing: Off, 3 frames/0.3EV, 3 frames/0.7EV, 3 frames/1.0EV
To me this is basically no different from AE bracketing except the only thing that changes is the ISO value. For that reason it's maybe better to use AE bracketing. The only situation I can see where this may have a use is if you are experiencing tricky lighting conditions for which you are using the Auto Gradation settings. Bracketing ISO will offer you a choice from a series of three ISO settings. (From previous experience I found that it worked where I had the camera set to ISO200 with Auto Gradation and got the most pleasing result from the ISO bracketed shot taken at ISO400.) This setting seems to be aimed at JPG only shooters.
OBSERVATIONS: For the purpose of setting up your camera leave this setting at OFF.
2c(v) ART bracketing
With this enabled (and you can enable it for every Picture Mode and ART Filter available) the camera records, in single frame mode (not sequential), a single shot per filter; then wait as the camera records multiple images, each with a different art filter setting. Quite why you would want to do this I'm unsure. I can't envisage any circumstance. The manual warns:
Recording may take some time - I bet.
ART BKT cannot be combined with WB BKT or ISO BKT (NOTE: so it uses WB and ISO differences too).
OBSERVATIONS: Leave this setting to off and if you find a good reason to use it let me know - it's been suggested it might be fun to see what each ART filter does.
2d HDR
The camera has a dedicated button for HDR. When activated this button offers 3 basic choices: Mode 1 - sets the camera to take 3 exposures with subtle exposure differences and blends them together so you only have one image at the end of it although it does keep an ORF version of the blend. Mode 2 - is the same as Mode 1 except the exposure differences are greater producing a higher contrast blend. Thirdly - you choose the number and EV spread (bracket) you require and take the exposures. The camera keeps all copies in both jpg and ORF (assuming you set the camera to jpg+RAW) so you can blend them as you wish in post processing. HDR bracketing choice is 3, 5 or 7 exposures at 2EV or 3 or 5 shots at 3EV.
When you select HDR from the button the camera automatically engages sequential mode.
There is also an HDR set-up available from the menu. This allows you to increase the 3 shots to 4 in HDR Modes 1&2.
So there are three choices; easy subtle HDR with 3 or 4 frames; easy dramatic HDR with 3 or 4 frames; HDR to your specification requiring you to blend the results in post processing. In addition there are the normal bracketing options in the menu; 2, 3, 5 or 7 frames at 0.3/0.7/1.0EV that may, or may not, suit the conditions. Here you need to engage sequential mode.
OBSERVATIONS HDR can be effective if used correctly. However it is mostly overdone producing some horrible renditions.
2e MULTIPLE EXPOSURE: On/Off (2 frames only in JPG mode).
The E-M1 offers the function of superimposing two frames together as one image. Very useful for the creative photographer. If you shoot only in JPG's you can only put together 2 frames (see OVERLAY below.) Unless you enable Auto-Gain the images will be combined as recorded (with accumulating brightness). For normal photography set MULTIPLE EXPOSURE to OFF.
AUTO-GAIN: When enabled the software reduces brightness by half so on combination of both images the level of brightness is more realistic. (OFF by default)
OVERLAY: This allows you to choose up to 3 RAW frames on which to overlay your 2 multiple exposures. (OFF by default)
OBSERVATIONS: Enable when required; otherwise set to OFF.
2f TIME LAPSE SETTINGS:
You can only engage time lapse in P A S or M.
Here you can set various parameters for time lapse:
1. FRAME - sets the number of frames to be captured (up to 999)
2. START WAITING TIME - sets the time before starting to record
3. INTERVAL TIME - between each shot in hours/minutes/seconds
4. TIME LAPSE MOVIE Off - records each frame as a still image: On - records each image a still image AND frame of a movie.
OBSERVATIONS: This is the first time this feature has appeared in CSC from Olympus (actually not quite; I have been informed the Pen E-P5 has the same time-lapse feature - thanks J-Marc) and is welcomed. Use as desired but for normal photography set to OFF.
2g RC MODE: On/Off
Here set the camera to work with Remote Controlled (not Radio Control - thanks Gary) flashguns such as the FL600R/FL300R/FL50R/FL36R etc when using multiple flashguns for lighting control.
OBSERVATIONS: For normal photography using any compatible flash as a single unit directly mounted on the flash bracket (hot shoe) on top of the camera, set to OFF.
MENU 3 - PLAYBACK and EDIT
Playback and Edit Menu
|
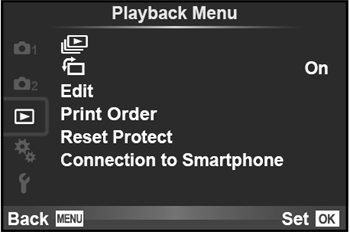
Slideshow: Will perform a slideshow with music and effects.
Image Orientation change captured portrait orientation.
Edit: RAW Data Edit and JPEG edit: Shadow Adjustment, Redeye Fix, Crop, Aspect, B&W, Sepia, Saturation, Resize, e-Portrait
DPOF print marking: One, All
Reset Protect: On/Off Cancel any previous image protection.
Connection to Smartphone WiFi settings
None of these features are required to set up the E-M1 for photography; for further details please read the manual.
MENU 4 - COGS or CUSTOM MENU:

Cogs Menu Screens 1&2
|
4. COGS/CUSTOM Menu:
Has 11 primary headings; (A) AF/MF, (B) Button/Dial/Lever, (C) Release, (D) Display/PC, (E) Exp/Metering/ISO, (F) Flash Custom, (G) File Size & compression/Aspect/Colour/WB, (H) Record/Erase, (I) Movie, (J) Built-in Evf, (K) Utility.
4a AF/MF:
Has 12 sub-headings; AF Mode, Full-Time AF, AEL/AFL, Reset Lens, BULB/TIME focusing, Focus Ring, MF Assist, AF Points Set Home, AF Illuminator, Face Priority, AF Area Pointer, C-AF Lock. The following deal with each sub-heading.
4a (i) AF MODE: STILL PICTURE/MOVIE: S-AF, C-AF, MF, S-AF+MF, C-AF+TR
Here you set the AF mode of the camera for either still or movies. The choice is between Single AF, Continuous AF, MF, S-AF+MF and C-AF+TR. The latter two use a combination of AF and MF and AF and TRACKING. NOTE: Both C-AF settings require technique and practice. If your photography includes birds in flight you will need to use either of these modes and practice.
NOTE: 07/12/13 - Having C-AF/TR enabled may adversely affect the refresh rate of the EVF.
OBSERVATIONS: For most photographic needs S-AF is probably the best choice because it can be used in most situations. But if your subject is moving you might wish to select either C-AF or C-AF with Tracking (TR). Remember, both of these auto-focus modes needs practice and the right technique to get the best results.
4a (ii) Full-Time AF: On/Off)
Here you determine if the lens continually focuses as you move the camera around or only focuses when you half-press the shutter. if you enable it the camera will be drawing power to focus the lens. It may also contribute to the aperture blades closing/opening if the lens is exposed to bright conditions (sometimes referred to as 'rattlesnaking').
OBSERVATIONS: Unless needed set to OFF.
4a (iii) AEL/AFL
AE/AF LOCK: Here you determine how the AE and AF functions respond when the shutter button and/or the AEL/AFL button (just right of the viewfinder) are pressed. (S1/C2/M1)
(a) S-AF: Mode 1, 2, 3
(b) C-AF: Mode 1, 2, 3, 4
(c) MF: Mode 1, 2, 3
A choice is offered for each focus mode available; S-AF, C-AF and MF. For each focus mode are offered several pre-determined sequences. This setting does not change focus modes, only how the buttons react in each focus mode.
The E-M1 offers this choice as with most E-system cameras. I have studied and played with every AE/AF Lock combination on offer and I conclude that unless you have an over-riding need to change the pre-sets, stick with the factory defaults as they are very logical.
OBSERVATIONS: Leave the setting on default unless you know exactly what you want in a particular focus mode.
SUGGESTION: Manual Focus mode "M3" allows auto-Focus on demand and can be used in conjunction with Spot metering; This can save time and provide a good starting point for manual fine tuning of the focus point (e.g. in macro photography).
NOTE: 20/02/14 - Suggestion from Karl Gundwald (USA) Where you require separate Focus from Shutter release this can be easily achieved on the E-M1 by switching the default settings for AEL/AFL to: S3/C2/M3.
4a (iv) RESET LENS: On/Off (resets lens to infinity when camera turned off)
When enabled the lens will reset to infinity on camera shut down. A sensible feature that is designed to protect the lens barrel. This setting mainly relates if you use 4/3rds lenses such as 35 & 50mm macro and 70-300mm zoom where the lens barrel winds out of the main lens body to achieve close focus. With this setting enabled the lens tube 'parks' itself correctly fully retracted into the lens body, on shut-down. Most m4/3rds lenses are internal focus and do not require this 'parking'.
OBSERVATIONS: Leave this set to ON.
4a (v) BULB/TIME FOCUSING: On/Off (selectable manual focus during bulb exposure)
On occasions when you use the BULB feature (long exposure) you can chose to enable/disable any manual focus during the exposure period. (May not work with ZD SWD lenses and Sigma 30mm x 1.4; this is based on E-System camera experience).
OBSERVATIONS: I can't recall ever wanting to alter focus during a bulb exposure so I keep this set to OFF.
4a (vi) FOCUS RING: Counter-clockwise, Clockwise (direction of Focus By Wire focus rings)
Here you may chose the direction you turn the manual focusing ring on Olympus MZD and ZD lenses when manually focusing. It is throw back to film days when different manufacturers had their lenses turn different ways to achieve infinity.
OBSERVATIONS: Entirely up to you; Legacy OM lenses turn anti-clockwise for infinity.
4a (vii) MF ASSIST: Magnify On/Off, Focus Peaking On/Off.
Lets you determine circumstances in manual focusing when turning the focus ring will either Magnify the image or turn on Focus Peaking.
NOTE: 07/12/13 - Having focus peaking enabled will adversely affect the refresh rate of the EVF.
OBSERVATIONS: Very useful if you use manual focus with MZD or ZD lenses. You can set both features to ON. If you use 135 format legacy lenses focus peaking helps considerably. I have both set to ON. You will need to assign peaking to a button. You can also select the colour for peaking (black/white) see 4d (xv) below. Peaking affects the FRAME RATE menu selection at 4d (x) below.
4a (viii) AF POINT - SET HOME: All Points, Single Point, Single Point Small, Nine Points.
The dual AF system employed in the E-M1 offers 2 matrices; an 81 point matrix for m4/3rds lenses and a 37 point matrix for 4/3rds lenses. The choice of points and size remains the same for both, it's just there's less choice for position with 4/3rds lenses. On the 4/3rds matrix none of the AF points is of a cross pattern (i.e. sensitive to both horizontal and vertical targets), they are vertical only. Also with 4/3rds lenses if you have the MAGNIFY function enabled AF does not work in magnified view.
The AF function needs a home point for later customisation so when pressing the assigned button the AF point returns to your home choice. Choose from Full AF Matrix, Single point anywhere in the matrix, Single point (small) anywhere in the matrix or nine point pattern anywhere in the matrix. The set-up box in the menu will show the matrix and allow you to move the AF point to where you wish to register its home.
OBSERVATIONS: I have mine set to single small centre point. You can also control the position and size of the AF point by pressing the AF Home button (Fn1 by default) in Live View to display the matrix and then move the point with the control wheels or 4-way pad. To change the AF point size press the INFO button after pressing Fn1 and scroll through the options.
4a (ix) AF ILLUMINATION: On/Off
Here you set the AF lamp on or off to help with AF. On older E-Camera Olympus used the strobing flash for AF assist much to the annoyance of many users. The E-M1 AF lamp is a small beam of orange light that comes from the front of the camera. Very useful in dim conditions.
OBSERVATIONS: I have mine set to ON.
4a (x) FACE PRIORITY: Off, On, Face + near eye, Face + right eye, Face + left eye.
This is an overlooked but powerful auto-focus sub-system feature often derided by DSLR users. All I can say is try it and you will be delighted at the results. Useful in candid people photography as well as informal portraiture. Works very well with individual eye recognition. Guarantees accurate eye-in-focus results.
OBSERVATIONS: Enable when required.
4a (xi) AF AREA POINTER: On/Off.
This enables the green AF area box to be displayed in conjunction with correct focus on screen/EVF.
OBSERVATIONS Set this to ON.
4a (xii) C-AF LOCK: Off, Low, Normal, High.
When enabled this prevents the camera constantly changing focus when in C-AF mode if something other than the subject passes across the frame. There are three sensitivities. I believe it works by anticipating the degree of AF change caused by extraneous objects. You are left to judge the sensitivity.
OBSERVATIONS Whether you use C-AF or not it seems reasonable to have this set to NORMAL.
4b BUTTON/DIAL/LEVER
Has 6 sub-headings: Button Function, Dial Function, Dial Direction, Mode Dial Function, +1 +2 Lever Function, On/Off buttons (2)
4b (i) BUTTON FUNCTION: Here you choose the function of the various programmable buttons.
Before we explore this section it might be useful to know what features are set to which buttons by default. The front and rear control wheels and the two buttons on the ON/OFF switch change when the 2x2 lever is switched:- Mode 1 is with 2x2 lever at position 1, Mode 2 is with 2x2 lever at position 2 (please also see 4b (vi) below):
- Front Control Dial Mode 1 = EV Compensation: Mode 2 = ISO
- Rear Control Dial Mode 1 = Aperture or Shutter Speed depending on P/A/S/M: Mode 2 = White Balance
- ON/OFF switch Front Button Mode 1 = HDR & DRIVE: Mode 2 = Bracket
- ON/OFF switch Rear Button Mode 1 = Metering & AF: Mode 2 = Flash Exp Compensation & Flash mode
- Front Plate Button Lower = Depth of Field Preview
- Front Plate Button Upper = One Touch WB
- Fn2 = Multi-Function (Highlight & Shadow/Colour Creator/Magnify/Image Aspect)
- Fn1 = AF Point
- AEL/AFL = As marked
- 4-Way Pad = AF Area (Point specific position)
Virtually all the buttons on the camera can be assigned different functions, depending on your need. Before you start re-assigning functions note what the default settings are and think carefully about what you want the camera to do over default, because you can soon get very confused and lose track. I'd recommend you make a list of your proposed customisations then prioritise them before you start.
The buttons you can re-assign are: Fn1, Fn2, Red (movie), AEL/AFL, Front Top, Front Bottom, 4-way Right*, 4-way Down*, 4-way*, BattGrip Fn1, BattGrip Fn2, Lens Fn1. *See NOTE below.
There are 26 different functions assignable to the 9 programmable buttons on the body, plus 2 more on the battery grip and a further 1 on a lens with Fn. The functions assignable are: AF Area, AF Home, MF, RAW, Test Picture, MySet1~4 (individually), UnderWater Case, EV Comp, Live Guide, Digital Teleconverter, Magnify, HDR, BKT, ISO, WB, Multi-functional, Peaking, Level Display, Off, AEL/AFL, Movie REC, Preview, One Touch WB.
If you assign a MySet data to a programmable button it works thus: camera operates normally until you press the assigned button, this loads your MySet and it remains in operation until you re-press the assigned button which takes the camera back to its previous state.
As you can see with this degree of assignability it is easy to make a mistake, or duplicate what the camera already offers.
NOTE: 02/12/13 Whilst the amount of customisation seems huge it is actually restricted because of the 4-way pad (in default is AF Area (point specific position). To reprogramme the 4-way right and down buttons first you have to reassign the 4-way pad to Direct Function (there are only 3 functions available; AF Area/Direct Function/Off) or else the 4-way right and down buttons are greyed out in the menu. When you do this the right and down 4-way pad buttons are now programmable BUT both are now limited to Flash Mode/Drive/ISO/WB/Touch Screen Lock/Electric Zoom/EV Comp only, not the same 26 functions available to the other buttons (as above). This makes no sense to me. However, this being the case I left the 4-way pad at default and re-assigned Fn1 which has the same default function as the 4-way pad anyway, to Magnify or Digital Tele-converter.
I am now looking at the Fn2 button, by default Multi Function (Highlight & Shadow/Colour Creator/Magnify/Image Aspect), as I find it slow and cumbersome to use - you have to hold it down for a couple of seconds to get the 4 choices on screen and spin the rear dial to select which one you want to use, then release and press again for your selection and a similar process to disengage your selection to move elsewhere. The problem now arises that you cannot assign any individual Multi Function features - it's all 4 or none, and if you wish to use them you'll have to find a button you don't use very much like the One Touch WB to reassign Multi Function to. You may now be at the stage of deciding which of all the functions you wish to assign you need least and either leaving them out of the equation or assigning one of them to your least used button so you can later reassign any of them to the same button without disturbing the rest of your button assignments. (This is where you can get into a knot - best write everything down on the available E-M1 settings Excel spreadsheet).
Don't forget the settings and customisation Excel spreadsheet that will help you remember all your settings. It's available here.
NOTE: 20/02/14 - Observation from Karl Gundwald (USA) If you assign Magnify function to Fn1 along with [...] HP assigned to Fn2 (as I have) the [...] HP function does not work as expected. RESOLVED: When using the Magnify function you must fully exit Magnify to allow [...] HP to work. To exit Magnify completely either hold down the assigned button for a couple of seconds or or press OK to remove the Magnify green box and return the screen to your normal setting. The [...] HP function should cycle between your Home Point (set in Menu) and the last AF point you set.
NOTE from AUTHOR: Because the camera uses a very similar shaped green box for Magnify and AF Point it can be confusing as to whether you are in Magnify or not. It would be more intuitive if the Magnify position box could be in RED or otherwise marked to avoid this confusion. I shall pass this to Olympus (Japan).
OBSERVATIONS: Obviously how you customise the button/dial/lever on your E-M1 up is entirely up to you; we all require different things. I found after a couple of sessions I got totally lost and had to force a reset. Eventually I did not stray too far from default assigning only Peaking (to Red Dot), Magnify (to Fn1) and AF Home (to Fn2). The rest suits me at default - but this is a review camera I've not got for long. If this were my camera I'd have more time to consider further customising and I'd set up some MySet data sets and assign them to the MODE dial.
4b (ii) DIAL FUNCTION: Here you choose the function of the front and rear dials in P, A, S, M, Menu and Review.
OBSERVATIONS: This is another highly personal set of choices dependant on the type of photography you do. I left mine at default but there are several settings.
SUGGESTION: J-Marc Guillemaut "If you use mostly the Aperture priority mode "A" and occasionally "M", you may wish to set in "M" the rear dial to FNo so the rear dial is the same in modes "A" & "M" (if that's your setting in "A" mode, of course) while shutter speed is then controlled by the front dial in "M".
4b (iii) DIAL DIRECTION: Dials 1 & 2 (selectable for effect of turning the dial L or R)
As indicated determines how the selected feature reacts when the dial is turned.
OBSERVATIONS: I have the dial set to turn to the right. This means that in A mode when I turn the dial away from my eye (to the right) the aperture closes and vice versa. To me, this seems logical.
4b (iv) MODE DIAL FUNCTION: Here you can assign any of your MySet data's to any of the 9 detents of the Mode Dial.
Please read Section 1a on RESET/MySet 1~4 above in conjunction with this section. A very useful feature of not only being able to store 4 different data sets of your camera set-up but also being able to assign each one to any of the powerful MODE Dial positions for instant recall/use.
Olympus users have been waiting for this latter feature that first appeared on the E-PL5, for some time. The only thing lacking is the ability to name, and the camera to display, your own MySet data set name on the screen/EVF.
If you get it wrong you can always RESET to return to default.
OBSERVATIONS: When you reach the screen that tells you which Mode Dial position is assignable you may be misled into thinking only ART and iAUTO are available. You need to scroll this menu box down to see all the Mode Dial positions. Quite a few folks have emailed me about this. Assigning a MySet to the MODE dial is a very powerful feature that also needs plenty of thought.
OBSERVATION 2: If you assign a MySet to any of assignable buttons you simply press that button to call up your MySet and press it again to cancel it. However, be aware that this can be lost by switching the camera off/on, the camera entering sleep mode, accessing the menu or accidentally bumping the assigned button. To me it is better to assign your MySet to a MODE dial detent because you can lock it thereto. If you assign a MySet to any of the MODE dial detents then you access your MySet by turning the dial to your chosen detent and cancel it by returning the MODE dial to its previous (or any other) position.
4b (v) 2x2 LEVER FUNCTION: Off, MODE(S) 1 ~ 5.
Here you choose the functions assigned to the 2-way lever around the AEL/AFL button. If you wish to change from default study the options carefully because some may impinge on other button customisations you have already done or may wish to do. As I've said earlier with so many available customisations it is really easy to get yourself into a knot.
OBSERVATIONS Personally I left this at default (Mode 1).
NOTE: When the lever function is set to mode 5 you lose the ability to assign MF to a button regardless of the of the AF assignments of each lever position (from Marty Linder).
4b (vi) ON/OFF BUTTONS (2): Off, On - this refers to the two buttons inside the main camera on/off switch (HDR & AF) on left of top plate.
If you select ON the function of these two buttons changes to BKT (front button) and Flash Comp (back button) when the 2x2 Lever is in the +2 position. If left at OFF these two buttons remain the same regardless of the position of the 2x2 lever (HDR and Drive front button and Metering and AF back button). This adds a little more functionality.
OBSERVATIONS: Again, this may impinge on other customisations. I set this to ON.
4c RELEASE & fps
Has 8 sub-headings: Release Priority S, Release Priority C, Low fps, High fps, IS off in sequential mode, Half Way release with IS, Lens IS Priority, Release Lag-Time.
4c (i) RLS PRIORITY S: On/Off
(RLS = release) The 'S' setting allows you to override the camera and force it to fire the shutter whether or not AF is achieved, when in S-AF mode.
OBSERVATIONS: Unless you specifically need this feature, set to OFF (default).
4c (ii) RLS PRIORITY C: On/Off
(RLS = release) This is identical to the above except it relates to C-AF mode.
OBSERVATIONS: I rarely use C-AF but can see that it is probably better to have this set to ON (default).
4c (iii) LOW FPS: 1, 2, 3, 4, 5, 6, 6.5 FPS (frames per second)
This setting is linked to the 'DRIVE' button screen that lets you choose single frame, high FPS or low FPS etc. Here you set the number of pictures taken in 1 second in sequential mode in LOW fps.
OBSERVATIONS: With fps set to LOW, auto-focus, exposure and White balance are computed for each shot in the burst. In other words the most accurate sequential shooting is when in LOW fps. Also shooting with IS enabled reduces sequential shooting to 3.5 fps. Be aware. I have this set to 6 fps.
4c (iv) HIGH FPS: 5, 6, 7, 8, 9, 10 FPS (frames per second)
Here you set the number of pictures taken in 1 second in sequential mode in HIGH fps.
OBSERVATIONS: With fps set to HIGH, auto-focus, exposure and White Balance are computed for the first frame and locked then applied to all else in the burst. In other words HIGH fps bursts may go out of focus, exposure or WB. Also shooting with IS enabled reduces sequential shooting to 3.5 fps. Be aware. I have this set to 10 fps.
4c (v) IS OFF in SEQUENTIAL MODE: On/Off
If set to ON the Image Stabiliser is disengaged in sequential mode. Also shooting with IS enabled reduces sequential shooting to 3.5 fps.
OBSERVATIONS: I have this set to ON (default).
4c (vi) HALF WAY RELEASE WITH IS: On/Off.
Here you can determine if the Image Stabiliser works on shutter button half press. More useful for longer lenses to see the image stabilised in the EVF.
OBSERVATIONS: I'm struggling to think of any situation where you wouldn't want this. I have this set to ON (default).
4c (vii) LENS IS PRIORITY: On/Off
If you are using non-Olympus lenses with built-in stabilisation (Lumix) use this setting to enable lens IS. One might assume this should disable the in-body image stabilisation when set to ON and the camera recognises an IS lens.
OBSERVATIONS: I tried this with my PanLeica 14-50mm 2.8~3.5 stabilised zoom, both on and off in-body and on and off in lens. The E-M1 did not switch off the in-body IS (it remained at IS-1 on the screen) so I am not sure if this feature works with 4/3rds IS lenses. I have no m4/3rds IS lenses to try out. In any case I have it set to OFF (default).
4c (viii) RELEASE LAG-TIME: Normal, Short.
This setting controls the amount of time between the shutter button being pressed and the shutter actually releasing (shutter lag).
NOTE: 08/12/13 It seems that when set to SHORT a different mechanism for holding the shutter is employed which is probably an electro-magnet rather than a mechanical mechanism. This reduces shutter lag by 20% but increases battery drain by the same amount (around 50 shots). So shutter lag is reduced to around 0.044 second when set to SHORT from around 0.054 seconds in NORMAL. Because the electro-magnetic device consumes power battery life is reduced. In addition I've also been informed by J-Marc Guillermaut that "when used on my E-P5 by accident it also overheated quite a bit the battery and hence the card in the same compartment".
OBSERVATIONS: If you are photographing fast moving objects you may wish to have this set to SHORT but be aware of reduced battery performance and overheating. The manual also warns that if set to SHORT and the camera is knocked the monitor display may also disappear. For normal use set to NORMAL.
4d DISPLAY/SOUND/PC:
Has 20 sub headings: HDMI, Video Out, Camera Control Settings, Screen Info Settings, Displayed Grid, Picture Mode Settings, Histogram Settings, Mode Guide, Live View Boost, Frame Rate, Art LV Mode, Expand LV Dynamic Range, Flicker Reduction, LV Close-Up Mode, Peaking Settings, Backlit LCD, Sleep, Auto Power Off, Sound, USB Mode.
4d (i) HDMI: HDMI out 1080i/720p/480p/576p, HDMI Control Off/On.
Here select the appropriate video signal for your TV when connecting with an HDMI cable. Set the Control feature to allow you to control the camera via the TV's remote if supported.
OBSERVATIONS: Set up as required.
4d (ii) VIDEO: PAL, NTSC.
Depends on where you are in the world.
OBSERVATIONS: For UK set to PAL.
4d (iii) CONTROL SETTINGS - see image below: Accessing the control panels.
Here you can determine which control overlay pops up when you press the OK button (to access all the shooting parameters). Live Control (LV) is the reverse 'L' shaped overlay (default) with the functions down the right hand column and the choices along the bottom. Super Control Panel (SCP) is the full screen of shooting parameter icons (from the E-System cameras) and offers slightly more choices but with more button presses. You can have neither, one or both displayed in P/A/S or M. Furthermore in iAUTO, ART and SCENE modes you can have the same plus Live Guide, Art Menu and Scene Menu respectively.
OBSERVATIONS: As I use PASM for 99% of the time I have both Live Control and Super Control Panel activated and flick between them via the INFO button. I like both interfaces but still prefer the Super Control Panel as it offers more access than Live Control. (See below image for differences).
Which ever panel you have selected they both work similarly. You find the setting you wish to alter by using the rear control wheel then with the front control wheel you scroll through the various choices available.
NOTE: 16/12/13 For example on the bottom right of the SCP is the section to control the various Function (Fn) buttons. With this illuminated you can see and scroll through those function you have assigned to the 10 Fn assignable buttons via the front control wheel. Furthermore if you wish to change a particular button's function scroll through the buttons with the front wheel until you have the one you want then press the OK button to be taken to the correct place in the menu to change the function. This is very quick and saves you menu-diving. (It would have been nice if the rear control wheel could have scrolled through the various functions assignable to the particular button selected - even quicker, but I can see why not!).
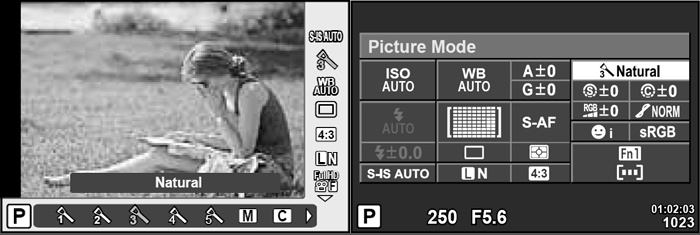
LEFT: Live View Control Panel; RIGHT: Super Control Panel.
|
4d (iv) SCREEN INFORMATION SETTINGS: Accessing various screen display choices.
When you use the INFO button on the camera to scroll through the Review image or the Live View image there are a series of overlaid screens with different information that can appear. Most of these overlays are useful but you may want to disable or remove them from the sequence if you find them annoying. This menu setting allows you to do just that. You can choose the screens to be seen in Review mode (choice of 5) or Live View mode (choice of 4).
In Review mode you can have any or all of the following: Image Only, Overall, Histogram, Highlight & Shadow (Blinkies), Light Box.
On the LV screen (normal viewing screen when taking images you can have any or all of the following: Histogram, Highlight & Shadow (Blinkies), Image Only, Level Gauge.
In Review (Reduced by turning the rear dial clockwise) you can choose to display the number of images per screen being 4, 9, 25, 100 and the Calendar.
OBSERVATIONS: This is entirely personal preference. In Review I have all but Light Box; In Live View I have all except histogram as I prefer Highlight & Shadow (Blinkies) to the histogram. In Reduce I have 25 and Calendar. Blinkies are exceptionally useful in Live View by showing areas of your composition that are over exposed (orange) or under exposed (blue) and showing the results of any EV compensation you apply.
4d (v) DISPLAYED GRID: Off, 5x4, 3x3, Cross Hair, Diagonal Cross, Panorama.
In Live View you can have a composition Guide Overlay set to display. There are 5 different overlays to choose from.
OBSERVATIONS: Again personal choice. I have mine set to 3x3.
4d (vi) PICTURE MODE SETTINGS:
Here you control the number of Picture Modes available in Live View (shooting mode) to choose from. You can enable/disable each picture mode. For example if you disable all the ART Filters then none will show up in LV or SCP.
OBSERVATIONS: Dependant on whether you use all available Picture Modes. If you don't want them all to display remove the ones you don't need. By default they are all enabled. I left mine at default.
4d (vii) HISTOGRAM SETTINGS: Highlight 245~255, Shadow 1~10
Here you can adjust the upper and lower limits of the Histogram display warnings for highlight and shadow.
OBSERVATIONS: I set mine to 251 and 4 respectively rather than the default full extent of [255 and 0] to give a little room.
4d (viii) MODE GUIDE: On/Off.
Choose to display or not the little HELP box that appears when you change the MODE dial.
OBSERVATIONS: I have this set to OFF.
4d (ix)LIVE VIEW BOOST: On/Off.
If enabled the effects of any EV Compensation and other settings you apply will NOT be reproduced on the screen/EVF. Some users suggest that having this set to ON produces a more OVF like experience. In addition when shooting with studio lights the image on the screen may appear dark as there is a mismatch between ambient light and what the camera screen displays.
OBSERVATIONS: I have this set to OFF as I like to see the results of EV compensation etc.
NOTE: 06/01/14 However, if you are shooting with studio lights you will want to set Live View Boost to ON to allow you to view the subject in the monitor. So, for general photography set to OFF; for studio light work set to ON. This is an ideal candidate for a MySet for studio work.
4d (x) FRAME RATE: Normal, High.
The manual says Select [High] to reduce frame (LCD/EVF) lag. However, the image quality may drop.
OBSERVATIONS: For most of the time this menu choice was greyed out. It was only adjustable after a full reset. I still have not worked out what other setting removes this from the menu. Leave at default (normal) NOW RESOLVED.
NOTE: 02/01/14 ISSUE RESOLVED thanks to the folks at www.monolympus.com in France. The reason the Frame Rate menu choice gets greyed out is that Focus Peaking has been enabled and/or assigned to a button. As soon as this is disabled the Frame Rate menu item is selectable (see 4a (vii) above).
4d (xi) ART LIVE VIEW MODE: Mode 1, Mode 2.
Here you decide if the ART Filter effect is duplicated on the monitor. Mode 1 allows you to see the full effect at risk of a slower frame rate. Mode 2 shows a lightened version of the effect with a higher frame rate.
OBSERVATIONS: For me an additional setting of Off might be useful. Default is Mode 1. I set mine to Mode 2.
4d (xii) EXPAND LIVE VIEW DYNAMIC RANGE: On/Off.
Applies only to HDR1 or HDR2 Modes: If enabled (on) the Live View Dynamic Range is increased to show the effects on the monitor. When you select HDR1 or HDR2 the Live View scene on the monitor/EVF darkens (by about the difference in EV that is going to be applied to the HDR shots). When set to Off the monitor/EVF will display normally (no darkening).
OBSERVATIONS: I don't understand the benefit of this function. I set mine to OFF.
4d (xiii) FLICKER REDUCTION: Auto, 50Hz, 60Hz, Off.
This feature reduces the effects of flicker under certain kinds of lighting, including fluorescent lamps. If flicker is not reduced by the [Auto] setting, set to [50Hz] or [60Hz] to accord with the power frequency of the region where you are.
OBSERVATIONS: Leave at default [Auto].
4d (xiv) Live View Close Up Mode: Mode 1, Mode 2.
If you have the MAGNIFY function enabled via a button customisation you can choose whether AF works in the enlarged view when shutter button is half pressed or the enlarged (magnified) view disappears leaving only the enlargement green frame (AF only works on the unenlarged view).
Mode 1 = AF does not work in enlarged view, when shutter button half pressed enlarged view disappears.
Mode 2 = AF works in enlarged view.
OBSERVATIONS: This is especially useful for critical focus if you are using OM legacy lenses. I left mine at default - Mode 2.
4d (xv) PEAKING SETTINGS: White, Black.
Allows you to select the colour of the 'in-focus' areas of the frame when using focus peaking.
OBSERVATIONS: I would have liked to see more choices - add orange, red and blue as it rather depends on the colour spread of your frame. However, I set mine to White.
4d (xvi) BACK LIT LCD: 8, 30, 60 seconds, Hold.
Straightforward choice of how long you wish the screen to be illuminated before it switches itself off to save battery power.
OBSERVATIONS: In normal photographic use 8 seconds is enough. If you are setting up the camera set to HOLD temporarily.
4d (xvii) SLEEP: 1, 3, 5 minute, Off.
Straightforward choice of how long the camera stays operative before going to 'sleep'.
OBSERVATIONS: Personal preference. I have mine set to 5 minutes. When remote controlled (e.g. via WiFi), set to OFF so that camera does not go to sleep before it is called to activate (from J-Marc Guillemaut).
4d (xviii) AUTO POWER OFF: 5, 30, 60, 240 minutes, Off.
Straightforward choice of how long the camera stays ON before switching itself OFF.
OBSERVATIONS: Personal preference. I have mine set to 30 minutes.
4d (xix) SOUNDS: On, Off.
Turn on & off the 'beep' on focus lock.
OBSERVATIONS: In a church for example you might like to have the beep turned off. I have it enabled.
4d (xx) USB MODE:
Here you determine the state of the cameras USB interface.
OBSERVATIONS: Default is AUTO. This makes sense.
4e EXP/METERING/ISO:
Has 14 sub-headings: EV Step, Noise Reduction, Noise Filter, ISO, ISO Step, ISO Auto Set, ISO-Auto, Metering, AEL Metering, BULB/TIMER Timer, BULB/TIME Monitor, Live BULB, Live TIME, Anti-Shock.
4e (i) EV (Exposure Value) STEP: 1/3, 1/2 or 1EV
Here you can set how the camera measures and displays exposure values (aperture and shutter) in its read-out. For example a 1EV aperture progression will read f2.8 - 4.0 - 5.6 - 8.0 - 11 - 16 - 22 whereas a 1/3rd aperture progression will read f2.8 - 3.2 - 3.5 - 4.0 - 4.5 - 5.0 - 5.6 - 6.3 - 7.1 - 8.0 - 9.0 - 10 - 11 - 13 - 14 - 16 - 18 - 20 - 22. (ZD & MZD lenses open/close the aperture in 1/3rd steps.) Measuring, determining and expressing EV is critical to good photography. As Olympus cameras are capable of using the 'fine' measure of 1/3rd EV it seems crazy not to use it.
OBSERVATIONS: You can opt for your EV steps to be by 1/3rd, 1/2 or 1EV. Personally I have mine set to 1/3rd.
4e (ii) NOISE REDUCTION: On, Off Auto.
Here you choose the level of noise reduction you wish the camera to use when longer exposures are taken; (also known as dark noise or frame subtraction). In effect the camera subtracts an unexposed but equally long exposure from the actual exposure thus removing noise caused by the sensor. If enabled it engages when there are any exposures over 1 second. If DRIVE mode is set to sequential NR is switched off.
OBSERVATIONS: It seems a perfectly logical thing for the processing engine to do so set this to either ON or AUTO. It only occurs with longer exposures in any case.
4e (iii) Noise Filter: Off, Low, Standard, High.
This setting allows you to choose the 'strength' of the noise filter as it is applied in the JPEG engine (does not apply to RAW). The noise filter removes random noise caused by the sensor/sensor gain during exposure. Inevitably it also means some loss of fine detail.
Do not be fooled by the OFF setting; all this means is the filter is set to a very low level which Olympus does not reveal but is the least intrusive or has the most acceptable level of detail loss. All four settings appear to be exponentially applied, being applied more and more aggressively as the ISO value increases.
Andrzej Wrotniak has an informative article on the subject and I suggest you read it here before setting this parameter. Though written for the E-System cameras it is still very relevant.
The cameras processor is trying to strike a balance between noise removal and detail preservation as ISO increases. You need to make a judgement where you wish that point to be.
OBSERVATIONS: This is a setting I believe you should at least explore by experimentation. If you frequently use high ISO values you may wish to set the noise filter lower (OFF or LOW) to preserve detail; if you rarely go above ISO 1600 you may be happy with the setting at STANDARD. It is largely a matter of personal preference. Personally I have it set to OFF or LOW.
4e (iv) ISO: Auto, Low, 200, 250, 320, 400, 500, 640, 800, 1000, 1250, 1600, 2000, 2500, 3200, 4000, 5000, 6400, 8000, 10000, 12800, 16000, 20000, 256000.
Here you set the ISO (sensor light sensitivity) value. You have a selectable range of 200-25600 in whatever step you determine (see next heading); either 1/3rd steps or single steps + AUTO and LOW settings. If you choose AUTO the camera 'calculates' from the exposure criteria (aperture and shutter speed) and noise performance and dynamic range of the sensor, whether to raise the ISO value to increase the shutter speed to avoid camera shake in low light situations. (I've often wondered if this auto setting of ISO takes into account any Image Stabilisation you may have enabled but have been unable to demonstrate any correlation). You set the upper and lower limits of Auto-ISO later in this section. The LOW setting is interesting; Olympus does not quantify what this might be but rather say it is a 'special' setting that guarantees additional fine detail (though some say at the expense of some Dynamic Range). I assume it is probably an ISO 200 image with applied compensation which is then subject to a particular processing with very little or no noise removal and sharpening and some subtle lifting of highlight and shadows and contrast and saturation (my own thoughts).
As Olympus have slowly improved their higher ISO performance I've rather changed my mind about Auto-ISO. I used to think Auto-ISO is perhaps a step too far in camera automation and believe it's up to the photographer to judge the required ISO as they determine, not the camera. However, the latest cameras from Olympus have pretty good higher ISO results and more sophisticated noise removal I think, providing you set the Auto-ISO limits conservatively, it's not a bad tool to have working for you.
OBSERVATIONS: Although I tend to still set ISO according to the lighting conditions I'm shooting in and/or the results I'm trying to achieve, there is a place for the automatic approach, especially in changeable conditions such as we experience in the UK. Remember too that as a general rule the lower the ISO the more detail you capture because there is less noise to remove. Some noise filtering still occurs even when you set the filter to Off. Looking at the results I've had from this camera at various ISO settings I'd say results are perfectly acceptable at ISO 3200 but over this the image starts to degrade. For everyday use I'd stay below 3200 and use the higher settings when the lighting conditions demand.
So my recommendations for the E-M1 is an ISO value of between 200 and 3200 depending on conditions; 6400 results are reasonable but the heightened values of 12800 and 25600 are strictly for emergencies. Use Auto-ISO wisely (see below).
4e (v) ISO STEP: 1/3rdEV, 1EV.
Here you can set the step by which the ISO is adjusted. The smaller value is 1/3 EV; for example the progression is ISO 100, 120, 160, 200 - so 3 steps per full ISO stop. The larger value is 1 EV so the progression is ISO 100, 200, 400 - 1 step per ISO stop. The 1/3 EV choice offers a 'fine' step which some folk prefer; the larger value means you scroll through the ISO values much quicker.
OBSERVATIONS: Personally I use 1EV; it is easier to rationalise (with other values such as aperture and shutter speed) when 1EV = a doubling of the current ISO value. Whereas 1/3rd step is not so easy though gives a finer progression.
4e (vi) ISO AUTO SET:
See ISO and ISO Step above. Here you determine both the highest value you allow the camera to select if you enable AUTO ISO and its default (lower) value. You are setting two parameters.
HIGH LIMIT Sets the maximum ISO value the camera can select if AUTO ISO is enabled. You can select any value between ISO 200 and 256000.
LOW LIMIT Sets the minimum ISO value the camera can select if AUTO ISO is enabled. Again, you can select any value between ISO 200 to 25600.
OBSERVATIONS: I think there's a place for Auto-ISO. Set conservatively at LOW = 200 and HIGH = 3200. That said check you images for intrusive noise or over-sharpening and if you are unhappy either disengage Auto-ISO or drop the upper limit to 1600. Correct ISO selection is still quite critical and something I'd encourage you take responsibility for especially if your assignment is extremely important.
4e (vii) ISO-AUTO: P/A/S, All.
See ISO, ISO Step and ISO Auto Set above. Here you can determine if you wish to restrict ISO-Auto Set to Program, Aperture and Shutter Modes only or all exposure modes of the camera.
OBSERVATIONS: I have this set to P/A/S (default).
4e (viii) METERING: ESP, Centre Weighted, Spot, Highlight Spot, Shadow Spot.
OBSERVATIONS: You have 5 choices; ESP (Electro-Selective-Pattern) - a computer generated pattern that ensures as correct an exposure as possible across the frame; Centre Weighted - priority is given to about 40% of the frame centred around the centre spot; Spot - priority is given to a small area of about 2% of the frame centred on the centre spot; Highlight Spot - takes a spot meter and applies +EV compensation automatically to brighten the result ensuring white subjects are recorded as white; Shadow Spot - takes a spot meter and applies -EV compensation to ensure dark subjects appear correctly.
OBSERVATION: This depends on your shooting requirements. I used to shoot more or less exclusively in ESP but I now use Centre-Weighted for about 20% of my shots.
4e (ix) AEL METERING: Auto, Centre Weighted, Spot, Highlight Spot, Shadow Spot.
When you use the AEL button to 'Lock' the exposure settings for a particular task, this menu choice allows you to determine the metering pattern you wish to be used with the AEL button as opposed to the shutter button. Your choices are:
* Auto: Selects the same metering pattern that you have already chosen for non-AEL.
* Centre-weighted: Self explanatory; uses CW.
* Spot: Self explanatory; uses SPOT.
* Highlight Spot: Self explanatory.
* Shadow Spot: Self Explanatory.
OBSERVATIONS: I have mixed feelings about this. I can see by setting this to say 'SPOT' it will be useful as a rapid way of accessing spot metering without using the Super Control Panel or dedicated button. But I also see the risk which is that your series of 'locked' exposures (say for a Panorama) uses a less familiar metering pattern and may spoil your series.
On balance I've decided to leave this setting to AUTO and change the metering pattern manually when required. This is because I don't trust my memory to remind me that I've set a different metering pattern for AEL exposures.
4e (x) BULB/TIME TIMER: 1, 2, 4, 8, 15, 20, 25, 30 minutes.
This setting determines how long the shutter will remain open in the BULB/TIME modes regardless of whether you are holding down the shutter.
OBSERVATIONS: I rarely use the BULB/TIME mode so I leave this on default of 8 minutes, use and set as required.
4e (xi) BULB/TIME MONITOR: -7 to +7Monitor brightness.
Here you set the brightness of the monitor/EVF when BULB/TIME function is selected. (See next heading).
OBSERVATIONS: Seems sensible to have the monitor dim - leave this on default, adjust as required.
4e (xii) LIVE BULB & LIVE TIME (BOTH): 0.5, 1, 2, 4, 8, 15, 30, 60 seconds, Off.
Choose the display interval during shooting (monitor refreshes). The refresh frequency drops as set ISO increases. Maximum number of refreshes is 24 at LOW ISO. In other words if you set a BULB/TIME exposure of 8 minutes with a refresh rate of 30 seconds at LOW ISO, the image will build over 16 refreshes. Off disables the display. Tap LCD or touch shutter button to refresh the display.
OBSERVATIONS: Set as required, otherwise leave at default.
4e (xiii) ANTI-SHOCK: (Legacy term - Mirror Lock/Mirror Up) Off, 1/8th, 1/4, 1/2, 1, 2, 4, 8, 15, 30 seconds.
In the old SLR days, mechanical cameras were fitted with a device that turned and locked the mirror in its uppermost position and effectively removed the mirror flip (ker-plunk) out of the exposure equation. Initially this was to facilitate the projection of the rear element into the exposure box. But stopping the mirror from flapping about was good for imaging as it removed a lot of vibration from the camera body, and so benefited (sharpened) the exposure. Its downside was you couldn't see anything through the optical VF!
With DSLR cameras the same principle applies, it's just achieved differently. An additional delay is built into the exposure process that holds the mirror in the up position before allowing the shutter to open/close. It is this delay that's called ANTI-SHOCK. When you set anti-shock from 1 to 30 seconds this determines how long the mirror stays up before the shutter is fired. This allows the vibrations caused by the mirror flapping about to subside before the shutter fires. Normally a setting of 5 seconds will allow all vibrations to pass.
The E-M1 is a mirrorless camera so what's going on? Well there are still vibrations and movements at work from the shutter press to the shutter actually firing so the principle still applies even though there's no mirror it just works slightly differently.
OBSERVATIONS: Default setting is OFF. Leave at default until you need anti-shock and remember to disengage it when done or you will wonder what has gone wrong with your camera next time you come to use it!
4f FLASH CUSTOM:
Has 3 sub-headings: Flash X-Sync, Flash Slow Limit, Flash Compensation.
4f (i) FLASH X-SYNC: 1/60, 80, 100, 125, 160, 200, 250, 320th second.
This sets the fastest shutter speed with which the camera shutter will synchronise with the flash to leave no shutter vignette. The E-M1's upper limit is 1/320th seconds for the supplied external FL-LM2 flash unit (default) but it can be lowered to a slow speed of 1/60th sec. This upper limit is 1/250 seconds when using a separately sold (Olympus) external flash unit and 1/125 seconds when using a commercially available specialty flash (as per the Olympus E-M1 manual, page 51; and Page 106 - thanks to J-M Guillemaut).
OBSERVATIONS: I leave this at default of 1/320th second.
4f (ii) FLASH SLOW LIMIT:
This setting allows you to set the slowest shutter speed which will synchronise with the flash in any of the AE modes P, Ps, A; that is the times when the camera determines shutter speed. Your choice is between 30 sec and 1/320th sec. If you subsequently use any of the SLOW flash modes this setting is irrelevant because the camera meters external light for that exposure.
OBSERVATIONS: Default is 1/60th sec - leave on default unless needed but see below.
29/01/2014: One of the most vaunted features of the E-M1 is its 5 axis IBIS. An aside of IBIS is the potential to use lower ISO values giving cleaner files. This benefit is used by some commentators to make more favourable comparisons of E-M1 output with larger sensored cameras (with less noisy ISO) but without stabilisation of body OR lens. That said, Olympus seems to have disabled by default this benefit if you use Auto ISO because the camera will choose ISO's far higher than necessary. Some high-end DSLR machines have a highly configurable Auto ISO set-up governing determination of ISO selection depending on bands of shutter speeds. The E-M1 tends to select a shutter speed of (about or more than) 2x focal length of the lens and then sets the ISO to provide this EV. This would normally be seen as 'correct' but takes no account of the stabilisation effect allowing you to use much lower shutter speeds safely when IBIS is deployed. What is given with one hand is taken away by the other!
For example I metered an indoor scene with the MZD 12mm at f=2 in A mode with IBIS set to S-IS1 with Auto ISO and Slow Limit of 1/60th; it showed an EV of 1/80th sec @ F2.0 Auto ISO 640. I changed the slow limit to 1/30th and the same scene showed an EV of 1/40th sec @ F2.0 Auto ISO 320. Selecting lower slow limit did not change the EV so it seems 1/30th is the sweet spot or any lower setting is ignored.
Therefore, to partially address this imbalance adjust the Flash Slow Limit in Custom Menu F, flash slow limit, and set to 1/30th rather than the default 1/60th. Remember, this only works in Mode P, Ps and A.
Of course you can avoid this scenario by selecting ISO yourself, rather than using Auto ISO.
4f (iii) FLASH COMPENSATION +/- EXPOSURE COMPENSATION:
Here you determine if any flash compensation you have added is cumulative with any exposure compensation. You have two choices:
ON Whatever flash exposure compensation is present is added to any exposure compensation;
OFF Ignores any exposure compensation.
OBSERVATIONS: Default (OFF) seems the most logical to me; YMMV
4g FILE SIZE, ASPECT, COLOUR & WB:
Has 8 sub-headings: File size set, Pixel count, Shadow compensation, WB, WB all compensation, WB auto - keep warm colour, Flash + WB, Colour space.
4g (i) FILE SIZE SET: Large/Middle/Small, Superfine/fine/normal/basic (selectable size and compression)
If you are a JPG shooter and with the price of memory (SD cards) getting cheaper there's little reason (other than computer processing and HDD space) to capture your images in anything other than highest resolution/lowest compression ratio.
OBSERVATIONS: Set File 1 to Large/SuperFine and File 2 to Large/Normal. These settings will be reflected when you access the FILE settings in the CAMERA menu section 1c above. Unless you have some overwhelming desire for reduced size or increased compression take advantage of the choices Olympus allows you to obtain the best possible files from your camera. On the other hand, smaller JPG files will suffice if you always process your raw files for final output, and use only the JPG for a quick preview and immediate export for quick sharing (suggestion from J-Marc Guillemaut).
4g (ii) PIXEL COUNT: (selectable resolution for following sizes): Middle: 3200 x 2400, 2560 x 1920, 1920x 1440, 1600 x 1200; Small: 1280 x 960, 1024 x 768, 640 x 480
This allows you to set the resolution for the Middle and Small files.
OBSERVATION: As you are going to use only the best resolution files you can ignore this setting though it might be wise to set Middle to 3200x2400 and Small to 1280x960 but NEVER actually select them as your choice of file size.
4g (iii) SHADING COMPENSATION: On, Off.
With some lenses, especially wide angle ones, the collected light does not penetrate evenly across the sensor, leaving the corners shaded (this is known as vignette). When this happens the sensor recognises this vignette and can communicate with Olympus MZD and ZD 'smart' lenses that then tell the camera processor the area and level of brightening required to lighten the shaded corners automatically during jpeg processing.
OBSERVATIONS: This is an automatic, non destructive and sensible enhancing feature; set it to ON.
4g (iv) WHITE BALANCE: Auto, 5300K, 7500K, 6000K, 3000K, 4000K, U/W, Flash WB 5500K, MySets 1~4, Custom WB.
The camera has the above series of predetermined WB values already stored. These have been carefully calculated to work with the cameras sensor and processing engine in varying lighting conditions. For the vast majority of the time you will select one of the pre-set values or leave the camera to choose the most appropriate one by using the in-built WB sensor by selecting AUTO WB.
But you can store you own 'custom' WB for special circumstances and/or tweak the colour channels for any of the pre-sets. You may also set and store WB settings for your MySet data's.
It should be noted that WB is applied only to JPEG images, not RAW. If you shoot RAW you can choose whatever WB you like in processing.
OBSERVATIONS: Unless you are experienced in colour temperature I strongly recommend you leave well alone and simply choose the most appropriate WB from the list, or use AUTO, or set a CWB before a critical shoot. Incorrect WB is virtually impossible to correct in a JPEG image.
SUGGESTIONS: Set "WB" to "Sunny" to retain colours of sunset/sun rise. Set WB to "Shade" on dull overcast days.
4g (v) ALL WB COMPENSATION: All set, All Reset.
Here you may prescribe any over-ride you wish to the global White Balance setting the camera uses for all JPEG processing. This is done via alterations to the channels Amber to Blue and Green to Magenta. The Reset option undoes any changes you make and restores camera defaults.
OBSERVATIONS: Once again, unless you are experienced with colour temperature I suggest you leave this setting alone.
4g (vi) WB AUTO - KEEP WARM COLOUR: On, Off.
The manual tells us to select Off to eliminate warm colours from pictures taken under incandescent lighting. However, leaving it set to On for general photography can give your jpegs a mildly 'warm' colour signature with a slightly orange/yellow hint that you may find quite pleasing to the eye. Will not be applied to RAW files.
OBSERVATIONS: Try it in different natural light; if you like it set to ON, if you prefer a cooler look set to OFF.
4g (vii) FLASH + WB: Off, WB Auto, WB Flash.
Here you can set the camera to automatically use either WB Auto or WB Flash when you attach an Olympus FL flash gun.
OBSERVATIONS: I leave this at default (WB Auto).
4g (viii) COLOUR SPACE: sRGB, Adobe RGB
You may choose either colour space above (a set of colour criteria laid down to a standard and adopted by software's controlling computer outputs such as monitors and printers). sRGB is by far the widest used though Adobe ostensibly offers a wider spectrum (gamut). Having once accidentally set my E-5 to Adobe RGB (then could not understand why my output was 'different' I have never strayed from sRGB since.
OBSERVATIONS: Colour space is almost a science in itself and is very complex (I do not profess to understand any of it); unless your whole system is set up to operate within Adobe RGB set it to sRGB only and leave it there.
4h RECORD/ERASE:
Has 7 sub-headings: Quick Erase, RAW + JPEG Erase, File Name, Edit File Name, Priority Set, dpi Settings, Copyright Settings.
4h (i) QUICK ERASE: On, Off.
Should you wish to delete an image when reviewing, quick erase will simply erase the image without further question when you press the delete button. Default is OFF for good reason.
OBSERVATIONS: Setting to ON is dangerous. There is no second chance to change your mind. Leave at OFF.
4h (ii) RAW+JPEG erase: JPEG, RAW, RAW+JPEG (decide what is removed when you delete a RAW+JPEG photo)
This selection only applies if you save your images in two formats (ORF and JPEG) concurrently. If so, and when you wish to delete the image(s) while being viewed, on pressing the DELETE button the camera will delete either one or the other or both formats together of the image, depending how you set this menu choice.
OBSERVATIONS: I use RAW+JPEG so I have this set to JPG thus leaving the RAW version to be culled later. If you never save in dual format then leave this at the default setting of RAW+JPG. It is a matter of preference. However, if you use RAW+JPEG, and only delete the obviously worst shots when directly on location, then leave as "ON" as the display on the rear LCD can mislead you into rejecting an otherwise fine picture (after editing) so that it may be wise to keep most shots until they are downloaded on your computer and viewed on a large screen (suggestion by J-Marc Guillemaut).
4h (iii) FILE NAME: Auto, Reset
Here you may set how the file number is recorded when taking an image either when starting a fresh sequence or with a new card. In this context the meaning of RESET = starts from new i.e. 0001; or AUTO = continues from the last recognisable sequence.
OBSERVATIONS: This choice can lead to confusion. If you set to RESET there is the risk the camera may mark two files with the same number if two cards are used on the same day - not good. ALWAYS set this to AUTO which is not the default setting, unfortunately!
4h (iv) EDIT FILE NAME: sRGB, Adobe RGB.
Here you can partly (edit) name your own files for either or both colour space descriptors. You may change the first four characters in sRGB and the and second, third and fourth characters in Adobe RGB.
Normally the file is prefixed with a 'P' (or '_' if working in Adobe colour space) "P" for "Picture"; as used by several other camera manufactures. The second digit represents the month (Jan = 1; ~ Sept = 9; Oct = A; ~ Dec = C. The next two refer the day thus a file named PC250157 is interpreted as Olympus File; December 25th: image number 157 out of a possible 9,999.
OBSERVATIONS: I believe this is an understandable way to name files and can see no reason to change it. As I archive all my images by date I can see the date of any file via the given file number. Unless you are particularly gifted at file naming conventions and have the discipline to adopt your system across the board, leave well alone. The default system (above) works just fine.
ADDITION: By J-Marc Guillemaut: You can replace the first character "P" by another letter to identify which camera was used, which can be necessary to avoid conflict when using several cameras for the same shooting session. (("P" was used by my Camedia C4040Z, then I switched to "E" for my E-500, using F, G, H for the subsequent E-3s (two bodies used in Africa with different lenses to avoid dust ingress when on location), and E-5. "K" for my E-P5 and now "M" for the E-M1.))
4h (v) PRIORITY SET: No, Yes.
This setting controls the box that pops up when you press the DELETE button when reviewing your shots. By default this is set to NO which means that you have to move the highlighted box from NO to YES with the cursor key in the ERASE mode (one additional enforced step that may prevent accidental deletion). If you set this to YES you do not have to move the highlighted box as it is set to YES. Effectively it saves you one stage in the delete process.
OBSERVATIONS: I have all my cameras set to YES - it is much quicker.
4h (vi) DPI SETTING: Custom - allows setting of dpi.
Of all the terminology associated with digital imaging DPI and PPI are the most confusing.
OBSERVATIONS: Unless you have a specific printing requirement, leave this setting on Default (350dpi).
4h (vii) COPYRIGHT SETTING: Set On/Off, Artist Name, Copyright Name.
When set to On and the artist and copyright name duly registered, the camera records these into the EXIF information.
OBSERVATIONS: A very useful feature. Take the time to register your details - the interface is easy to use - and offer some protection to your images.
4i MOVIE:
As said at the start of this article I have no experience of movie/video recording. I am not going to discuss these menu options though they appear quite straightforward.
4j BUILT-IN EVF:
Has 6 sub-headings: Built-in EVF Styles, Info Settings, Displayed Grid, EVF Auto Switch, EVF Adjust, Half Way Level.
4j (i) BUILT-IN EVF STYLE: Style 1, 2, 3.
The E-M1 offers you a choice of 3 overlays for the EVF. Style 1 is a slightly lessened screen size with a blue bar across the bottom (ala OM4) that shows critical shooting information. No icons are displayed on the viewing screen. Style 2 is identical to 1 except the bar along the bottom is black. Style 3 is very much like Live Control with a full screen and no bar across the bottom.
OBSERVATIONS: Very much personal preference - I have mine set to Style 1 - Blue Bar, with Level Gauge.
4j (ii) INFO SETTINGS: Histogram, Highlight & Shadow, Level Gauge, Basic (shooting) Information.
Here you determine which overlays to have displayed when you press the INFO button while looking through the EVF. Choose none, one or all of the above overlays. However, you cannot have them all at once.
OBSERVATIONS: Very much personal preference - I have mine set to display all 4 and use the one most pertinent to my shooting situation. Usefully, the camera remembers the last screen displayed through a power off/on sequence.
4j (iii) DISPLAYED GRID: Off, 5x4, 3x3, Cross Hair, Diagonal Cross, Panorama.
These are exactly the same overlays you choose from to display on the LCD. On the EVF you can have a composition Guide Overlay set to display. There are 5 different overlays to choose from.
OBSERVATIONS: Again personal choice. I have mine set to 3x3 to match the LCD. But I can see the benefit of having a different one.
4j (iv) EVF AUTO SWITCH: On, Off.
This setting enables the eye sensor in the EVF rear pupil surround. Off to have only the LCD panel enabled.
OBSERVATIONS: You can also hold down the button on the back of the camera to the left of the EVF rear pupil [O] to quickly access this menu setting. Also, press the same [O] button left of the EVF to bring it back to life if not active. If you wish to use the EVF set this to ON.
4j (v) EVF ADJUST: EV Auto Luminance On/Off; EVF Adjust.
Auto Luminance ON means the EVF brightness will be adjusted automatically by the camera reacting to the ambient light. In other words the display will 'gain up' in darker conditions thus reflecting the actual picture that will be recorded by the camera, rather than the external available level of brightness. Some maintain having this set to OFF gives a more 'Optical VF' experience.
The second setting allows you to adjust the brightness and colour temperature of the EVF to your liking.
OBSERVATIONS: Personal choice. I have Auto Luminance set to ON.
4j (vi) HALF WAY LEVEL: On, Off.
The manual says: If set to [Off], the level gauge will not be displayed when the shutter button is pressed halfway down. This is effective when [Built-in EVF Style] is set to [Style 1] or [Style 2]. My experience is different; regardless of how I set this the Level Gauge appears in the EVF no matter which screen style I have enabled and whether the shutter button is half pressed or not. I even tried removing the level gauge from the LCD display but this too made no difference to the display in the EVF. There must be a bug in this camera or I am missing something?
NOTE: 29/12/13 Having updated the firmware to version 1.1 this feature now works as per the manual. I've had several emails about this indicating no problems so I suspect a bug in my camera now resolved by a firmware re-write.
OBSERVATIONS: I have this feature turned ON and EVF Style 1 enabled as I like the blue bar.
4k UTILITY:
Has 7 sub-headings: Pixel Mapping, Exposure Shift, AF Focus Adjust, Battery Warning Level, Battery Priority, Level Adjust, Touch Screen Settings.
4k (i) PIXEL MAPPING: Start.
Olympus offer this feature for your use whereas other companies charge you a maintenance fee for the same. Special in-camera software will map out any bad pixels on the sensor. Olympus recommends you do this at 3-6 monthly intervals.
OBSERVATIONS: Run infrequently at the recommended interval. Do not over use.
4k (ii) EXPOSURE SHIFT: ESP, Centre Weighted, Spot; -1 [0] +1 in 1/6th steps.
A setting for advanced/experienced users. It allows you to set a global level of exposure compensation (+/- 1/6th ~ 1EV) for each metering pattern. This is completely separate to the cameras 'normal' compensation regime. It is, effectively, fine tuning the AE system.
I'd imagine 99% of users are happy with the factory settings but cameras can vary so it's possible this feature could be used by someone who can see their images are consistently a tad over or under exposed.
The over-rides can be set independently for each metering pattern ESP, CW, SPOT. If you apply any compensations in this section the amount of compensation available in ordinary shooting is reduced by the same amount in either direction.
OBSERVATIONS: On no account use this until you have used the camera for at least 3 months and can readily demonstrate to yourself there is a consistent over/under exposure associated with a particular metering mode that is slight enough NOT to require factory re-calibration. If you wish to use it, proceed with caution. I have not applied any.
4k (iii) AF FOCUS ADJUST: Off, Default Data, Lens Data.
As with the latter E-System models the E-M1 allows the user to correct misfocusing lenses globally (for example if your lens is back-focusing throughout its range) OR for some or all of the 37 focus points that make up the PDAF sensor (specific tuning). For zoom lenses you may also specify varying corrections to the wide and telephoto ends as the selectable focus points have two settings, Wide and Tele, so for zoom lenses there are a possible 74 focus points available to adjust.
How it works: Let's say you wish to 'tune' a specific lens to specific AF points on the PDAF sensor; mount the lens in question and then select Lens Data from the menu. You are taken to another screen Create Lens Data Set, press the right button to go to a representation of the PDAF sensor with its 37 points. Select the point you wish to 'tune' and press OK. You will then see a Live View of your subject. Obtain focus on your point and then turn the front dial to magnify. Then adjust the sliders -20 [0] +20 until you are happy with the new focus. To set this focus press OK. Go back and tune whatever AF points you wish until happy. These settings will be stored for that lens.
If you wish to globally adjust a lens (say for consistent front-focus) for all points go to the Default Data screen which is a Live View of your subject, obtain focus, magnify and then adjust on the sliders until you are happy.
You need to have your camera tripod mounted throughout this exercise.
Prior to this system you had to make multiple test shots and then work out if the lens was front/back focusing etc. Now it is relatively easy.
OBSERVATIONS: While the process has been simplified it's still a lot of work and you need confidence to undertake it; these settings are not transferable so you cannot store them externally. If they are lost (say in a factory reset) you have to repeat the exercise.
4k (iv) BATTERY WARNING LEVEL: -2 [0] +2
If you believe the battery warning (green) lamp glows either too early/too late in your battery's normal cycle you can adjust it in this menu feature. You will have to experiment yourself to get the setting to your liking.
OBSERVATIONS: I left this at default [0].
4k (v) BATTERY PRIORITY: Body Battery, PBH (power battery holder or 'grip') Battery.
Selects which battery will be exhausted first if you use the Power Battery Holder (power grip); battery in body or battery in grip.
OBSERVATIONS: I have no grip fitted to this camera and I left this at default [PBH]. However, if you use the battery grip, PBH makes sense as it is straightforward to replace a depleted battery by a spare (3rd) one in the grip, rather than having to remove the grip to access the other battery inside the camera.
4k (vi) LEVEL ADJUST: Reset, Adjust.
If you think the in-built level is inaccurate you can either adjust it to a known level surface or reset to factory default. It is very easy to do; simply place the camera on a known level surface , select adjust, press OK and the camera will record this as its horizontal level.
OBSERVATIONS: I have not adjusted this setting (left at default).
4k (vii) TOUCH SCREEN SETTINGS: Off, On.
Turn on the touch screen or disable it.
OBSERVATIONS: I do not like touch screen technology - I have this set to OFF.
5 MENU - SETUP or SPANNER:
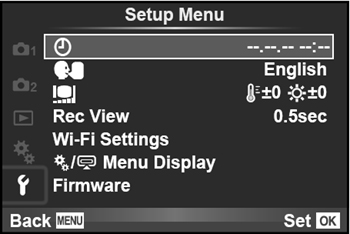
Setup or Spanner Menu
|
SPANNER Menu:
Has 7 primary headings: Clock, Language, Monitor, Rec View, Wi-Fi Settings, Cogs Menu Display, firmware.
5 (i) CLOCK:
Here you set the correct time and date; yes, it is important if you want that part of your EXIF information to be right! Bear in mind too the internal clock has no way of knowing the season (daylight saving) so you must alter this manually twice per year.
OBSERVATIONS: From J-Marc Guillemaut - Once connected by WiFi to a smartphone, the date & time will be automatically updated, after a short while.
5 (ii) LANGUAGE:
Here you select the language the camera must adopt in its menu system. There are 34.
5 (iii) MONITOR ADJUSTMENT:
The E-M1 LCD monitor screen brightness and colour temperature can be adjusted through 15 points each. Personal preference.
5 (iv) REC VIEW: Auto play, Off, 0.3, 0.5, 1 - 20 secs (image review; auto play option enters playback mode after image recorded)
This is the time in seconds the 'just taken' image is displayed on the LCD and is adjustable. In AUTO mode the image stays on the screen and you can instantly scroll through the exposure information (INFO button) and enlarge the image without having to press the review button.
Nothing comes for nothing! With Rec View set to AUTO, using the camera on tripod and using a USB remote to trip the shutter (i.e. for all my testing sessions), I have to touch the shutter button to close the AUTO Rec View screen before the remote will work. Over time I have got used to this, but you may find it annoying.
OBSERVATIONS: Personally I have Rec-View set to AUTO; as this saves me time. It means the image stays on the screen indefinitely. However, for normal photography I switch to timed display where I settled for 2 seconds.
5 (v) WI-FI SETTINGS:
You must install Olympus software OI.Share on your smartphone before you can access/setup your Wi-Fi connection. With this app, images captured with an Olympus camera can easily be imported to a smartphone, and shared with family and friends. With Olympus Image Share you can actually add Art Filters, made popular by the PEN series, to imported photos, use your smartphone as a remote control to a compatible Olympus camera, and also add GPS tags to photos.
You can read more about OI.Share and download the application from Olympus, Japan.
I think it also requires iTunes to run at its best. This can also be downloaded from the above link.
I will not have the camera long enough to explore this feature but if you have then please write a short review and I will gladly include it in this section with relevant acknowledgement.
NOTE: 08/12/13: By J-Marc Guillemaut - Now that the infrared remote control (RM-01) (used since the Camedia compact cameras up to and including the E-5) is no longer operative, use of the smartphone as a wireless remote trigger is invaluable. It can be used when completely invisible by the subject (e.g. in a different room inside a house, or behind a wall when the camera points at an animal in its hide or nest: you can actually see what you are going to shoot, you can also select the focus point (touch screen). An additional feature over the E-P5 is the ability to remotely change the exposure mode and parameters. Great!!
5 (vi) COGS MENU DISPLAY: Cogs Menu Display On/Off, Accessory Port Menu Display On/Off.
Cogs Menu Display: This setting allows you to turn off (remove from the main menu) the COGS sub-menu. A potentially life-saving setting if your camera is shared. The COGS menu contains all very specific camera settings that may take you some time/experience to fine-tune. All too easy to lose if an inexperienced hand explores the depths of the menu system. Having it switched OFF does not affect the MySet data slots so you could still have two users sets stored. Very useful.
It also turns off and on the ACCESSORIES Menu if you use the Olympus PenPal. Fitting into the Accessory Port 2 of your PEN or OM-D system camera, the PENPAL is an easy way to send pictures to your friends, your smart phone, laptop computer - or even another similar system camera. PENPAL uses the widely compatible Bluetooth® standard and is easy to use, no technical skills necessary. Plus, PENPAL makes your pictures internet-ready: you dont have to worry about resizing or reformatting your pictures. Just send a picture to your mobile phone, and its ready to post on your social network. You can store up to 2,600 pictures on the PENPAL so youll have plenty to share. Shared Images are restricted to 1920x1440 at the largest and 640x480 smallest. This is fine if you use the social networking sites that use low-res images but of limited other uses. The PENPAL unit can also store images but is not as convenient as a USB hard drive.
OBSERVATIONS: This was Olympus' previous and proprietary solution to image sharing before OI.Share. I tried one some time ago and although it did what it said on the tin, I wasn't overly impressed due to the size limitations. However I'm old fashioned. Unless you use the PenPal system turn this OFF.
5 (vii) FIRMWARE VERSION:
Here you may check what version of the firmware the camera, lens and flash is using. For the latest firmware version(s) available go to Olympus, Japan. You will need to access the firmware from within Olympus Viewer 3 software that comes with your camera, OR you can also use the more direct software: "OLYMPUS Digital Camera Updater" (ver. 1.3 on my computer) that is available from the above link too. Obviously updates are restricted to the lens/flash/accessory currently mounted on the camera when plugged into the software.
Not sure how to upgrade your firmware? This is the official method from Olympus HERE .
FW version 1.1: As of 28th November 2013 there is a new firmware available for the E-M1, version 1.1. Please use the link above marked 'Olympus, Japan' and follow the instructions. Make sure you have a fully charged battery inserted.
NOTE: 02/12/13 I have just updated the body firmware to version 1.1. It took a total of 28mins and 45seconds to complete and that was via an 8MB Internet connection! This is far too long and puts the camera at risk of 'bricking' if anything goes wrong. I wish Olympus would just make the .BIN file available so we can update from an SD card.
Also updated my MZD 45mm x f=1.8 lens and MZD 9-18mm x f=4~5.6. Each lens update took approx 1min 30secs.
CONCLUSION
I do not suggest these settings are in any way perfect, but they will give you a good starting point especially if you are not particularly familiar with Olympus CSC's and their menu systems. I encourage you to experiment with some of the more major settings to get the image output you require and the button/dial/lever customisations to provide you with your ideal handling of your new OM-D E-M1.
EXCEL SPEADSHEET Version 4 latest firmware:
Don't forget to download this workbook/spreadsheet that will help you keep track of the customisations & MySets you've made. Thanks to Greg Bloor, Weyburn, Saskatchewan, Canada, and Chris from UK for the latest revision and de-bugging.
GLITCHES & BUGS; QUIRKS & IDIOSYNCRASIES
19/12/13: I have noticed a couple of things that don't seem to work right, operate strangely or not as one might expect. I'm going to list these here and hope that readers will share any similar observations with me here, so I can collate and pass them onto Olympus, Japan.
1. When reviewing a newly taken image on occasions when I turn the rear wheel to magnify the image the magnification immediately jumps to 14X rather than expected incremental increases. It does not happen every time (makes me think this is a glitch or bug) but is slightly annoying.
2. Please see 4j (vi) HALF WAY LEVEL (above): It does not matter how I set up the camera the Level Gauge appears in the EVF no matter which screen style I have enabled and whether the shutter button is half pressed or not. NOTE: This issue is now resolved following the firmware update. It now works as per the manual.
NOTE: This article seeks nothing other than to inform. Only you can decide what equipment you want/need for your use. Olympus UK provided me with a (loaned) review sample of the E-M1 for this article. I have nothing to gain or lose by publishing this article, photographs, examples or opinion.
|
Posted 29th November 2013; continually updated
|
Copyright © 2013 John Foster
|
|